Salesforce Winter '27 Flow: Testing, Retries, User Context

Most of us have a mental list of things we’d rather not build in Flow. Not because Flow can’t technically do them, but because of what comes afterwards. Writing a repeatable test is awkward. A month-end run can hit the central processing unit (CPU) time limit, and often the first you hear about it is from a user. And when Apex calls the flow, it isn’t always obvious what permissions it’s actually running under.
Flow has been capable of everything on that list. What’s kept those things on it is the operational side: how you test it, how it behaves when something goes wrong, and what access it actually runs with.
Winter ’27 looks to be changing that picture. It ships a dedicated test mode with saved scenarios and assertions, mock outputs so you can test a flow without its dependencies, an automatic retry for record-lock contention, save-time checks for two common mistakes, and a run context that finally enforces the access level you intended. Individually these read as modest release-note entries. Together they change what you can responsibly say yes to.
This article covers what shipped, what each feature is genuinely good for, and where the boundary still sits. That includes a straight answer to the question this release raises for anyone who writes both: how much can you build in Flow now before Apex is still the better call? It assumes you’re comfortable in Flow Builder. If you want the foundations first, the automation guide covers elements, resources and Flow types.
Flow is only part of this release. The rest of the Winter ’27 release highlights cover the permission and accessibility changes enforced as your org upgrades, the integration deadlines running through to Summer ’27, and the Apex and LWC additions worth adopting early.
📰 What’s New in Flow in Winter ’27
Section titled “📰 What’s New in Flow in Winter ’27”If you have five minutes, start here. These are the changes that caught my eye rather than every release note; the rest of the article explains the setup, limits and trade-offs.
- Test Flows in a Dedicated Test Mode (Beta). This is a great idea: saved scenarios, assertions and coverage finally make Flow testing repeatable. Mock outputs isolate Actions and Subflows, while primitive collection inputs are a smaller but welcome debugger improvement.
- Enforce User Permissions No Matter How a Flow Runs. It has taken a long time to get here, but a user-context flow can now keep the running user’s access level when system-context automation invokes it.
- Reduce Flow Failures Caused by Record Lock Contention. An automatic retry should absorb a meaningful slice of intermittent lock failures. Salesforce also announced dynamic batch sizing for scheduled flows, but removed it from the Winter ’27 release notes during the week of 24 August because it wasn’t ready.
- Catch Missing Required Fields When You Save a Flow. This is a basic guardrail, but a much-needed one when a missing assignment would otherwise appear only at runtime.
- Group Elements to Organize and Simplify Flows, Clean Up Flows Faster with the Unused Resources Filter, and Classify and Discover Flows with Flow Tags. I’ve wanted the clean-up filter for a long time, and tags could be especially useful in an org shared by several business units. Groups are a good idea too, provided they don’t become an excuse to avoid a healthier subflow boundary.
- Process Multiple Records with Screen Flows from List Views and Related Lists. This makes guided bulk work possible from the user interface (UI), although the selection still caps at 100 records.
- Capture Time Values with the Time Component and Evaluate Conditional Visibility Rules with Reactive Formulas. Neither is a headline feature, but together they remove several screen-flow workarounds.
- Build Flows Faster with Auto-Generated Element Labels. The idea is useful for building quickly; the question is whether the suggested labels are accurate enough to keep. It also requires an Agentforce licence.
The first three are the changes most likely to alter what you build or how safely you operate it. The rest are practical improvements you’ll notice while building and maintaining flows.
🧪 Proper Testing Comes to Flow
Section titled “🧪 Proper Testing Comes to Flow”Testing has been the weakest part of the Flow story for years. You could debug a flow interactively, but you couldn’t save that setup, so every change meant re-entering the same inputs by hand. Flow Tests existed but sat apart from the debugger. And if your flow called an external service or a subflow, you were testing the dependency as much as the logic.
Winter ’27 addresses all three.
Test Mode applies only when the Flow Type is Autolaunched Flow (No Trigger) or Record-Triggered Flow. Don’t rely on Process Type alone: a Schedule-Triggered Flow can show Autolaunched Flow as its Process Type, but it isn’t supported and doesn’t display the Test button.
🔬 Test Mode brings debugging and testing together
Section titled “🔬 Test Mode brings debugging and testing together”Test Mode (Beta) puts debugging and scenario testing in one place.
-
Open a supported flow. From Setup, enter
Flowsin Quick Find, select Flows, and open an existing Autolaunched Flow (No Trigger) or Record-Triggered Flow. If you need a practice flow, click New Flow and create either supported type. -
Open Test Mode. In Flow Builder, click Test. With no saved scenarios, the test setup panel opens directly.
-
Enter your inputs. Choose the record that triggers the flow or provide values for variables, then click Run Scenario.
-
Save the setup with Save Scenario so the next run reuses those inputs instead of asking for them again.
-
Add assertions. Select Scenario Testing Automation, then add the conditions that should hold when the test runs. The scenario now reports pass or fail rather than just running.
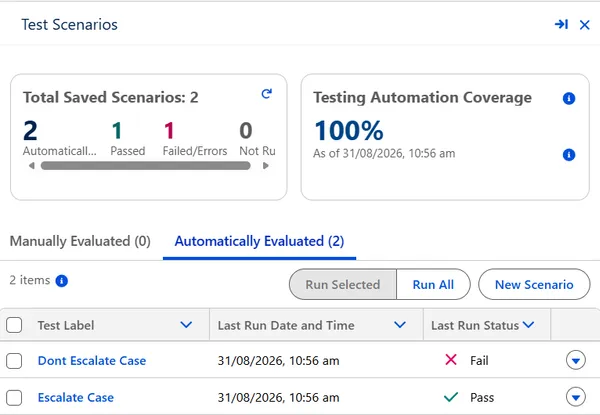
That last step is the one that matters. A scenario without assertions is a saved debug session, which is useful but modest. A scenario with assertions is a regression test: it tells you the flow still does what the business agreed it should do, after someone else edits it six months from now.
The beta is available in Professional, Enterprise, Performance, Unlimited and Developer editions.
Coverage is worth reading carefully. It shows that all elements and paths ran successfully, and failed tests don’t count toward coverage. That’s the right design because running through a path proves nothing about whether the outcome was acceptable. But it does mean coverage is a completeness signal, not a quality one. A flow at full coverage with weak assertions is still a flow you haven’t really tested.
🎭 Mock outputs make fault paths testable
Section titled “🎭 Mock outputs make fault paths testable”Mock outputs for Action and Subflow elements, also in beta, make Test Mode much more practical for flows with dependencies. They let you isolate the flow under test by supplying a controlled response for an Action or Subflow. You can then verify the flow’s decisions, assignments and fault handling against that known outcome without also testing the dependency. Mock a callout Action and the flow skips the Hypertext Transfer Protocol (HTTP) request entirely. Mock a Subflow and the referenced flow isn’t executed.
Set it up on the element itself: open its properties panel in Test Mode, click Scenario Output, then Use Mock Output.
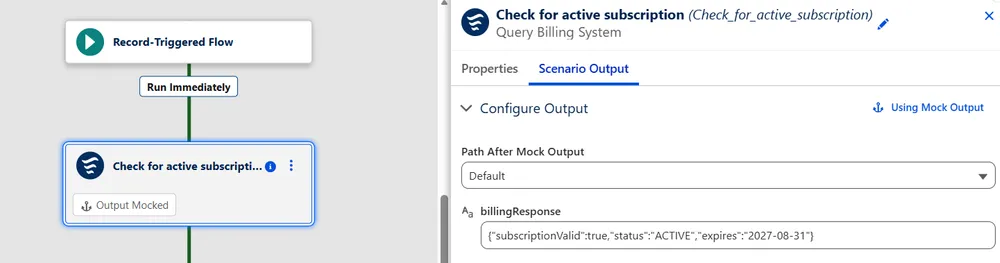
There’s a detail here that makes the whole thing practical. You can copy the output values from a previous debug run in the debug history rather than typing a realistic response from scratch. Run it once against the real dependency, capture what came back, and turn that into your mock.
Salesforce calls out four cases where this helps, and the fourth is the one worth pausing on:
- Actions with HTTP callouts to application programming interfaces (APIs) that are rate-limited or unavailable
- Actions invoking Apex methods with complex dependencies
- Flows with Subflow elements, without executing the referenced flows
- Fault paths that are difficult to trigger with live data
My guess is that a fair number of fault paths in production haven’t run at all. They get built because the guidance says to build them, and then nobody can make the dependency fail on demand to check whether the handling works. Now you can force the failure and assert that the flow degrades the way you intended.
If you’ve written Apex tests, this is the same move as HttpCalloutMock. The testing and deployment guide covers that pattern, and the thinking transfers directly.
🤖 Generating scenarios from the terminal
Section titled “🤖 Generating scenarios from the terminal”The item most likely to get missed in this release is Agentforce for Flow Headless. It generates test scenarios from a terminal rather than Flow Builder. Connect your artificial intelligence (AI) terminal to the org, navigate to the flow, and prompt:
create flow testsIt analyses the flow’s structure, decision outcomes and required fields, proposes scenarios covering success, fault and edge-case paths, and, once you approve them, builds them, validates them, runs them, and hands back a web address to review in Flow Builder. It works on record-triggered, autolaunched and Data Cloud-triggered flows.
With Test Mode enabled, a second prompt is available:
use isolated data for my flow testsThat creates test data separate from your org data, which your scenarios use when they run. For anyone who has watched a Flow Test break because someone edited the record it depended on, that’s the more interesting half of the feature.
This one has a real gate on it: you need the Agentforce Platform Developer and Admin permission set licence, plus the Agentforce Developer and Admin Tools permission set. I don’t have that combination in the org I used for this article, so I haven’t been able to try the terminal workflow myself. Confirm access before you plan a testing strategy around it.
📏 Smaller debugger improvements that add up
Section titled “📏 Smaller debugger improvements that add up”Two changes make the Flow Builder debugger less annoying, and both require Flow Test Mode (Beta) to be enabled in Process Automation Settings. With that setting on, you can enter a static 15- or 18-character record ID directly into an input variable. Flow Builder fetches the record details automatically during the test run, avoiding a search through lookup results for objects with limited searchability such as Cases and Campaign Members.
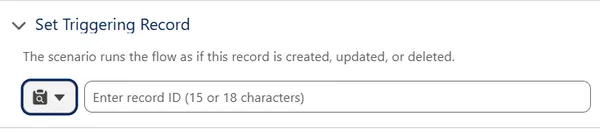
You can also populate primitive collection inputs, such as a text collection of IDs. Previously you could only test single input values. Salesforce removed record collections from the documented scope during the week of 24 August.
Neither is headline material. Both remove friction from something you do dozens of times a week.
🔄 Better Failure Handling in Flow
Section titled “🔄 Better Failure Handling in Flow”Testing is the headline, but these operational safeguards may have the greater production impact. Record-lock retries recover automatically from a specific failure, while two save-time checks flag configuration problems before users encounter them.
🔓 Record lock contention retry
Section titled “🔓 Record lock contention retry”When a flow encounters a record lock error during transaction initialisation, it now waits ten seconds and tries again, giving the other process time to finish and release the lock. Previously that was an immediate UNABLE_TO_LOCK_ROW failure. This one is automatic; there’s nothing to configure.
The scope is narrow: Salesforce promises this retry only when the record-lock error occurs during transaction initialisation. The release note doesn’t say that record-lock errors in other circumstances are retried. Contention occurs when concurrent processes try to update the same record. Salesforce’s record-locking guidance also explains that work on related records can lock a shared parent. For example, inserting an Opportunity can lock its Account, and a roll-up summary can lock the master record. The ten-second retry should reduce intermittent UNABLE_TO_LOCK_ROW failures, not eliminate them. If the same records repeatedly contend for a lock, you still need to reduce concurrent updates or redesign the automation.
What I’ve found is that these failures rarely announce themselves. A nightly job started falling over shortly after a new trigger went live, and the first sign wasn’t an error report: it was someone noticing that the follow-up automation had stopped running. A short pause and another attempt would have been enough if two processes had simply arrived at the same moment. Ours was busier than that, with an integration touching related records at the same time, so waiting wouldn’t have helped and we had to change the design instead. That’s the question worth asking of this feature. If your lock errors are occasional and never quite reproducible, the retry will quietly absorb a good share of them. If they turn up on the same records week after week, it will buy you time rather than a fix.
✋ Save-time validation catches two classic runtime failures
Section titled “✋ Save-time validation catches two classic runtime failures”Two Winter ’27 release notes describe checks that run when you save a flow. They’re easiest to understand with the record-variable pattern: an Assignment prepares field values, and a later Create Records or Update Records element writes that record to Salesforce.
- Field length violations. Flow Builder compares fixed text assigned to a record field with that field’s maximum length. If you assign 81 characters to a field limited to 80, the validation panel identifies the field and overlong value before the flow runs.
- Missing required fields in Create Records elements. When Create Records uses a record variable, Flow Builder checks whether required fields have assignments it can see at design time. If a required field such as the Billing ID in the screenshot below hasn’t been assigned, the validation panel names it instead of leaving the runtime failure to reveal what was missing.
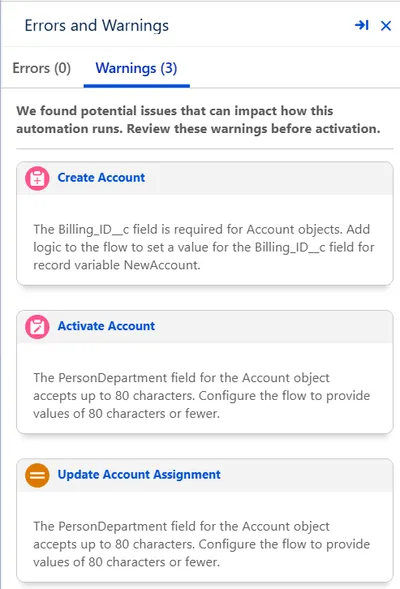
The documented checks have the same sensible boundary: they only cover what can be determined at design time. The Assignment validation checks fixed text values only, not variable references or other resources. Required field validation can’t help if the field gets populated through an input variable or a subflow. That’s honest because the platform can’t know a runtime value at save time.
💡 Why this cluster matters more than it looks
Section titled “💡 Why this cluster matters more than it looks”There’s a piece of documented behaviour that ties these together, and it surprises most people who’ve been building flows for years:
Per-transaction limits govern flows. If an element causes the transaction to exceed governor limits, the system rolls back the entire transaction, even if the element has a defined fault connector path.
Fault paths don’t cover governor-limit failures. If your scheduled flow blows the CPU limit, the fault connector you carefully wired up doesn’t run. The transaction is gone.
With Reduce Limit Failures in Scheduled Flows with Dynamic Batch Sizing removed from Winter ’27, that broader gap remains. A CPU, Salesforce Object Query Language (SOQL) or heap limit can still roll back the transaction without running the fault path. The new record-lock retry solves a narrower problem at transaction initialisation; it doesn’t protect a flow from governor limits reached after execution starts.
If you want the underlying model, triggers, limits and bulk patterns goes through transaction boundaries and bulkification in depth.
🔐 A Security Context You Can Rely On
Section titled “🔐 A Security Context You Can Rely On”Test Mode is the change everyone will talk about. The new run context is the one most likely to be quietly wrong in your org today, and the first I’d act on.
Flow Builder gains a run context called User Context—Enforces User Permissions, available in Lightning Experience in Professional, Enterprise, Performance, Unlimited and Developer editions. Salesforce’s release note puts it firmly: the option guarantees the flow runs with the running user’s access level, regardless of what invoked it.
That access level comes from the running user’s profile and permission sets, so the context is only as tight as the permissions behind it. The supported set is screen flows and autolaunched flows. Salesforce doesn’t break that down by trigger type the way it does for Test Mode, so treat the dropdown as the tell: if How to Run the Flow doesn’t offer the option, that flow type can’t use it.
The reason it exists is worth stating plainly. Previously, a flow configured to run in user context would inherit elevated permissions from its caller. If something running in system context, such as another flow or Apex, invoked your user-context flow, that flow also ran in system context. The setting you chose was effectively advisory whenever the flow wasn’t the entry point.
For most orgs that’s a quiet gap rather than an active incident. But if you have a subflow library called from Apex, or utility flows invoked by system-context parents, some of those have been running with more access than their configuration implied.
-
Open the flow in Flow Builder.
-
Open the flow’s settings dialog, then click Show Advanced. On a new flow, Save opens it. On a flow you’ve opened from the Flows list, use the Flow settings cog (the View properties icon in Salesforce Help), or Save As New Flow.
-
Set API Version for Running the Flow to 68.0 or later, if it isn’t already.
-
Under How to Run the Flow, select User Context—Enforces User Permissions.
-
Save the flow, then re-test it as a representative user rather than as an admin.
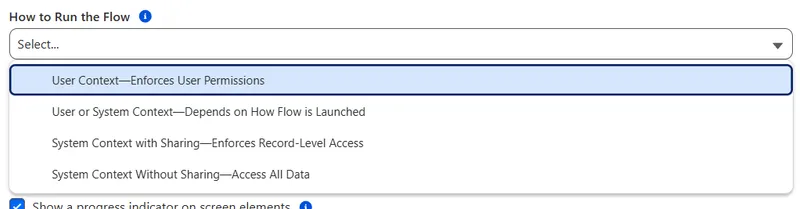
Re-testing as a real user isn’t optional. A flow that was quietly relying on inherited access will start failing once the boundary is enforced, and an admin session will hide that from you.
I haven’t yet tested the new run context on an autolaunched flow called from Apex that would otherwise give it elevated access. Winter ’27 has only just reached preview sandboxes, and I’d rather say that than guess at the failure modes.
My first test will start with a representative user, invoke the flow through Apex, and observe what happens when it tries to read or update data that user can’t access. That’s the boundary this setting is designed to enforce, and the part worth proving firsthand.
🆚 So How Much Can You Build in Flow Now?
Section titled “🆚 So How Much Can You Build in Flow Now?”More than before, but not because Flow can process more records. Winter ’27 raises the operational ceiling: better testing and clearer security boundaries make more complex logic reasonable to keep in Flow. For scheduled workloads, however, the processing ceiling hasn’t moved.
Flow’s SOQL and data manipulation language (DML) governor limits remain unchanged, as does the 200-record maximum batch size for schedule-triggered flows. The previously announced dynamic batch sizing is also no longer part of the release. That feature would have retried certain limit-related failures using smaller batches.
Those changes make Flow logic easier to test, secure and govern, but they don’t make large scheduled workloads more resilient. If a scheduled flow exceeds a governor limit, the transaction still rolls back; Flow won’t automatically reduce the batch size and try again.
For that kind of workload, Apex still earns its place when you need:
- Very large datasets with explicit chunking. A schedule-triggered flow can process more than 200 records overall, but never more than 200 in one batch and it remains subject to scheduled-flow interview limits. A Batch Apex
QueryLocatorcan select up to 50 million records, and each transaction can take a scope of up to 2,000 records, or more whenstartreturns an iterable. - State across batch transactions.
Database.Statefulpreserves instance variables between Batch Apexexecute()calls, which is useful for running totals, failure lists and end-of-job summaries. - Deterministic job chaining. A Batch Apex
finish()method can start the next batch, while Queueable Apex can link sequential pieces of work. - Controlled callout recovery. Flow supports callouts and fault paths, but Apex gives you direct control over retry conditions, backoff, idempotency and how partial failures are recorded.
- Granular exception and DML-result handling. Apex can catch specific exceptions or inspect per-record
Database.SaveResultvalues, allowing successful records to commit while failed records are logged or retried.
That exception-handling advantage stops at governor limits. Apex can’t catch a System.LimitException, and a Flow fault connector can’t prevent rollback after the transaction exceeds a governor limit. In both tools, the protection is to design the transaction so it stays within the limit rather than trying to recover afterwards.
My practical read is that the interesting shift isn’t batch work at all. It’s that Flow now has tests, mocks and a reliable security context, so the argument for moving logic to Apex purely because Flow was hard to verify has started to fade. The record-lock retry removes one narrow failure case, but it doesn’t change the governor-limit boundary. If you want the async options on the Apex side, asynchronous Apex covers Batchable, Queueable and the rest.
🧱 Building Bigger, and Keeping It Maintainable
Section titled “🧱 Building Bigger, and Keeping It Maintainable”Several features here make larger flows easier to live with, and there’s a piece of context that makes them more significant than they first appear. None of it is an argument for building one enormous flow: a flow that’s hard to reason about stays hard to reason about, however good the tooling around it. The point is that flows grow whether you planned for it or not, and this release gives you better ways to keep that growth under control.
The 2,000-element limit on a single flow was removed in API version 57.0. There is now no cap on how many elements a flow can contain. The platform stopped enforcing an upper bound on flow size some time ago; what’s arrived now are the tools to work at that scale deliberately.
Group Elements lets you organise related elements into named, collapsible groups with descriptions. Add one in auto-layout via Add to Flow → Group, then collapse it to hide detail while you work elsewhere. Flow Builder remembers your collapsed state. Salesforce says this feature is available on a rolling basis starting in Winter ’27. It hasn’t reached the org I used for this article yet, which is disappointing because I was looking forward to trying it on a genuinely large flow. I haven’t been able to test it firsthand.
The Unused Resources filter narrows the Toolbox to resources with no recorded usage. Click Filter in the Toolbox and select Unused. It’s auto-layout only, and the filter clears when you close Flow Builder. It’s best used during peer review. Check that a resource isn’t referenced by a deployment dependency before removing it, since “no recorded usage” and “safe to delete” aren’t quite the same claim.
Edit History is richer than I expected from its release-note summary. For flows that support versioning, you get a timeline of each save, a preview of what changed, and element-level detail. Click an element name to see its change details. From a past save you can Save as New Version to restore previous logic, or Save as New Flow to copy the logic somewhere else. Note it’s Enterprise, Performance, Unlimited and Developer only, so Professional orgs miss out.
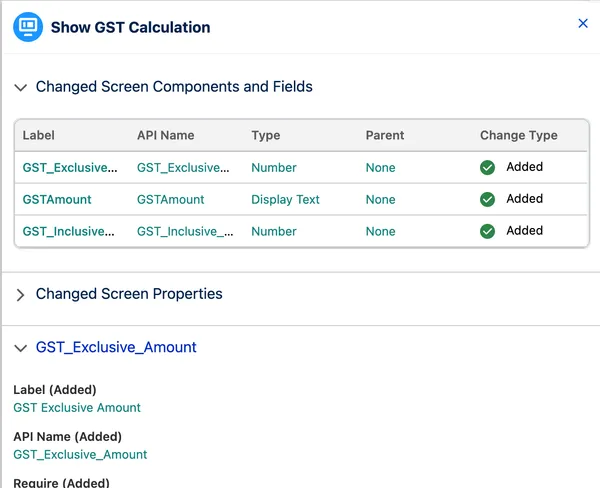
Flow Version Comparison gets a matching improvement, which is easy to miss because it sits in a different part of the release notes. Element name labels in the comparison table are now clickable and open a resizable side panel with the full change details, and the old Change Details column has gone to reduce clutter. Version dropdowns also list in a sensible order now. Taken together with Edit History, you can answer both “what changed inside this version?” and “what’s different between these two versions?” without leaving Flow Builder.
Flow Tags are the last piece, and the one most likely to pay off in a large org. They’re available in Professional, Enterprise, Performance, Unlimited and Developer editions. Create tags in the Automation App’s Tags tab and organise them into tag groups. Apply them from the Flows tab with the row-level Assign Tags action, select several flows and assign in bulk, or set the Tags field in the Save As modal. Then filter the flow list by one or more tags.
If several business units share an org, this is the first native answer to “which automations does this policy change affect?” that doesn’t depend on everyone having followed the same naming convention. Keep the taxonomy small and consistent, perhaps domain, owner and lifecycle, rather than tagging everything with every word that applies.
🔧 Smaller Flow Builder Wins
Section titled “🔧 Smaller Flow Builder Wins”Several smaller changes remove long-standing friction.
Split by Date and Split by Field Value are two new Decision types added to the release notes during the week of 24 August. Split by Field Value compares a field you select against either values you set or a resource, so each path is defined by what that field holds. Split by Date compares the current date against a date you give it, either a fixed date or a resource such as a date field on a record or a value captured on a screen. In the Winter ’27 preview org I used for this article, both appeared as separate elements in Flow Builder, although the release note describes them as options you select after adding a Decision element. Treat that difference as a preview observation rather than settled product behaviour. You define the paths and set values with inline pickers rather than writing an expression.
Reactive formulas in conditional visibility. You can now reference reactive formulas in conditional visibility rules on flow screens. Previously, conditional visibility didn’t support formulas that included components on the same screen. That limitation has forced a lot of awkward workarounds over the years, several of them mine. I won’t miss them.
The Time component. A proper time input for screen flows, with configurable minimum and maximum values to bound the selectable range. Useful anywhere you were modelling a time selection with loosely validated text or a picklist.
Screen flows as mass quick actions. You can now configure a mass quick action of type Flow on a list view or related list, and the screen flow receives the selected record IDs. Set it up in Object Manager, then add the action in the List View Button Layout or to the related list in Page Layouts. Before this, mass quick actions supported only Create a Record and Update a Record, so this turns a fixed-shape bulk edit into arbitrary guided logic.
End elements stay where you put them. Flow Builder now saves end elements to the flow’s metadata whenever you save in auto-layout, so the canvas stops reshuffling itself on save and reload. Existing flows pick this up the next time you save them. The quieter benefit is that every end element now appears explicitly in the flow’s XML, so metadata tooling can see where a flow actually terminates. That’s useful if you do anything with static analysis or documentation generation.
Flow Builder now uses the Cosmos theme, bringing updated colours, spacing and visual consistency. Separately, the denser canvas shows more of a flow at once, while keyboard navigation reduces mouse work. Improved Decision element navigation lets you click a canvas path to highlight its conditions, drag to resize the property panel, and double-click a path name to rename it inline. Flow Builder doesn’t support Salesforce Lightning Design System 2 (SLDS 2) Dark Mode.
Agent actions visible from the canvas. A Run Agent element shows which agent it calls, not what that agent can do. Select the element and expand the agent’s information panel to see its actions, each with a name, type, description and API name, without opening Agentforce Builder. The panel reflects the agent’s current configuration, wherever it was last edited. It’s available in Enterprise, Performance, Unlimited and Developer editions with an Agentforce for Sales, Agentforce for Service or Agentforce Platform add-on.
Auto-generated element labels generate from the properties you configure and preserve any manual edit. Worth knowing that this one requires an Agentforce licence, which is a notable gate on what presents as a basic authoring convenience. Whether the generated labels are good enough to keep is the sort of thing you’ll only know after a week of using it. If they need editing every time, you’ve swapped one bit of typing for another.
🧾 Approvals and Orchestration Get the Same Treatment
Section titled “🧾 Approvals and Orchestration Get the Same Treatment”Flow Builder isn’t the only part of the Automation release worth a look. If you are designing or troubleshooting one, the approval process guide covers the Classic and Flow builders end to end. Flow approval processes and orchestrations both get lower-latency background steps and less event contention, but the rollout differs: the first change is versioned, while the second is automatic.
The features in this section apply in Lightning Experience in Enterprise, Performance, Unlimited, Einstein 1, Agentforce 1 and Developer editions.
Both got the same two runtime improvements:
- Background steps now run synchronously when the action supports it. Previously, any background step containing an Action element ran asynchronously even when the action itself was synchronous, which could add unnecessary latency. Existing flow approval processes and orchestrations pick up the new behaviour only when you move them to API version 68.0 or later.
- Record-change events now route to a dedicated channel. Salesforce documents the change separately for flow approval processes and orchestration runs. Previously both record-change and step-completion events shared one platform event channel, so a bulk data operation firing thousands of record-change events could leave step-completion events queued behind them, stalling work items and delaying progress. This one is automatic with nothing to configure.
That second change is the interesting one if you’ve ever had approvals mysteriously crawl during a data load and struggled to explain why.
On the approvals side specifically, the new Request Approvals component lets you put up to 10 autolaunched flow approval processes on a record page for the submitter to choose from. Configure it in Lightning App Builder.
Salesforce originally announced Experience Builder support too, and an earlier version of this article included it. That support was removed from the release notes during the week of 31 August because it wasn’t ready.
There’s also a compliance-driven addition. Deleting a parent record now automatically cancels related in-progress approval submissions and their in-progress child records, so you can then delete the approval submissions themselves to satisfy a General Data Protection Regulation (GDPR) erasure request.
For both approvals and orchestrations, the Automatically Open Next Work Item option on the Orchestration Work Guide opens the next item from the same run when a user completes one, instead of sending them back to a list view. If they have nothing left in that run, the component shows their updated work item list for the record. The option is off by default. Unlike Request Approvals, this Work Guide setting remains available in both Lightning App Builder and Experience Builder.
🎯 Final Thoughts
Section titled “🎯 Final Thoughts”Winter ’27 is a better Flow release than its individual release notes suggest, because the value is in the combination. A test framework matters more when you can mock the dependencies. Mocks matter more when fault paths become testable. A reliable user context makes reusable flow logic safer when an elevated caller invokes it.
The practical result is that one honest reason to avoid Flow has narrowed substantially: “we can’t test it properly” is much weaker now. “It can fail unpredictably at volume” remains a valid concern, especially after dynamic batch sizing was removed from the release.
Where I’d start, in order:
- Turn on User Context—Enforces User Permissions for flows handling sensitive operations or invoked from Apex. Move them to API 68.0, enable it, and retest as a real user. It’s opt-in and reversible, and it’s the change most likely to be quietly wrong in your org right now.
- Pilot Test Mode in a sandbox on one critical record-triggered flow. Aim for a small, trusted set of scenarios that prove your actual business rules, not a large number of tests. Remember it’s beta, so keep your existing review and deployment checks in place while you learn its edges.
- Adopt the hygiene features where your edition supports them. Groups and the Unused filter improve individual flows as you work, while Flow Tags add an org-wide classification layer from Professional Edition upwards.
The organisations that get the most from this release won’t be the ones that switch everything on in September. They’ll be the ones that use it to move a few things off the “we don’t build that in Flow” list deliberately, with tests to prove it.
If you’re weighing up where a given piece of automation belongs, the automation guide works through Flow types and design patterns, and triggers, limits and bulk patterns covers the transaction model underneath both Flow and Apex.