Build a Salesforce App: Object, Fields and Access

Your rules decision record says what should be true of an equipment request. It names the fields, the layer each rule belongs in, the formula that derives days open, two validation rules, and a test plan. It is a good document.
Nobody can open it.
This is the first of three chapters that turn that document into something a staff member can submit, a manager can approve, and IT can fulfil. Here you build the parts that everything else stands on: the object, its fields, the rules that guard them, the access model, and the interface people will work in. The approval and fulfilment automation comes next, and the reports and the evidence run after that.
All of it is point-and-click. A Salesforce admin can build this entire application without writing a line of code. The judgement it asks for is the part that comes with no documented path: what order to work in, who can see what, and how you know it works for somebody other than you.
Before you start: a Developer Edition org or a sandbox where you hold System Administrator access, and the decision record from the previous chapter. Practice Orgs & Safe Learning covers setting one up if you do not have one. Budget about a day for this chapter.
One boundary remains from the previous chapter. A formula can count Monday-to-Friday weekdays, but it cannot subtract your organisation’s holiday calendar. This build implements the weekday version and records the holiday-aware criterion as a known gap. That is an honest release decision, not a reason to pretend the criterion passed.
🧭 Build a Salesforce app in dependency order, or build it twice
Section titled “🧭 Build a Salesforce app in dependency order, or build it twice”The order of this build is not a matter of taste. Each piece is built on the one before it: a validation rule will not save until the fields it names exist, a record page has nothing to lay out until there are fields to put on it, and a permission set has nothing to grant until there is an object to grant it on.
Some of those dependencies stop you with an error. The expensive ones do not:
- Object, including the settings offered only during creation.
- Fields, plain fields before formulas and validation rules.
- Access, both object permissions and record visibility.
- Interface: tab, app, record page, and list views.
- Automation, which needs the data model and access decisions.
- Reports, built against the fields and visibility model they rely on.
- Evidence, gathered as the people in the brief rather than as yourself.
Access is the step most people move. It is tempting to get the page looking right and hand out permissions at the end, but that order fails in a particularly demoralising way: everything works in your own session, where you can see every field regardless, and then the first real user opens the app to find half the page missing. Settle access first and every layout decision after it is made against the permissions people will actually have.
🧱 Create the object and settle its behaviour
Section titled “🧱 Create the object and settle its behaviour”A custom object is a table of your own with its own fields, relationships, and record IDs; Data Model covers that vocabulary if it is new. In Setup, open Object Manager → Create → Custom Object. Use these settings:
| Setting | Value | Why |
|---|---|---|
| Label | Equipment Request |
The singular name users see |
| Plural Label | Equipment Requests |
The name used for the tab and related lists |
| Object Name | Equipment_Request |
Becomes the application programming interface (API) name Equipment_Request__c |
| Description | Staff requests for equipment, from submission through manager approval to IT fulfilment. Weekday ageing does not account for public holidays. | Tells the next administrator what the object is for and what it does not cover |
| Record Name | Equipment Request Number |
A request has no useful natural name |
| Data Type | Auto Number | Generates a stable identifier |
| Display Format | ER-{0000} |
Produces values such as ER-0001 |
| Starting Number | 1 |
Required alongside the display format; makes the first record ER-0001 |
| Allow Reports | Selected | Makes the object’s report type available |
| Allow Activities | Cleared | Tasks and events are not part of the agreed process |
| Track Field History | Selected | Starts an audit trail for the fields you choose next |
| Allow Search | Selected | New custom objects are not searchable by default; the tab you create later would switch this on, but set it deliberately |
| Deployment Status | In Development | Keeps the object away from ordinary users while you build |
| Add Notes & Attachments | Cleared | Use Salesforce Files on the page instead of starting with legacy attachments |
Then Save. If the form offers to launch the New Custom Tab wizard on the way out, decline it. The tab is an interface decision, and interface comes after access.
The description is the only field on that form that costs nothing now and saves someone an hour later. Object Manager shows it in the object list, and it travels with the metadata into every deployment, so write the sentence you would want to find if you inherited this org.
The label and API name do different jobs. Users see Equipment Request; formulas, Flow, APIs, and deployment metadata use Equipment_Request__c. The Auto Number format is also a display pattern, not a capacity limit: {0000} pads early values with zeroes but does not stop at 9,999.
Selecting Track Field History only turns the feature on. Choosing which fields it watches is a separate screen that has nothing to list until the fields exist, so that step waits for the next section.
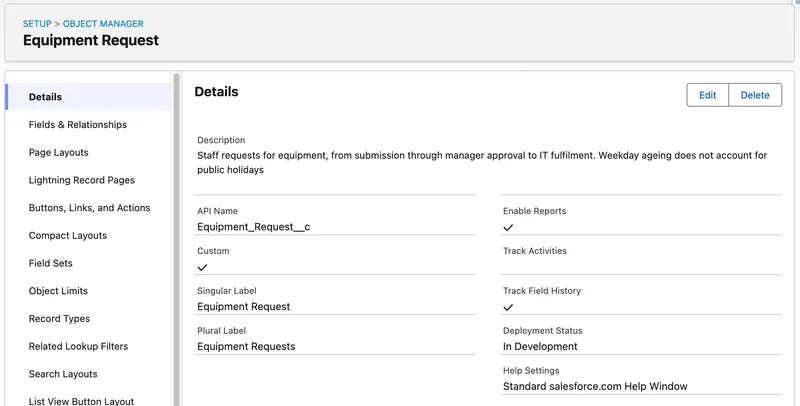
Object Manager’s Details page is where those decisions end up on the record. After saving, it should read back the description you wrote, the API name Equipment_Request__c, and the optional features exactly as you set them. Two of them answer to different names here: Allow Reports reads as Enable Reports, and Allow Activities as Track Activities.
🧾 Create the fields the process actually needs
Section titled “🧾 Create the fields the process actually needs”Before creating fields, settle two names the brief uses without giving them separate fields:
- Requester is the record owner. A staff member owns the request they submit.
- Team is the owner’s role. Reports group by Equipment Request Owner: Role.
That is deliberately lean. If people will submit on behalf of colleagues, queues will own requests, or one person can belong to several reporting teams, create explicit Requester and Team fields instead. Do not let a convenient shortcut quietly become the permanent model.
I learned that from a picklist. I built a provisioning tracker on the Opportunity object and added a custom picklist to record a reason for an action. Users created and updated records through the standard page, so the drop-down was the only route a value could take, and I left the field unrestricted. It kept data entry tidy enough for months, and by then the reports depended on those exact groupings.
Then another team built automation over the top. Their UI wrote values straight onto the record without passing the interface’s drop-down, unlisted strings went into the field, and every one of them saved without complaint. The reports broke immediately but no one spoke up for a while. A checkbox I could have ticked during field setup became a data cleanup, a UI patch, and an apology to the people who owned the dashboard. Status and Equipment Type below are both restricted picklists, and that is the whole reason why.
In Object Manager, open Equipment Request → Fields & Relationships. Every field is created the same way: click New, pick the data type, and work through the wizard with the settings below.
Fill in the Description on every field as you go. It costs a sentence, it travels with the metadata, and it is the only answer the next administrator gets when they find a field nobody remembers agreeing to.
| Label | API name | Type and settings |
|---|---|---|
| Status | Status__c |
Restricted picklist; Awaiting Approval is the default, followed by Approved, Rejected, Awaiting Stock, and Fulfilled |
| Equipment Type | Equipment_Type__c |
Restricted picklist using the values agreed with IT |
| Business Justification | Business_Justification__c |
Text Area |
| Needed By | Needed_By__c |
Date; required at field level |
| Expected Delivery Date | Expected_Delivery_Date__c |
Date; optional |
| Estimated Cost | Estimated_Cost__c |
Currency |
| Rejection Reason | Rejection_Reason__c |
Text, 255 characters |
| Fulfilled Date | Fulfilled_Date__c |
Date; populated by Flow |
| Days Open | Days_Open__c |
Formula returning Number, 0 decimal places |
| Weekdays Open | Weekdays_Open__c |
Formula returning Number, 0 decimal places |
-
Create the eight non-formula fields first: two picklists, a text area, three dates, a currency field, and a text field. None of them references another field, so their order does not matter. The two formulas do reference them, which is why they come next.
-
Tick Required on the Needed By field definition, and on nothing else here. Your decision record settled that layer already: required in the definition reaches every save, which is what the one field a request cannot exist without needs. Rejection Reason, Fulfilled Date, and Expected Delivery Date all apply later in a request’s life, so they stay optional at field level and get their rules in the validation rules below.
-
Create Days Open with the formula from the decision record:
IF(ISPICKVAL(Status__c, "Fulfilled"),Fulfilled_Date__c - DATEVALUE(CreatedDate),TODAY() - DATEVALUE(CreatedDate)) -
Create Weekdays Open from Salesforce’s weekday-counting formula, with two adaptations: use Fulfilled Date when Status is
Fulfilled, and add1inside eachMINterm so the count excludes the creation date and includes the end date when it is a weekday:(5 * (FLOOR((IF(ISPICKVAL(Status__c, "Fulfilled"),Fulfilled_Date__c,TODAY()) - DATE(1900, 1, 8)) / 7)))+ MIN(5,MOD(IF(ISPICKVAL(Status__c, "Fulfilled"),Fulfilled_Date__c,TODAY()) - DATE(1900, 1, 8),7) + 1)- (5 * (FLOOR((DATEVALUE(CreatedDate) - DATE(1900, 1, 8)) / 7)))- MIN(5, MOD(DATEVALUE(CreatedDate) - DATE(1900, 1, 8), 7) + 1)The
+ 1shifts when the partial week gains a day. A Friday request still reads0on Saturday; a Saturday request reads1on Monday. Without that adjustment, the documented formula returns1and0respectively. Both versions agree when both endpoints are weekdays. This build uses the adjusted convention so ageing advances on weekdays, and still makes no allowance for public holidays.Check those two weekend boundaries as well as a Friday-to-Monday interval, which should return
1. You can check the arithmetic separately with fixed dates before relying on live requests for the evidence run. -
Check every picklist value’s API name before a formula or Flow references it. A label can contain spaces while its API name uses underscores. Matching the wrong one produces automation that saves cleanly but does not take the intended branch.
-
Choose the tracked fields in Fields & Relationships → Set History Tracking: Status, Owner, Equipment Type, Business Justification, Needed By, Expected Delivery Date, Estimated Cost, Rejection Reason, and Fulfilled Date. That is everything the screen offers except Equipment Request Number, which never changes, and the two formula fields, which are not offered because a formula keeps no history to record. History starts when tracking is enabled and cannot reconstruct earlier changes, so set it before anyone creates a real request.
The weekday formula does not exclude public holidays. Put that sentence in the field description and the report description. If the owner will not accept the gap, stop here and design a holiday-aware automation rather than labelling this formula “working days”.
🚦 Add the two validation rules
Section titled “🚦 Add the two validation rules”Create the custom permission first. The needed-by rule’s formula checks $Permission.Bypass_Equipment_Rules, and Check Syntax refuses a formula naming a permission that does not exist yet: Error: Field Bypass_Equipment_Rules does not exist. Check spelling. In Setup → Custom Permissions, create Bypass Equipment Rules with the API name your rule checks, which is the escape-hatch pattern from the previous chapter. The rejection-reason rule deliberately gets no equivalent, so record that in its description; the omission should read as a decision rather than an oversight.
Then create both rules from Object Manager → Equipment Request → Validation Rules, copying the formula, error message, and error location straight from your decision record. If you want the reasoning again, the previous chapter works through the rejection-reason rule and scoping the needed-by rule. The design work is done, and quietly improving a rule here means the record no longer describes the org.
Worked through, the rejection-reason rule looks like this:
AND( ISPICKVAL(Status__c, "Rejected"), ISBLANK(Rejection_Reason__c))Set its error location to the Rejection_Reason__c field, and write the message as an instruction the approver can act on: Please enter a rejection reason. The requester will see this text, so say what they need to change. The needed-by rule takes the same three parts from your own record, with the scope and the bypass it specifies.
Activate the needed-by rule now. It is scoped with ISNEW() and ISCHANGED(), so it judges only the records someone is creating or rescheduling, and nothing you build later widens that.
Leave the rejection-reason rule inactive. It demands a value in Rejection Reason whenever Status is Rejected, and that is precisely the state your approval passes through. Until the result flow sets both fields in a single update, an active rule blocks your own approval from completing. You will turn it on in the approval section, once the automation that satisfies it exists.
🔐 Open the right door: permission sets and sharing rules
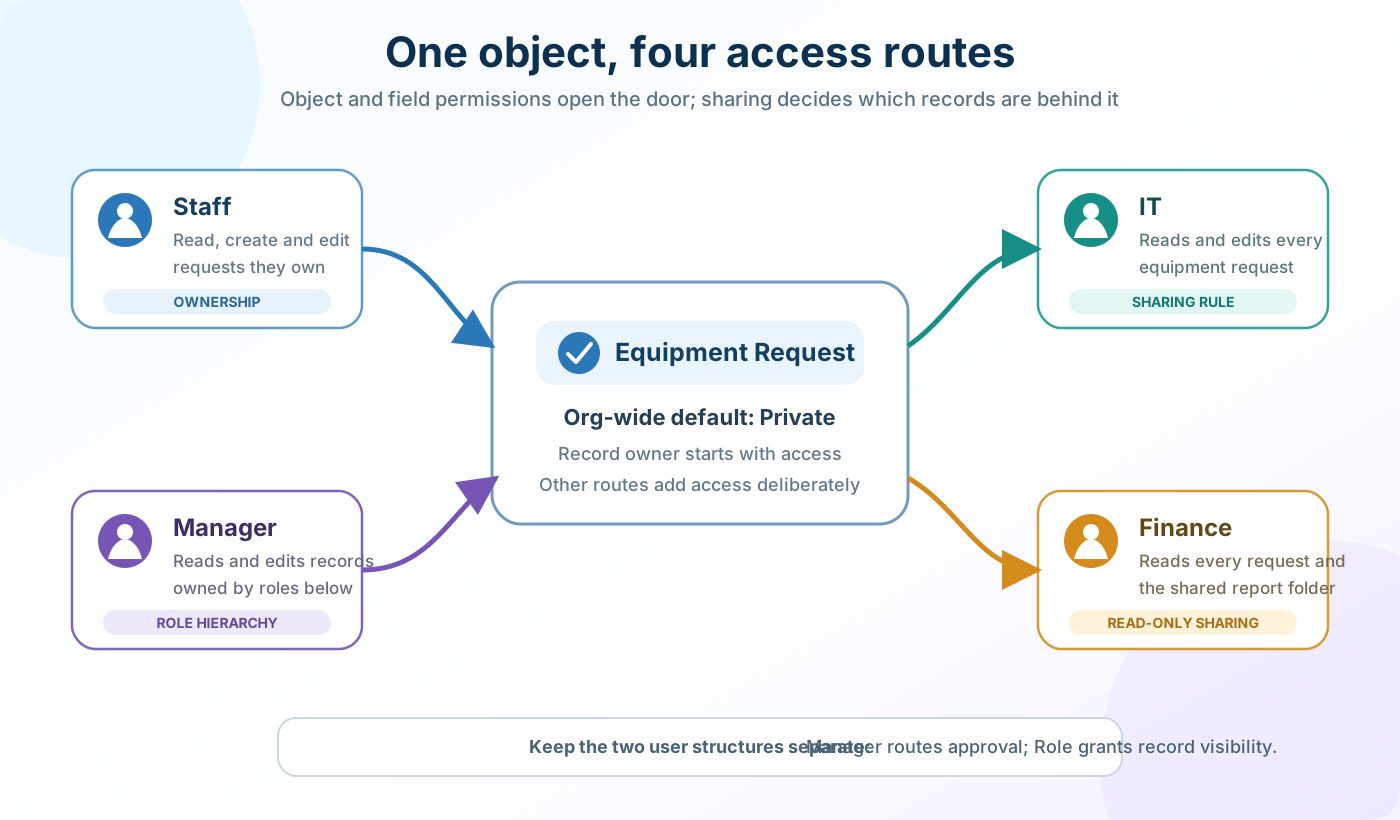
Section titled “🔐 Open the right door: permission sets and sharing rules”Access has two independent layers:
- Object and field access decides whether someone can use
Equipment_Request__cand which fields they can read or change. - Record access decides which individual requests they can open.
🔑 Grant the object and its fields
Section titled “🔑 Grant the object and its fields”I put access on a profile only when there is nowhere else to put it. A profile is one per user and profiles do not combine, so the moment two people need overlapping access you are cloning one, and the same decision now lives in two places that will drift. Permission sets stack, which keeps the answer to why can this person do that a list you can read rather than an excavation.
Create four permission sets, one per persona, rather than adding the access to profiles:
| Permission set | Object permissions | Field access |
|---|---|---|
| Equipment Request — Staff | Read, Create, Edit | Edit Equipment Type and Business Justification; read every other field |
| Equipment Request — Manager | Read, Edit | Edit Status and Rejection Reason; read every other field |
| Equipment Request — IT | Read, Edit | Edit Status, Expected Delivery Date, and Estimated Cost; read every other field |
| Equipment Request — Finance | Read | Read Status, Equipment Type, Estimated Cost, Days Open, and Weekdays Open; leave every other field unticked |
Three of those fields have no setting to argue about. Needed By is universally required and Owner is a system field, so both stay readable and writable whatever the permission set says. Days Open and Weekdays Open are formulas, which can only ever be granted as read.
-
Create each one from Setup → Permission Sets → New, using the label from the table. The API name fills itself in.
-
Leave License set to
Noneunless everyone assigned the set holds the same licence. A set tied to one licence can only be given to users who hold it, and can only include what that licence entitles.Noneis not a grant of its own: a user still needs a licence covering what the set opens up. -
Grant the access under Object Settings → Equipment Request. Object permissions and field permissions sit on the same screen, so set both columns from the table before saving.
-
Leave the assignments until the evidence run, where you create the four people and give them their roles, permission sets, and group membership together.
One more permission set carries the bypass and nothing else. Create Equipment Request — Bypass Rules the same way, add the Bypass Equipment Rules custom permission under its Custom Permissions section, and assign it to nobody. It goes on a named user for the length of a data load and comes off afterwards, which leaves the exception legible in Setup Audit Trail rather than buried in a rule somebody switched off for an afternoon.
I would rather grant a bypass loudly and briefly than ship a rule that is quietly weaker than it looks. A deactivated validation rule is invisible in a way an audit trail entry is not, and “we turned it off for the import” has a habit of outliving the import.
👥 Decide which records they can open
Section titled “👥 Decide which records they can open”Everything above settles what a person can do with a request they can already see. This layer decides which ones those are. It uses the three mechanisms Record Access covers in full: org-wide defaults, the role hierarchy, and sharing rules.
-
Build the role hierarchy in Setup → Roles: two manager roles, each with one staff role beneath it, such as
Ops ManageroverOps Team. Fill in Role Name as displayed on reports as well as the Label: they are separate fields, the second saves empty, and reports that group by Owner Role render it rather than the Label. Left blank, a grouped report returns the right records and the right grand total with every row under a single group labelled-, which reads like broken ownership. Set each person’s Role on their User record. Build two teams rather than one, because the evidence run checks that a manager cannot see the other team’s requests. -
Create two public groups in Setup → Public Groups:
Equipment Request — ITandEquipment Request — Finance, each holding those users or the role that covers them. Set the IT group’s API name toEquipment_Request_IT; the approver formula later uses that exact value. -
Set the Equipment Request org-wide default to Private in Setup → Sharing Settings.
-
Leave Grant Access Using Hierarchies selected on that same screen. Salesforce lets you clear it for custom objects; this design needs it so managers can see the records owned by users below them.
-
Create the IT sharing rule in the Equipment Request Sharing Rules section. Click New, label it
All Requests to IT, and select Based on record owner. For Owned by members of, choose Public Groups → All Internal Users. For Share with, choose Public Groups → Equipment Request — IT, set access to Read/Write, and save. -
Repeat for Finance, labelling the rule
All Requests to Finance. Keep Public Groups → All Internal Users as the source, share with Equipment Request — Finance, and set access to Read Only. Finance also needs access to the report folder, because folder access and record access are separate grants.
An owner-based sharing rule fits this build because every request is owned by an internal user. All Internal Users is the source population; the IT and Finance groups are the recipients. A role-based source could miss an internal owner with no assigned role, so do not substitute the top role for the source group. If you later introduce queue ownership or external requesters, revisit which owners the rules cover.
| Rule | Owned by members of | Share with | Access |
|---|---|---|---|
| All Requests to IT | All Internal Users | Equipment Request — IT | Read/Write |
| All Requests to Finance | All Internal Users | Equipment Request — Finance | Read Only |
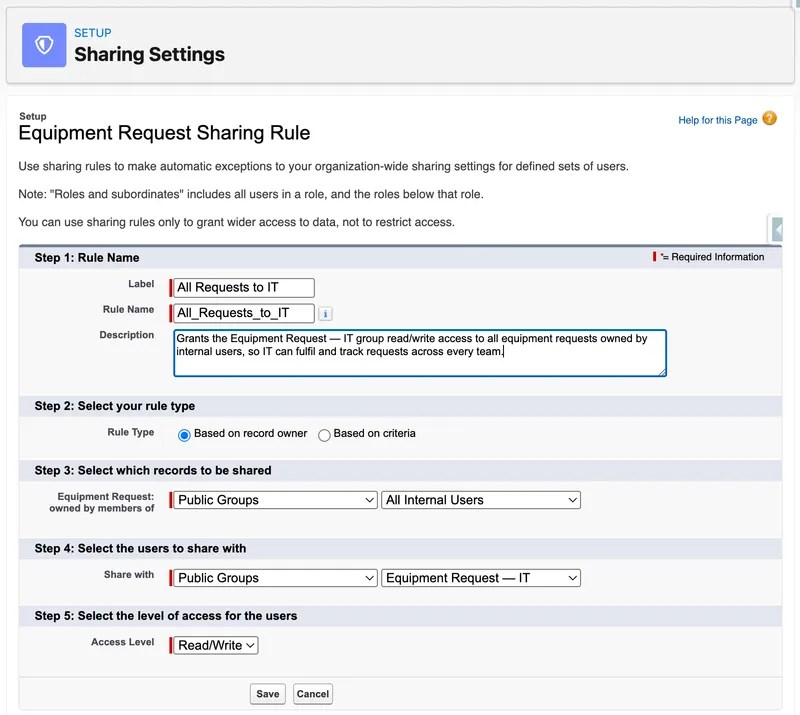
The IT rule shows the two groups doing different jobs: All Internal Users determines whose requests are included, while Equipment Request — IT determines who receives access. For Finance, keep the same source and change the recipient group and access level as shown in the table.
Criteria-based rules are useful when a field value decides which records to share. Here the requirement is every internally owned request, so there is no need to test the request number against a blank value. Verify the two team-owned fixtures and the administrator-owned fixture during the evidence run.
🧩 Build the Lightning app, tab, and record page
Section titled “🧩 Build the Lightning app, tab, and record page”The staff member needs to find their request and see what happens next. The manager needs the request’s context beside the approval work. IT needs to see what is waiting and record when it will arrive. Those jobs give the page its shape.
Salesforce spreads that shape across several settings. The Lightning app supplies navigation. The Lightning record page arranges components and, with Dynamic Forms, individual fields. The page layout still supplies the actions and related lists used by the standard components in this build. If you change one and nothing moves on screen, check which of these owns the thing you meant to change.
Build one shared record page. The permission sets already decide which fields each person can read or edit; you do not need four copies of the page to express those permissions.
📍 Give the app a clear front door
Section titled “📍 Give the app a clear front door”A custom object tab makes Equipment Requests available as a navigation item. Creating the app then puts that item beside the reporting tools people need.
-
Open Setup → Tabs, then click New under Custom Object Tabs. Select Equipment Request, choose a recognisable tab style, and give it a short description.
-
Choose tab visibility for the intended profiles. Set Default On for your administrator profile and the profiles your four personas will use (such as
Standard Platform Userif your personas hold Platform licences). Leave unrelated profiles at Tab Hidden. On the app-selection step, clear the selections for existing apps; you will add this tab to the focused app next. -
Open Setup → App Manager → New Lightning App. Name it Equipment Requests, with the description “Submit, review, and fulfil staff equipment requests.” Choose Standard navigation and Desktop and phone. Leave the utility bar empty for this build.
-
Choose the navigation items in working order: Equipment Requests, Reports, then Dashboards. On User Profiles, include your administrator profile and the persona profiles, then save. Open the app from the App Launcher and confirm those items appear. Reports and Dashboards are entry points for later; adding them does not create their contents.
Use Default On here so the tab is visible immediately. Default Off makes it available but does not show it in app navigation by default; it is not an app-specific way of keeping the tab out of unrelated apps. App navigation and tab visibility need to agree.
The earlier permission sets use License None. Salesforce only exposes tab settings in a permission set with a specified licence, which is why this build sets tab visibility on profiles. Object and field access still comes from the persona permission sets. Showing someone an app or tab does not grant them access to its records.
📐 Prepare the layout behind the page
Section titled “📐 Prepare the layout behind the page”Files and history need a source before the Lightning page can display them. In Object Manager → Equipment Request → Page Layouts, open Equipment Request Layout. From the Related Lists palette, drag Files and Equipment Request History into the related-list area, then save. If History is missing, check that field history tracking was enabled earlier.
Keep the request’s stored fields on this layout in a sensible order, with Equipment Type, Business Justification, and Needed By together. Under Salesforce Mobile and Lightning Experience Actions, check that Edit is available. If the section inherits predefined actions, use its override link before arranging them. This build keeps those layout-based actions; the manager’s approval decision will happen in the Work Guide.
Check Page Layout Assignment for the profiles used in your evidence run. This build has no custom record types, so use the existing Master assignment. Adding Files to a layout nobody receives will not make it appear for them. Salesforce’s record-page walkthrough shows this connection between the layout and the Lightning page.
Give the header a useful summary too. Under Compact Layouts → New, create Equipment Request Summary with Equipment Request Number first, then Status, Equipment Type, and Needed By. Save it, then use Compact Layout Assignment → Edit to make it the primary compact layout. The standard Highlights Panel will use those fields, so the request number and current status are visible before someone reads the detail.
🎨 Arrange the record around the work
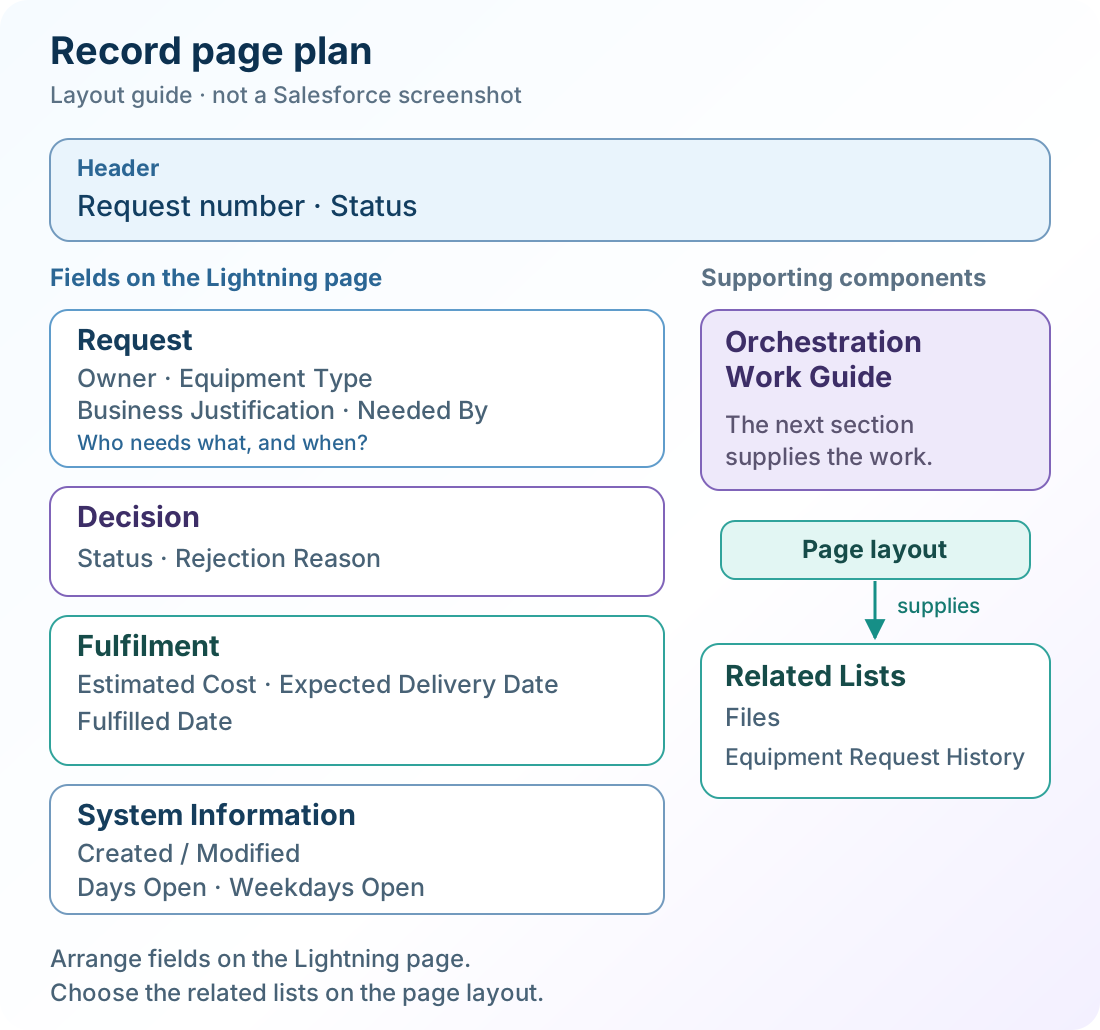
Section titled “🎨 Arrange the record around the work”Keep the request and its decision together, with fulfilment underneath and supporting material alongside. The plan below shows where to place the fields and components; it is a layout guide, not a screenshot of Salesforce.
-
Open Setup → Lightning App Builder → New → Record Page. Use Equipment Request Record Page as the label, select the Equipment Request object, and choose Header and Right Sidebar. Starting here lets you build without creating a request before its approval automation exists.
-
Add the standard Highlights Panel to the header. Keep its actions supplied by the page layout for this build. The compact layout you just assigned supplies its summary fields.
-
Open the Fields tab and add four Field Section components to the main column: Request, Decision, Fulfilment, and System Information. Start with one column per section so the order is easy to follow. Drag the fields into them as shown: Owner, Equipment Type, Business Justification, and Needed By in Request; Status and Rejection Reason in Decision; Estimated Cost, Expected Delivery Date, and Fulfilled Date in Fulfilment. Put Created By, Last Modified By, Days Open, and Weekdays Open in System Information.
-
Add Related Lists to the sidebar. This standard component displays the lists from the viewer’s assigned page layout. You have already prepared Files and Equipment Request History there.
-
Add Orchestration Work Guide above Related Lists. That is the component name to search for in App Builder, including when you are building a Flow Approval Process. Select Hide Work Guide When Empty so people without work are not left staring at an empty panel. Save the Lightning record page. If prompted to activate it, choose Not Yet; you will activate it after configuring field visibility below.
The Fields tab is the starting point for a new Dynamic Forms page. If you instead opened an existing page with a Record Detail block, select that block and use Upgrade Now to migrate it. Do not retain a second full Record Detail block beside your new field sections; it would repeat the fields you just arranged.
The Orchestration Work Guide is a place to complete assigned work. It does not create an approval by being on the page, and changing Status by hand is not the approval experience. The next section supplies the process and review screen.
In Setup → Permission Sets, open Equipment Request — Manager, then choose App Permissions → Edit. Under Flow and Flow Orchestration, enable Run Flows and save. This is an app permission, not a system permission. Enable it on Equipment Request — IT as well, since IT acts as the fallback approver in the next section. If you restrict access to the review flow, grant it to both groups of reviewers before the evidence run.
🔎 Reveal the fields needed at each status
Section titled “🔎 Reveal the fields needed at each status”A rejection reason is useful when a request has been rejected. An expected delivery date is useful when IT is waiting for stock. Showing those fields at the relevant point keeps the page readable without changing who can access their values.
Select each individual field on the App Builder canvas. In its Set Field Visibility settings, add the following record-field condition using Status and the Equal operator:
| Field | Show when Status equals | What the reader should see |
|---|---|---|
| Rejection Reason | Rejected |
The reason alongside the decision |
| Expected Delivery Date | Awaiting Stock |
IT’s delivery estimate while stock is pending |
| Fulfilled Date | Fulfilled |
The completion date stored by Flow |
Leave Status, Equipment Type, Business Justification, and Needed By visible without conditions. Needed By is universally required, so the user must have somewhere to enter it. Keep the conditional fields optional in App Builder: the rejection validation rule and fulfilment flow will enforce their agreed behaviour.
Apply these conditions to the fields, not the surrounding sections. Field visibility updates while the user edits; section visibility waits for a save. With the condition on Expected Delivery Date itself, IT can choose Awaiting Stock and enter the estimate in the same edit.
Visibility is presentation. Field permissions still control access, and a hidden field can still have a stored value. The Dynamic Forms required-field rules also distinguish a field required on one page from a field required throughout the object. Keep the validation rules where you built them.
📱 Activate the page in the app people will open
Section titled “📱 Activate the page in the app people will open”Saving preserves your design. Activation chooses which users and app contexts receive it.
Save the page, then open Activation. Choose App Default → Assign as App Default, select Equipment Requests, and assign the page for Desktop and phone. Review and save the assignments. This makes it the default Equipment Request page inside this app; it does not make it the org-wide default. If an existing page still appears later, check Object Manager → Equipment Request → Lightning Record Pages → View Page Assignments for the actual app, record type, and profile combination.
Open Setup → Salesforce Mobile App and confirm Dynamic Forms and Dynamic Highlights Panel on Mobile is enabled. If it is already on, leave it on. Then check your Lightning record page: if it contains Record Detail - Mobile, remove that component so the mobile experience uses your Dynamic Forms fields.
If an organisation keeps that setting off, a page built from scratch needs Record Detail - Mobile as its mobile fallback, with a usable assigned page layout. That fallback does not reproduce the conditional field arrangement above. Check the phone preview now for layout, then verify New, Edit, and the approval experience on the actual supported device during the evidence run.
📋 Make the list views answer a working question
Section titled “📋 Make the list views answer a working question”The record page helps with one request. List views tell people which request to open next.
As the administrator, open Equipment Requests from the App Launcher, select its Equipment Requests navigation item, and use List View Controls → New for each view below. Make My Requests and My Team’s Open Requests visible to all users of the object. Share Awaiting Fulfilment with the Equipment Request — IT public group. You can adjust that choice later through List View Controls → Sharing Settings.
In the Filters panel, set Filter by Owner, then add the Status filter shown below. Select both values within the same filter; no custom Filter Logic is needed:
| List view | Owner filter | Status filter |
|---|---|---|
| My Requests | My Equipment Requests | No status filter; keep completed and rejected requests findable |
| My Team’s Open Requests | All Equipment Requests | Status not equal to; select Rejected and Fulfilled |
| Awaiting Fulfilment | All Equipment Requests | Status equals; select Approved and Awaiting Stock |
With multiple values in one filter, not equal to excludes records matching either selected value, while equals includes records matching either. The team’s list therefore excludes rejected and fulfilled requests; IT’s list includes approved requests and those awaiting stock.
Save the filters. Under List View Controls → Select Fields to Display, start with Equipment Request Number, Status, Equipment Type, Needed By, and Owner. Add Expected Delivery Date and Estimated Cost to Awaiting Fulfilment so IT can triage without opening every row. Save the columns, then sort the fulfilment list by Needed By to put the oldest need first.
Sharing a list view shares its definition, while record sharing and field permissions still determine its contents. My Requests uses the viewer’s ownership. My Team’s Open Requests relies on this build’s role hierarchy; it is not an extra team filter. A manager sees the records shared to them, while IT’s broader access can show several teams through the same view.
You will test this interface in the later evidence run, after the approval automation and reports are complete, the object is deployed, and the persona permissions are assigned. During that test, use the routes people will use in practice: Staff selects New from the object tab; Manager reviews through the Work Guide; IT selects Edit when changing a request to Awaiting Stock; and Finance opens the same record read-only. Check Files and History too, and use the keyboard to move through the fields in their intended order. The useful finish line is that each person can find and complete their next task.
🔍 Create two requests and look at what you built
Section titled “🔍 Create two requests and look at what you built”Nothing so far has been tested by anyone, including you. The object is still In Development and the persona permission sets are assigned to nobody, so an ordinary user cannot reach any of this yet. You can, because Customize Application carries you past the deployment status.
Create two disposable requests as the administrator from the Equipment Requests tab. Use an Equipment Type from your picklist, set Needed By to today or later, leave Status at Awaiting Approval, and enter DEBUG — approval and DEBUG — rejection as their Business Justifications. Keep yourself as owner and copy both record IDs from their URLs into your notes; the next chapter debugs its flows against them.
Then read the two records back, because five decisions from this chapter are visible in them at once:
- The request number generated itself in the
ER-0001format, and you never typed it. - Status defaulted to
Awaiting Approvalwithout the form asking, which is what will make every new request enter the approval process in the next chapter. - Rejection Reason, Expected Delivery Date, and Fulfilled Date are absent from the page, because their visibility conditions are false at this status.
- Weekdays Open reads
0, and Days Open counts from today. - Try saving a request with Needed By set to yesterday. The validation rule stops you, and the message names the field.
✅ Checkpoint
Section titled “✅ Checkpoint”Produce an object a request can live in, and a written account of who will be able to reach it.
Build it, then write down:
- The object and ten fields, matching the decision record and the documented weekday compromise.
- Two validation rules, one active and one deliberately inactive, with the reason the second one waits.
- Five permission sets: four named for the access they grant, plus the unassigned bypass set holding the custom permission.
- A written access model: Private by default, hierarchy access for managers, Read/Write sharing for IT, and Read Only sharing for Finance.
- One Lightning app with its tab, activated record page, and three list views.
- Two disposable requests you created as yourself, with their record IDs noted.
You’re finished when you can answer this without opening Setup: when I assign these permission sets in two chapters’ time, which records will each of the four people see, and why? The answer is a sentence about ownership, the role hierarchy, and two sharing rules. If it is a shrug, the access model is not finished, and no amount of interface work will fix it.
🎯 Final Thoughts
Section titled “🎯 Final Thoughts”The order of this chapter is the part worth carrying forward. Some dependencies stop you with an error, and those are the affordable ones: a validation rule will not save until the fields it names exist. The expensive dependencies let you finish. A record page arranged before the permissions were settled looks completely done from your own seat, and goes on looking that way until the first real user opens it.
That is why access came before interface here rather than after it. Every layout decision you made was made against the permissions people will actually hold, instead of against the unrestricted view an administrator gets for free.
What you do not have yet is a request that can move. It can be created, and it sits at Awaiting Approval because nothing exists to approve it. That is the next chapter’s job.
🚀 Next steps
Section titled “🚀 Next steps”Build the Flow Approval Process is next. It adds the four automation pieces that carry a request from submission to fulfilment: the manager’s review screen, the flow that applies the decision, the approval process that holds the two together while somebody takes their time deciding, and the before-save flow that stamps the fulfilment date.
For more depth on the access model behind this chapter, Record Access covers organisation-wide defaults, the role hierarchy, and sharing rules in full, and Advanced UI Customisation goes further into Dynamic Forms, visibility rules, and page performance.