Salesforce Integrations — Dev Fundamentals 6

In Part 5, Asynchronous Apex, you learned how to move slow or heavy work off the synchronous path. Although integrations are not always asynchronous, that skill still comes up often in integration work. Some are fast, synchronous HTTP calls that return a result in milliseconds. Others are event-driven messages that you send and then forget. The common thread is that your code has to cross a system boundary, which means dealing with authentication, network failures, and data formats that Salesforce doesn’t control.
An integration is any connection between two systems. In general that could be any two systems, but we’re looking at it from the Salesforce lens: Salesforce asking a warehouse system for shipping status, a website creating leads in Salesforce, or an external data platform subscribing to record changes as they happen.
We’ll start with the broad integration patterns, then work through the tools and techniques you need: secure credential management, outbound and inbound REST, custom Apex APIs, Platform Events, Change Data Capture, error handling, testing, and choosing the right approach for a given problem. The last section applies them to the Expense Claim from earlier parts: you’ll configure the credential behind Part 5’s reimbursement callout and build the endpoint the finance system calls when a payment is returned.
🧭 Salesforce Integration Patterns
Section titled “🧭 Salesforce Integration Patterns”Integration architecture is a topic in its own right; entire books and certifications exist around it. But as a Salesforce developer, it helps to know the main patterns by name so you can recognise them in requirements and conversations with architects.
| Pattern | How It Works | Example |
|---|---|---|
| Request/Response (Point-to-Point) | One system sends a request directly to another and waits for a reply | Salesforce calls a shipping API and uses the tracking number from the response |
| Fire and Forget | One system sends a message and moves on without waiting for a result | A trigger enqueues a warehouse notification; it doesn’t need the warehouse’s answer |
| Publish/Subscribe | A publisher broadcasts an event; any number of subscribers react independently | Salesforce publishes an Order_Ready__e event; MuleSoft and an ERP both consume it |
| ETL / Batch | Data is extracted from one system, transformed, and loaded into another in bulk | Nightly job pulls updated Account records into a data warehouse |
| Hub and Spoke | All systems connect through a central middleware hub rather than directly to each other | MuleSoft sits between Salesforce, SAP, and a billing system, routing and transforming messages |
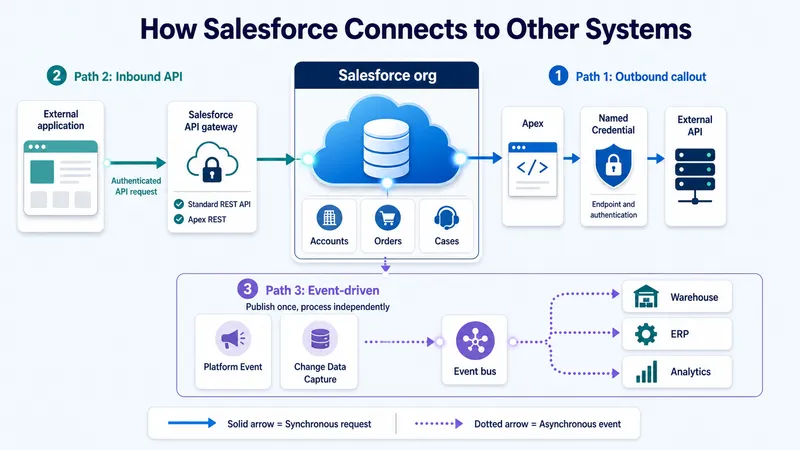
In practice, most Salesforce integrations use one of two mental models from this list:
🔀 Request/response
Section titled “🔀 Request/response”One system asks another for something and waits for the answer. A REST callout is request/response: Salesforce sends an HTTP request, the calling code pauses until the external system replies, and then Salesforce uses the data from the response to continue its work. For example, an Apex class might call a shipping API, read the tracking number from the JSON response, and save it to a field on the Order record, all within the same transaction.
Fire and forget is a variation of request/response where the caller sends the request but does not need the response to continue its work. Salesforce might POST a notification to an external warehouse system and treat any 2xx status code as confirmation that the message was received, without reading or acting on the response body.
📡 Publish/subscribe (event-driven)
Section titled “📡 Publish/subscribe (event-driven)”One system announces that something happened, and any number of other systems can react when they receive the message. The publisher does not need to know who the subscribers are, how many there are, or what they do with the event. It simply places a message on a shared channel and moves on.
Platform Events and Change Data Capture both follow this model in Salesforce. For example, when an order is approved, Apex can publish an Order_Ready__e Platform Event. A MuleSoft integration might subscribe to that event to notify the warehouse, while a separate Flow subscribes to the same event to send a confirmation email. Neither subscriber knows about the other, and the publishing code does not wait for either of them to finish.
This decoupling lets you add or remove subscribers without changing the publisher, and each subscriber processes the event independently in its own transaction.
A single org might use multiple patterns: request/response callouts for real-time lookups, fire-and-forget for trigger-based notifications, pub/sub for cross-system event processing, and a hub-and-spoke middleware layer tying it all together.
This article focuses on the patterns and tools you’ll implement directly in Apex: request/response callouts, fire-and-forget via async Apex, custom inbound APIs, and publish/subscribe with Platform Events and Change Data Capture.
🔐 Named Credentials and External Credentials
Section titled “🔐 Named Credentials and External Credentials”When Salesforce calls another system, it needs an endpoint and often an API key, bearer token, client secret, or certificate. Hardcoding those details in Apex ties the code to one environment and can expose secrets through source control, copied code, or logs.
If a leaked key is still valid, someone can call the provider as the integration. Rotating it won’t remove old copies from commit history. Named Credentials and External Credentials hold connection details in Setup and control who can use them.
Before a callout runs, Salesforce needs to know two things:
- Salesforce must know that the external endpoint is allowed.
- Salesforce must know how to authenticate to that external system.
That’s what Named Credentials, External Credentials, and Principals are for. These are three related Setup records that work together:
- A Named Credential represents the external service. It stores the base URL of the endpoint you want to call and points to an External Credential for authentication. This is the name you reference in Apex with the
callout:prefix. - An External Credential defines how Salesforce authenticates to that service — for example, OAuth 2.0 Client Credentials, a custom HTTP header with an API key, or JWT. It is separate from the Named Credential so that the same authentication configuration can be reused across multiple endpoints if needed.
- A Principal lives under an External Credential and represents the actual identity Salesforce authenticates as. For a shared integration this is typically one named principal that all users share. The actual credentials (tokens, API keys, certificates) are stored securely on the principal record, never in Apex. Access to the Named Credential is also controlled at the principal level: you grant a permission set access to a specific principal, so only users or processes assigned that permission set can make callouts using it.
You configure all three in Setup before your Apex code runs, usually by searching for Named Credentials or External Credentials in the Setup Quick Find box.
The separation also helps across environments. A sandbox can call a test endpoint while production calls the real service, with the same Apex code in both places. You can change a URL or rotate a key in Setup without redeploying that code.
Without a Named Credential, Apex callouts require a Remote Site Setting to approve the external endpoint.
With the Named Credential configured in Setup, Apex references it by name using the callout: prefix:
req.setEndpoint('callout:Customer_API/v1/customers');The callout: prefix resolves Customer_API to the configured URL and authentication at runtime.
At a high level, the setup looks like this:
-
Create the External Credential and choose the authentication protocol, such as OAuth 2.0, JWT, or a custom header-based scheme.
-
Create the Principal under that External Credential and enter the credential details Salesforce will use, such as OAuth client details, an API key, or a certificate.
-
Create the Named Credential with the base endpoint URL, then connect it to the External Credential.
-
Grant Permission Set Access by adding External Credential Principal Access for the principal to the permission set used by your integration user, or by the user context your Apex runs under.
The exact setup depends on the external system. A simple API might use a named principal with a shared API identity. A user-specific integration might use per-user authentication so each Salesforce user connects as themselves.
For the rest of this article, assume we have a Named Credential called Customer_API pointing at an external customer service.
🔑 What Happens Under the Hood: OAuth and Token Management
Section titled “🔑 What Happens Under the Hood: OAuth and Token Management”Named Credentials abstract authentication, but understanding what they do behind the scenes helps when troubleshooting failures or designing new integrations.
Many external APIs use OAuth 2.0 for authentication. Instead of sending a username and password with every request, the calling system obtains a short-lived access token and sends that token with API requests. Most APIs expect the token in an Authorization header, although the exact transport depends on the external system. When the token expires, a refresh token can be used to get a new one without re-prompting the user.
When an External Credential uses OAuth, Salesforce can handle the token work for you: requesting tokens, storing them securely, refreshing or re-requesting them when they expire, and adding the right authentication details to outbound callouts. Two common OAuth patterns you’ll encounter are:
| Flow | How It Works | When to Use |
|---|---|---|
| Client Credentials | Salesforce authenticates as an application using a client ID and secret, then receives an access token. No user interaction required. | System-to-system integrations where Salesforce acts as itself (e.g., calling a warehouse API with a shared service identity) |
| Authorization Code | A user is redirected to the external system to log in and grant permission. Salesforce stores the resulting tokens for that user. | Per-user integrations where each Salesforce user connects as themselves (e.g., connecting to a user’s Google or Microsoft account) |
The lifecycle looks like this:
- First request: The External Credential’s principal has no valid access token. Salesforce uses the configured OAuth flow to obtain one. Some flows also return a refresh token.
- Subsequent requests: Salesforce attaches the stored access token to outbound callouts automatically.
- Token expiry: When the access token expires, Salesforce refreshes it if a refresh token is available, or obtains a new access token using the configured flow when the external system supports that pattern. Your Apex code does not manage this.
- Refresh or re-authentication failure: If Salesforce cannot obtain a valid token, the callout fails and the admin or user must re-authenticate or update the principal configuration.
As a developer, you rarely manage tokens in Apex code. The key takeaway is that Named Credentials handle token acquisition, storage, refresh, and injection into your requests. If you find yourself manually storing tokens in custom settings or custom objects, that’s usually a sign you should be using a Named Credential instead.
To practise the setup path, the Quick Start: Create HTTP Callouts with Flow Builder Trailhead project walks through creating credentials for HTTP callouts. It uses Flow rather than Apex, but the Named Credential, External Credential, principal, and permission set concepts are the same ones Apex callouts rely on.
📤 Outbound REST Callouts
Section titled “📤 Outbound REST Callouts”An outbound callout is Salesforce making an HTTP request to another system: fetching data, sending a notification, or triggering a process on the other side. In the previous section, you set up Named Credentials to store the endpoint and authentication securely. Now you’ll write the Apex that actually makes the call.
Apex provides three core classes for this:
| Class | Purpose |
|---|---|
HttpRequest |
Build the request: endpoint, method, headers, body, timeout |
Http |
Send the request |
HttpResponse |
Read the status code, headers, and body returned by the external system |
Here’s a simple service class that fetches a customer profile from an external API:
public with sharing class CustomerApiClient {    public class CustomerResponse {        public String externalId;        public String status;        public String tier;    }
    public static CustomerResponse fetchCustomer(String externalCustomerId) {        HttpRequest req = new HttpRequest();        req.setEndpoint(            'callout:Customer_API/v1/customers/' +            EncodingUtil.urlEncode(externalCustomerId, 'UTF-8')        );        req.setMethod('GET');        req.setHeader('Accept', 'application/json');        req.setTimeout(10000);
        HttpResponse res = new Http().send(req);
        if (res.getStatusCode() == 404) {            return null;        }
        if (res.getStatusCode() < 200 || res.getStatusCode() >= 300) {            throw new CustomerApiException(                'Customer API failed with status ' + res.getStatusCode() + ': ' + res.getBody()            );        }
        return (CustomerResponse) JSON.deserialize(res.getBody(), CustomerResponse.class);    }
    public class CustomerApiException extends Exception {}}
There are a few important details in this example:
- The endpoint starts with
callout:Customer_API, so Apex uses the Named Credential. EncodingUtil.urlEncodeprotects the URL if the external ID contains spaces or special characters.req.setTimeout(10000)sets a 10-second timeout. Salesforce’s default callout timeout is also 10 seconds, but setting it explicitly makes the design obvious.- The response status code is checked before parsing the body.
- JSON is deserialized into a strongly typed wrapper class rather than a loose
Map<String, Object>.
🧾 Sending JSON with POST
Section titled “🧾 Sending JSON with POST”To send data to an external API, create a request wrapper, serialize it to JSON, and set the HTTP method to POST, PUT, or PATCH depending on the API contract.
public with sharing class WarehouseNotificationClient {    public class ShipmentRequest {        public String orderNumber;        public Id accountId;        public Decimal totalAmount;    }
    public static void notifyWarehouse(Order orderRecord) {        ShipmentRequest body = new ShipmentRequest();        body.orderNumber = orderRecord.OrderNumber;        body.accountId = orderRecord.AccountId;        body.totalAmount = orderRecord.TotalAmount;
        HttpRequest req = new HttpRequest();        req.setEndpoint('callout:Warehouse_API/v1/shipments');        req.setMethod('POST');        req.setHeader('Content-Type', 'application/json');        req.setBody(JSON.serialize(body));
        HttpResponse res = new Http().send(req);
        if (res.getStatusCode() != 202) {            throw new WarehouseApiException('Warehouse API returned HTTP ' + res.getStatusCode());        }    }
public class WarehouseApiException extends Exception {}}🔩 Callout Limits and Design Rules
Section titled “🔩 Callout Limits and Design Rules”Plan callouts around these platform limits:
- You can make up to 100 callouts per transaction.
- The maximum cumulative timeout for all callouts in one transaction is 120 seconds.
- The default timeout is 10 seconds if you don’t set one.
- The maximum request or response size is 6 MB in synchronous Apex and 12 MB in asynchronous Apex.
- Triggers cannot make callouts directly; the callout must run asynchronously. Use Queueable or Batch Apex with
Database.AllowsCallouts, or@future(callout=true).
Rule of thumb: if a callout starts from user action and needs an immediate answer, keep it fast and synchronous. If it starts from a trigger, touches many records, or can wait a few seconds, push it to async Apex.
🧼 SOAP Callouts
Section titled “🧼 SOAP Callouts”Most modern APIs use REST with JSON, but you will still encounter SOAP (XML-based) services in older enterprise systems, government integrations, and certain Salesforce platform APIs like the Metadata API.
Instead of manually constructing HTTP requests, SOAP callouts in Apex typically use WSDL-to-Apex generated classes. You upload the external system’s WSDL file through Setup (Setup → Apex Classes → Generate from WSDL), and Salesforce creates Apex proxy classes that represent the service’s operations and data types. Your code then calls methods on those generated classes as if the external service were a local Apex class:
// Generated classes from WSDL import, names come from the WSDL itselfcalculatorServices.CalculatorPort calc = new calculatorServices.CalculatorPort();Double result = calc.add(5.0, 3.0);System.debug('Sum: ' + result); // 8.0The generated class handles XML serialization, SOAP envelope construction, and HTTP transport. You still need a Remote Site Setting (or Named Credential) for the endpoint URL, and all the same callout limits apply.
| Factor | REST | SOAP |
|---|---|---|
| Data format | JSON (lightweight, human-readable) | XML (verbose, schema-enforced) |
| Tooling in Apex | Manual HttpRequest / HttpResponse |
Auto-generated proxy classes from WSDL |
| Typical use cases | Modern APIs, webhooks, microservices | Legacy ERP systems, government services, Salesforce Metadata API |
| Contract definition | OpenAPI / Swagger (optional) | WSDL (mandatory, strict) |
| Recommendation | Default choice for new integrations | Use when the external system only offers SOAP |
The Apex Integration Services module on Trailhead walks through REST callouts, SOAP callouts, and exposing Apex web services with hands-on exercises you can complete in a Trailhead Playground.
📥 Inbound APIs: Standard APIs First
Section titled “📥 Inbound APIs: Standard APIs First”Inbound integration means an external system calls Salesforce. That might be a website creating a Lead, a billing platform updating an Account, or a middleware tool loading thousands of records overnight.
Before you write Apex, pause and ask whether a standard Salesforce API already does the job. If the external system only needs record access, standard APIs give you Salesforce-managed authentication, documented request patterns, versioning, limits, and security behaviour. That keeps your work focused on access, field mapping, and error handling instead of owning a custom endpoint.
| API | Use When |
|---|---|
| REST API | An external system needs straightforward create, read, update, or delete access to Salesforce records |
| Composite API | One request needs to perform several related record operations, such as creating an Account and Contact together |
| Bulk API 2.0 | The integration needs to load, update, or extract large data volumes asynchronously |
| UI API | A custom front end needs Salesforce record data shaped by UI metadata, such as layouts, picklist values, field labels, or record defaults |
For hands-on practice with Salesforce’s standard APIs, use Postman against a Trailhead Playground in the Quick Start: Connect Postman to Salesforce project. This helps you see the OAuth flow, REST URLs, request bodies, and API responses before deciding whether custom Apex is needed.
If all the external system needs to do is create an Account, update a Case, or sync a batch of records, standard APIs are usually better than custom Apex. They respect the platform security model, avoid extra Apex test and deployment work, and reduce the amount of custom behaviour future developers have to understand.
If an existing integration still signs in with SOAP login() or the OAuth username-password flow, plan its move now: the runbook for retiring SOAP login and legacy auth covers finding and migrating those callers.
Use custom Apex REST when the integration needs Salesforce to expose a business operation, not just raw record access.
Good reasons to write custom Apex REST include:
- Validating business rules across several objects before committing any changes.
- Orchestrating related records when standard Composite API cannot express the sequencing, defaults, or rollback behaviour cleanly.
- Hiding internal Salesforce object and field names behind a stable, purpose-built API contract.
- Exposing a business operation, such as “submit a support request” or “start a renewal”, instead of giving the caller direct object DML access.
🔧 Custom APIs with Apex REST
Section titled “🔧 Custom APIs with Apex REST”Apex REST is the custom code option for inbound integrations. It lets you expose an Apex class as a REST endpoint under /services/apexrest/, receive a request from an external system, run Salesforce business logic, and return a controlled response.
Use it when the caller should invoke a business process rather than directly create or update Salesforce records. A good Apex REST endpoint should have a narrow purpose, a versioned URL, a clear request shape, and a response that does not expose more Salesforce internals than the caller needs.
The main pieces are:
| Piece | Purpose |
|---|---|
@RestResource |
Exposes the class as an Apex REST resource |
urlMapping |
Defines the path after /services/apexrest/, often with a version like /v1/... |
@HttpGet, @HttpPost, @HttpPatch, @HttpDelete |
Maps Apex methods to HTTP verbs |
| Wrapper classes | Define the request and response contract |
RestContext.response |
Lets you set HTTP status codes such as 201 or 400 |
Here’s a simplified endpoint that lets an external system submit a support request. It validates the request, creates a Case, and returns a controlled response object:
@RestResource(urlMapping='/v1/support-requests/*')global with sharing class SupportRequestApi {    global class RequestBody {        public String externalReference;        public String customerEmail;        public String subject;        public String description;    }
    global class ResponseBody {        public String caseId;        public String status;        public String message;    }
    @HttpPost    global static ResponseBody createCase(RequestBody requestBody) {        RestResponse response = RestContext.response;        ResponseBody result = new ResponseBody();
        if (            requestBody == null ||            String.isBlank(requestBody.externalReference) ||            String.isBlank(requestBody.customerEmail) ||            String.isBlank(requestBody.subject)        ) {            response.statusCode = 400;            result.status = 'Error';            result.message = 'externalReference, customerEmail, and subject are required.';            return result;        }
        Case newCase = new Case(            SuppliedEmail = requestBody.customerEmail,            Subject = requestBody.subject,            Description = requestBody.description,            Origin = 'API',            External_Reference__c = requestBody.externalReference        );
        insert newCase;
        response.statusCode = 201;        result.caseId = newCase.Id;        result.status = 'Created';        result.message = 'Support request created successfully.';        return result;    }}
Because the class uses @RestResource(urlMapping='/v1/support-requests/*'), the external system calls it at a URL like this:
https://your-domain.my.salesforce.com/services/apexrest/v1/support-requests/The JSON body must match the parameter name and wrapper structure expected by the Apex method:
{ "requestBody": { "externalReference": "EXT-10045", "customerEmail": "customer@example.com", "subject": "Order arrived damaged", "description": "The customer reported that the package was damaged in transit." }}🔒 Apex REST Security
Section titled “🔒 Apex REST Security”Apex REST classes let external callers run server-side code, so their access checks determine which operations those callers can perform.
Important security rules:
- Use
with sharingunless you have a deliberate reason not to. - Validate required fields and reject malformed requests early.
- Do not expose internal implementation details in error messages.
- Check CRUD and field-level security when your endpoint is acting on behalf of a user.
- Prefer narrow, versioned URLs like
/v1/support-requests/*rather than vague endpoints like/doStuff/*. - Avoid returning raw sObjects if you need stable API contracts. Return wrapper classes instead.
🔁 Retrying and Logging Integration Failures
Section titled “🔁 Retrying and Logging Integration Failures”Integrations fail in ways normal Apex code does not. A request might time out, the other system might be down for maintenance, or an API might reject a payload that Salesforce thought was valid. In production, the goal is not just to throw an exception. You need enough information to understand what happened, decide whether the work should be retried, and prevent duplicate side effects if the same request is sent again.
A common Salesforce pattern is to write failed integration work to a custom log object, then have Queueable or Scheduled Apex retry the records that are safe to try again. The log should capture the operation, target system, a safe failure category or HTTP status, a record or correlation reference, and the attempt count. Set a next retry time only after classifying the failure. Avoid copying full payloads into a broadly visible custom object: they can contain personal data, credentials, or fields your support team should not see.
public with sharing class IntegrationLogger { public static void logFailure( String systemName, String operation, String safeMessage, String relatedRecordId, Integer attemptNumber ) { insert new Integration_Log__c( Source_System__c = systemName, Operation__c = operation, Status__c = 'Failed', Message__c = safeMessage.left(255), Related_Record_Id__c = relatedRecordId, Attempt_Number__c = attemptNumber ); }}The callout client reports a safe HTTP status without copying the provider’s response body. A caller can log that status or a transport failure with the Order ID:
try { WarehouseNotificationClient.notifyWarehouse(orderRecord);} catch (WarehouseNotificationClient.WarehouseApiException ex) { IntegrationLogger.logFailure( 'Warehouse API', 'Create Shipment', ex.getMessage(), String.valueOf(orderRecord.Id), 1 );} catch (CalloutException ex) { IntegrationLogger.logFailure( 'Warehouse API', 'Create Shipment', 'Callout transport failure', String.valueOf(orderRecord.Id), 1 );}The log records failed work for follow-up; the caller should not treat that shipment as created. The HTTP status helps distinguish a temporary failure from a request that needs a data or credential fix. A retry process can set Next_Retry_At__c for transient failures after making that distinction.
Not every failure should be retried:
| Failure | Usually Retry? | Why |
|---|---|---|
Timeout, connection reset, 503 Service Unavailable |
Yes | The external system may recover without any Salesforce data change |
429 Too Many Requests |
Yes, later | The API is asking you to slow down, often with a retry window |
400 Bad Request |
No | The payload is usually invalid and will fail again until corrected |
401 Unauthorized or 403 Forbidden |
No, until fixed | Authentication or permissions need admin attention |
🛟 Designing for Safe Retries (Idempotency)
Section titled “🛟 Designing for Safe Retries (Idempotency)”When you retry a callout, there is one awkward possibility: the first request may have succeeded, but Salesforce never received the response. If you send the same operation again and the external system processes it again, you can create duplicate orders, send duplicate payments, or trigger duplicate notifications.
The design goal is idempotency. An idempotent operation is safe to receive more than once because repeated requests produce the same result instead of creating new side effects.
Outbound: Send an idempotency key
Section titled “Outbound: Send an idempotency key”Many APIs accept a unique request identifier in a header like Idempotency-Key or X-Request-Id. If the external system receives two requests with the same key, it can return the result of the first request without processing the operation again:
String idempotencyKey = 'CreateCharge-' + orderRecord.Id;
HttpRequest req = new HttpRequest();req.setEndpoint('callout:Payment_API/v1/charges');req.setMethod('POST');req.setHeader('Content-Type', 'application/json');req.setHeader('Idempotency-Key', idempotencyKey);req.setBody(JSON.serialize(paymentBody));
Use a deterministic key, such as the Salesforce record ID plus the operation name, so every retry sends the same value. Do not include Datetime.now() or a random UUID if the value is regenerated for each attempt, because that makes every retry look like a new request.
Where the key goes is up to the provider. This example sends it in a header, while Part 5’s reimbursement client sends it in the request body as clientReference, because that contract asks for it there. Neither is more correct, so follow the provider’s API documentation.
Inbound: Check before you create
Section titled “Inbound: Check before you create”Inbound APIs need the same thinking. An external system might retry a webhook or API request if it does not receive a response from Salesforce quickly enough. Guard against duplicates by requiring an external reference and checking for an existing record before inserting.
In the earlier SupportRequestApi.createCase method, insert this block after the required-field validation and before Case newCase = new Case(...). It uses the response and result variables already declared in that method; when no match is found, execution continues into the existing Case creation code:
// Check if this external reference already created a CaseList<Case> existing = [    SELECT Id FROM Case    WHERE External_Reference__c = :requestBody.externalReference    LIMIT 1];
if (!existing.isEmpty()) {    // Return the existing Case instead of creating a duplicate    response.statusCode = 200;    result.caseId = existing[0].Id;    result.status = 'Already Exists';    result.message = 'A case with this reference already exists.';    return result;}
This pattern works best when External_Reference__c is marked unique, so the database enforces the rule even if two requests arrive close together. The Apex check makes the endpoint friendly to repeat callers; the unique field protects the data model.
📣 Platform Events
Section titled “📣 Platform Events”Platform Events are custom application messages you define in your org. Think of a Platform Event as a message type: you create an event definition whose API name ends in __e, then add fields for the payload you want each message to carry, such as an order ID, an account ID, or a short status string. Each published event describes a fact or milestone, not a full record snapshot.
When Apex, Flow, or an API publishes an event, Salesforce places that message on the event bus. Subscribers such as Apex triggers, Flow, Pub/Sub API clients, CometD clients, and middleware can react to the message in their own processing path. The publisher does not need to know who is listening, and it does not wait for every subscriber to finish, which is what makes the pattern useful for integrations that should stay loosely coupled.
For example, an order process might publish an Order_Ready__e event when an order is ready for fulfilment. The publishing code does not need to know whether the subscriber is MuleSoft, Heroku, an ERP, a warehouse system, or another Salesforce automation.
🧬 How Platform Events differ from standard objects
Section titled “🧬 How Platform Events differ from standard objects”Platform Events use sObject-like syntax in Apex, but they behave very differently from sObject records. Understanding these differences before you write code will save you from some common surprises.
- Not stored as queryable records. You cannot write
SELECT Id FROM Order_Ready__e. Platform Events are never available through SOQL. Events are retained on the event bus for up to 72 hours so that subscribers can replay missed messages, but they are not rows in a database table. - Immutable after publishing. You cannot update or delete a published event. If you need to correct information, publish a new event with the corrected data. Subscribers should be designed to handle corrections or superseding messages.
- Publish behaviour controls transaction coupling. Each Platform Event definition has a publish behaviour setting: Publish After Commit or Publish Immediately. New event definitions default to Publish Immediately, so check the setting rather than assuming. Publish After Commit sends the event only if the publishing transaction commits; Publish Immediately can deliver it before that transaction finishes and still delivers it if the transaction later rolls back.
- No record ownership or sharing. Platform Events have no
OwnerId, no sharing rules, and no record-level access controls. Access is managed through permissions on the event definition itself: you grant Read access to profiles or permission sets that need to subscribe, and Create access to those that need to publish. - Replay support. Each published event receives a sequential
ReplayId. Subscribers that disconnect and reconnect can resume from a specificReplayIdto pick up missed events within the retention window, rather than starting from scratch. This is how external subscribers such as Pub/Sub API clients recover after a network interruption. - Daily allocation limits apply. Your org has a daily limit on the number of Platform Events that can be published, based on your Salesforce edition and any add-on allocations. Monitor usage through
PlatformEventUsageMetricor the Event Usage page in Setup. When the limit is reached, publish calls fail and return errors in theDatabase.SaveResult. If your code does not check that result, the failure is effectively silent, so monitoring matters in production. Delivery to subscribers has its own allocation too; a real platform event delivery incident shows how one open subscriber used it up.
These object-level differences also change how Platform Events behave as an integration tool compared to the request/response callouts and custom APIs covered earlier in this article:
- Asynchronous and separately transactional. The publisher continues without waiting for subscribers, and each subscriber processes delivery in a separate transaction. A REST callout instead waits for a response.
- Loosely coupled by design. The publisher does not know who the subscribers are, how many exist, or whether any are listening at all. You can add, remove, or change subscribers without modifying the publishing code. That flexibility is the main advantage over point-to-point callouts, but it also means the publisher has no control over what happens after the event is published.
- Duplicates are possible, and delivery is not guaranteed. Salesforce uses at-least-once publishing, so internal publishing retries can produce duplicate events. In rare cases, an event cannot be persisted and is never delivered or recoverable. Subscriber logic should still be idempotent: processing the same event twice should not create duplicate records or trigger duplicate side effects. See Salesforce’s publishing considerations.
- No synchronous feedback loop. A REST callout gives you a status code and response body you can act on immediately. Publishing a Platform Event from Apex returns a
Database.SaveResult; success confirms the event was queued for publication, not that it was published or processed. That result cannot tell you whether a subscriber succeeded, failed, or even exists. If the integration requires confirmation that the downstream system processed the message, use a request/response callout or design a separate callback or acknowledgement event. - Subscriber failures do not roll back the publisher. If a subscriber’s trigger fails, the publisher’s transaction is unaffected. Recovery depends on the trigger’s code: throw
EventBus.RetryableExceptionto retry a batch after a transient failure, or usesetResumeCheckpoint()to resume after the last successfully checkpointed event if an unhandled exception occurs. Salesforce compares these two mechanisms. The publisher needs a separate monitoring or alerting mechanism to learn about subscriber failures.
In practice, this means Platform Events are strongest for fire-and-forget notifications, cross-system broadcasting, and decoupling systems that do not need to coordinate within the same transaction. They are unsuitable for validation-critical flows where the publisher must confirm the subscriber’s outcome before proceeding.
📮 Publishing a Platform Event from Apex
Section titled “📮 Publishing a Platform Event from Apex”In Apex, a Platform Event looks like an sObject, but you publish it with EventBus.publish instead of inserting it with DML. The Database.SaveResult tells you whether Salesforce accepted the event for publishing; it does not confirm publication or subscriber processing.
The snippet below assumes you defined a Platform Event Order_Ready__e with fields named OrderId__c, OrderNumber__c, AccountId__c, and Status__c whose types are compatible with the values you assign (for example Text fields carrying IDs and text, or lookups where supported). It also uses the standard Order sObject, which must be available in your org.
public with sharing class OrderEventPublisher {    public static void publishOrderReady(Order orderRecord) {        if (orderRecord == null) {            return;        }
        Order_Ready__e eventMessage = new Order_Ready__e(            OrderId__c = orderRecord.Id,            OrderNumber__c = orderRecord.OrderNumber,            AccountId__c = orderRecord.AccountId,            Status__c = 'Ready for Fulfilment'        );
        Database.SaveResult result = EventBus.publish(eventMessage);
        if (!result.isSuccess()) {            for (Database.Error error : result.getErrors()) {                System.debug(LoggingLevel.ERROR, 'Platform Event publish failed: ' + error.getMessage());            }        }    }}
Salesforce queues an accepted publish request and publishes it asynchronously. Once successfully published, the message is available to subscribers on the event bus. In the org, subscribers are usually Apex triggers on the event object or platform event–triggered Flows. Outside the org, clients subscribe through the Pub/Sub API or the CometD-based Streaming API. Middleware such as MuleSoft uses one of these APIs rather than a separate Salesforce subscriber channel.
🎧 Subscribing with an Apex Trigger
Section titled “🎧 Subscribing with an Apex Trigger”To handle a Platform Event inside Salesforce with code, write an after insert trigger on the event object. This is the only trigger context Platform Events support: there is no before insert, no updates, and no deletes. That makes sense once you remember that events are immutable messages, not database records. There is nothing to update or delete, and no “before” stage where you could modify or reject the event because it has already been published to the bus. The trigger exists purely to react to delivery.
The example below shows a subscriber trigger on Order_Ready__e that reacts to each delivered event by writing a log record. Because Salesforce delivers events in batches of up to 2,000, the trigger must handle multiple events per invocation, so it collects all log records into a list and inserts once.
trigger OrderReadyTrigger on Order_Ready__e (after insert) {    List<Integration_Log__c> logs = new List<Integration_Log__c>();
    for (Order_Ready__e eventMessage : Trigger.New) {        String orderLabel = eventMessage.OrderNumber__c != null            ? eventMessage.OrderNumber__c            : '(no order number)';
        logs.add(new Integration_Log__c(            Source_System__c = 'Order Event Bus',            Operation__c = 'Order Ready',            Status__c = 'Received',            Message__c = 'Received order ' + orderLabel,            Related_Record_Id__c = eventMessage.OrderId__c        ));    }
    if (!logs.isEmpty()) {        insert logs;    }}
Platform Event triggers behave differently from triggers on standard or custom objects:
- Separate transaction from the publisher. Each batch of delivered events runs in its own Apex transaction. If the subscriber trigger fails, it does not roll back the publisher’s work, and if the publisher’s transaction rolled back (with Publish Immediately), the subscriber may still fire.
- Batched delivery. A single trigger invocation can receive up to 2,000 event messages. You can lower the batch size per subscriber using
PlatformEventSubscriberConfigthrough the Metadata or Tooling API when smaller batches improve reliability or reduce lock contention. - Governor limits still apply. Even though the subscriber trigger runs asynchronously from the publisher, each batch it processes is a normal Apex transaction with the usual CPU, heap, DML, and query limits.
- Runs as Automated Process. By default, the trigger executes as the Automated Process user, not as the user who published the event. Set a different running user through the same
PlatformEventSubscriberConfig. Setup displays the configured user and batch size and lets you suspend or resume the subscription; the configuration guide covers the API steps. - No direct callouts. Apex cannot make HTTP callouts from inside a Platform Event trigger. If the subscriber needs to call an external system, enqueue a Queueable job (or use
@future) so the callout runs in a context that allows it.
If you want to make event-driven architecture more concrete, the Build an Instant Notification App Trailhead project walks through building a working notification app with Platform Events.
🔄 Change Data Capture
Section titled “🔄 Change Data Capture”Change Data Capture, usually shortened to CDC, is Salesforce’s built-in way to publish events when selected records change. If Platform Events are messages you design yourself, CDC messages are generated by Salesforce from normal record activity.
This solves a common integration problem: an external system needs to keep a copy of Salesforce data up to date. Without CDC, that system often has to poll the REST API every few minutes, compare timestamps, and guess what changed. With CDC, the external system subscribes to a stream of change events and reacts when Salesforce tells it that a record was created, updated, deleted, or undeleted.
CDC is enabled per object. When you enable it for an object such as Account, Salesforce starts publishing a change event for that object whenever matching record changes happen. The event is not a custom business message like Order_Ready__e; it is a record-change message generated by Salesforce that says, in effect, “this Account changed, here is what happened, and here are the relevant field values.”
For example, if CDC is enabled for Account, an external system can subscribe to:
/data/AccountChangeEventThe subscriber receives AccountChangeEvent messages when Account records change. Each event includes header information such as the changed record IDs and change type, plus field values based on the CDC configuration and the fields available in the event.
CDC is a strong fit when an external system already has, or can create, its own copy of Salesforce data and needs a reliable stream of ongoing changes. For a brand-new sync, integrations often do an initial data load first, then use CDC to keep that external copy current.
| Feature | Platform Events | Change Data Capture |
|---|---|---|
| Message shape | Custom event fields you define | Record-change event generated by Salesforce |
| Publisher | Apex, Flow, APIs, external systems | Salesforce record changes |
| Best for | Business events like “Order Ready” | Data sync like “Account changed” |
| Subscriber examples | Apex triggers, Flow, Pub/Sub API, CometD | Apex triggers, Pub/Sub API, CometD, external data platforms |
To practise CDC beyond the concept, the Change Data Capture Basics module walks through change event characteristics, subscriptions, Apex triggers, and testing.
🧪 Testing Integration Code
Section titled “🧪 Testing Integration Code”One of the first things you’ll notice when writing tests for integration code is that Salesforce does not allow real HTTP callouts from inside a test. If you try to call an external API in a test method, Salesforce throws an error rather than letting the request go out. This is intentional: tests should be deterministic, fast, and self-contained. A test that depends on an external service will fail whenever that service is slow, down, or returns an unexpected response.
🎭 Mocking HTTP Callouts
Section titled “🎭 Mocking HTTP Callouts”Salesforce provides a mock framework that lets you register a fake HTTP response for the duration of a test. When your code calls new Http().send(req), Salesforce intercepts the request and returns whatever your mock class provides, without any network activity. You control exactly what status code, headers, and body your code sees, which makes it straightforward to test both the happy path and error handling.
The key method is Test.setMock. You call it before the code under test runs, passing in the interface type (HttpCalloutMock.class) and an instance of a class that implements that interface.
To implement HttpCalloutMock, you write a class with a single respond method. Salesforce calls that method instead of making a real HTTP request, and whatever HttpResponse object you return is what your production code sees. A common pattern is to define the mock as a private inner class inside the test class, so the test and its mock live together and neither pollutes the outer namespace.
In this example, CustomerSuccessMock returns a 200 response with a JSON body that matches the shape CustomerApiClient expects. The Assert.isTrue inside respond verifies that the production code is actually using the Named Credential, not a hardcoded URL. The test method then calls the real production code inside Test.startTest() and Test.stopTest(), and asserts that the deserialized response fields match what the mock returned:
@IsTestprivate class CustomerApiClientTest {    private class CustomerSuccessMock implements HttpCalloutMock {        public HttpResponse respond(HttpRequest req) {            Assert.isTrue(                req.getEndpoint().startsWith('callout:Customer_API'),                'The service should use the Customer_API Named Credential.'            );
            HttpResponse res = new HttpResponse();            res.setStatusCode(200);            res.setHeader('Content-Type', 'application/json');            res.setBody('{"externalId":"C-123","status":"Active","tier":"Gold"}');            return res;        }    }
    @IsTest    static void testFetchCustomerSuccess() {        Test.setMock(HttpCalloutMock.class, new CustomerSuccessMock());
        Test.startTest();        CustomerApiClient.CustomerResponse result = CustomerApiClient.fetchCustomer('C-123');        Test.stopTest();
Assert.areEqual('Active', result.status); Assert.areEqual('Gold', result.tier); }}🔌 Testing Apex REST Endpoints
Section titled “🔌 Testing Apex REST Endpoints”Testing a custom Apex REST endpoint works differently. There is no mock interface to implement because the external system never actually calls into your test. Instead, you call the Apex method directly, supplying its arguments and any RestContext objects the method uses.
RestContext is a static object that Apex REST methods read from when they want to inspect the incoming request. In a real API call, Salesforce populates it for you from the HTTP request headers, URL, and body. In a test, you populate it yourself. Once it is set, your production code can read from it exactly as it would in production, and you can inspect RestContext.response afterward to verify that the endpoint set the right status code.
The earlier SupportRequestApi.createCase method accepts a RequestBody parameter and writes to RestContext.response. The test below creates those two objects and calls the method directly. After Test.stopTest(), it checks both the return value and the status code. This tests the method’s behaviour; a real HTTP request is still needed to check Salesforce’s mapping of incoming JSON to that parameter:
@IsTeststatic void testCreateSupportRequest() {    SupportRequestApi.RequestBody requestBody = new SupportRequestApi.RequestBody();    requestBody.externalReference = 'EXT-TEST-10045';    requestBody.customerEmail = 'customer@example.com';    requestBody.subject = 'Need help';    RestContext.response = new RestResponse();
    Test.startTest();    SupportRequestApi.ResponseBody result = SupportRequestApi.createCase(requestBody);    Test.stopTest();
    Assert.areEqual('Created', result.status);    Assert.areEqual(201, RestContext.response.statusCode);    Assert.isNotNull(result.caseId);}
📻 Testing Platform Event Subscribers
Section titled “📻 Testing Platform Event Subscribers”Testing a Platform Event subscriber is different again because you are not mocking an HTTP response or constructing an inbound REST request. Instead, you are testing the subscriber’s reaction to a message on the event bus. The test creates a real Platform Event record, publishes it, and then checks whether the subscriber logic did what it was supposed to do.
The important detail is timing. In production, Platform Event subscribers run asynchronously after Salesforce accepts the event and delivers it on the bus. In a test method, that delivery does not happen automatically while your assertions are waiting. Test.getEventBus().deliver() tells Salesforce to deliver the queued test events immediately so the subscriber trigger runs before the test finishes.
In the example below, the test publishes an Order_Ready__e event with the field values the subscriber expects. After calling deliver(), it queries Integration_Log__c and verifies that the trigger created exactly one log record. That means the test is checking the subscriber’s observable outcome, not just that the event was published successfully:
@IsTeststatic void testOrderReadyEventSubscriber() {    Order_Ready__e eventMessage = new Order_Ready__e(        OrderId__c = '801000000000001AAA',        OrderNumber__c = '00001001',        Status__c = 'Ready for Fulfilment'    );
    Test.startTest();    EventBus.publish(eventMessage);    Test.getEventBus().deliver();    Test.stopTest();
    List<Integration_Log__c> logs = [        SELECT Id, Status__c, Message__c, Related_Record_Id__c        FROM Integration_Log__c        WHERE Operation__c = 'Order Ready'    ];    Assert.areEqual(1, logs.size());    Assert.areEqual('Received', logs[0].Status__c);    Assert.areEqual('Received order 00001001', logs[0].Message__c);    Assert.areEqual('801000000000001AAA', logs[0].Related_Record_Id__c);}
Part 7 — Testing & Deployment goes deeper on test structure, assertions, test data, and deployments; it links back here for these integration testing examples instead of repeating them.
🔍 Monitoring and Operating Integrations
Section titled “🔍 Monitoring and Operating Integrations”In production, integrations fail in ways users cannot always see: an external API times out, a queueable job retries in the background, a subscriber fails after the original transaction has already finished, or a third-party system accepts a request but processes it incorrectly. If you cannot see those failures clearly, you end up debugging blind.
Good monitoring gives you a way to answer basic operational questions quickly: Did Salesforce send the request? Did the external system respond? Did the async job finish? Did the event subscriber run? Which records were affected, and what should be retried? That is what turns an integration from a code sample into something you can safely run in production.
Useful places to check:
- Debug Logs: Helpful during development, especially for callout status codes and response bodies.
- Apex Jobs: Check Queueable, Batch, and Scheduled jobs that run integration work in the background.
- Custom integration logs: Store request IDs, external IDs, status, retry count, and user-friendly error messages. The
IntegrationLoggerclass from the retry section earlier is a starting point for this. - PlatformEventUsageMetric: Monitor event publishing and delivery usage for Platform Events and CDC.
- External system logs: Always capture the correlation ID or request ID from the other system if it provides one.
You do not need a full observability platform on day one. Start with the custom log object and retry pattern from earlier in this article, add correlation IDs to your callouts, and expand your monitoring as the integration matures. For the org-wide side of the same job, such as background jobs, capacity, and recent configuration changes, Org Health & Monitoring sets out a monitoring cadence.
🚦 Which Salesforce Integration Pattern to Use
Section titled “🚦 Which Salesforce Integration Pattern to Use”With several options available, choose based on what the systems need from each other.
-
Does the external system just need Salesforce record data? Use the standard REST API, Composite API, or Bulk API before writing custom Apex.
-
Does Salesforce need to call another system and use the response immediately? Use a REST callout with a Named Credential, but keep it fast and handle errors clearly.
-
Does a trigger need to notify another system? Enqueue Queueable Apex and make the callout asynchronously.
-
Does Salesforce need to expose custom business logic? Use Apex REST, with versioned endpoints, wrapper classes, sharing, and explicit security checks.
-
Does another system need to react when something happens? Use Platform Events for business events or CDC for record-change events.
Here’s the quick decision table:
| Requirement | Recommended Pattern |
|---|---|
| Secure outbound endpoint and auth | Named Credential |
| Send data from Salesforce to an external REST API | Outbound REST callout |
| External system creates or updates records | Standard REST API or Composite API |
| External system invokes custom business logic | Apex REST |
| Publish a business event | Platform Event |
| Sync changed Salesforce records externally | Change Data Capture |
| Process lots of outbound records | Batch Apex with Database.AllowsCallouts |
| Retry failed work later | Queueable or Scheduled Apex with custom logging |
🧱 Apply the patterns: close the reimbursement loop
Section titled “🧱 Apply the patterns: close the reimbursement loop”Part 5’s reimbursement build sends approved Expense Claims to a finance system through callout:Payment_API, and it left two things for this chapter. The first is the credential behind that name: until it exists, every real callout fails. The second is what happens after a claim reaches Paid. A confirmed payment can still come back days later, for example when the employee’s bank account has closed, and Salesforce needs to hear about it.
This build finishes both halves on the same Expense Claim. You’ll configure the outbound credential Salesforce uses to call finance, then build a small inbound API that finance calls when a paid reimbursement is returned. A returned payment moves the claim to the Payment Review status Part 5 added. One new field keeps finance’s return reference separate from the explanation in Reimbursement_Error__c, so Salesforce can recognise the same notice if finance retries it. The Order and Case examples earlier in this chapter stay as they are; this section applies the same techniques to the claim.
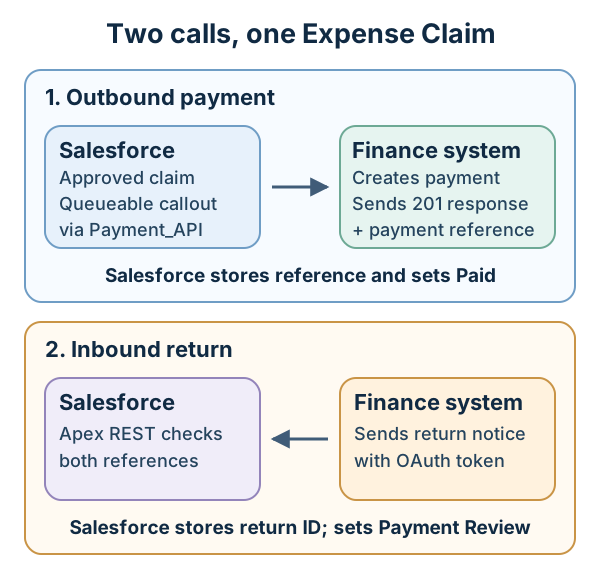
Both directions use the OAuth 2.0 client credentials flow, but each needs its own client ID and secret, issued by the system being called:
| Direction | What happens | Where the caller keeps its credential | Issued by |
|---|---|---|---|
| Outbound | Salesforce asks finance to pay a claim | On an External Credential principal in Salesforce | Finance, which can revoke it |
| Inbound | Finance tells Salesforce a payment was returned | In finance’s own system, with requests running as a dedicated integration user | Salesforce, through an External Client App it can revoke |
Because the two credentials are independent, a leaked secret or a departing admin means rotating one direction without touching the other.
🪪 Configure the Payment API credential
Section titled “🪪 Configure the Payment API credential”The fictional finance provider from Part 5 uses the client credentials flow from earlier in this chapter. Finance registers Salesforce as a client and issues it a client ID and secret. The External Credential sends those to finance’s token endpoint, receives a short-lived access token, and adds it to each callout, fetching a new one when it expires. Your practice org has no finance system, so use placeholder values. Real callouts still fail until a provider’s details replace them, and none of the tests in this series make a real callout.
-
Create the External Credential. In Setup, open Named Credentials, select the External Credentials tab, and click New. Use the label Payment API Auth and the name
Payment_API_Auth. Set Authentication Protocol to OAuth 2.0 and Authentication Flow Type to Client Credentials with Client Secret Flow. Set Identity Provider URL to finance’s token endpoint (https://payments.example.com/oauth/tokenworks as a practice placeholder). Leave Scope blank unless the provider documents one, then click Save. -
Add a principal under Principals. Click New and name it
FinanceService. Enter the Client ID and Client Secret finance issued. In a practice org, any placeholder strings will do. Client credentials principals are always named principals, so every permitted user shares one service identity. Click Save. -
Create the Named Credential. On the Named Credentials tab, click New. Use the label Payment API and the name
Payment_API, which is the name Part 5’scallout:Payment_APIresolves. Enter the provider’s base URL (https://payments.example.com) and select the Payment API Auth External Credential. Leave Generate Authorization Header selected, so Salesforce adds the access token to each request. Click Save. -
Grant access through a permission set. Create a permission set labelled Payment API Callout and click Save. Open External Credential Principal Access, click Edit, and add the
Payment_API_Auth - FinanceServiceprincipal. Click Save. Then open Object Settings, select User External Credentials, click Edit, select Read, and click Save. Only users with this permission set can call finance through the credential. Assign it to the users who approve claims and to the user who schedules the nightly sweep, because Part 5’s Queueable and batch make their callouts as those users.
The second grant is there because Salesforce stores the credential’s tokens in the User External Credentials object, and every user who makes a callout needs access to it. Many profiles include that access, but Minimum Access - Salesforce doesn’t. Without it, the callout fails with “You don’t have read permissions on the User External Credential object.” even though the principal access is in place.
📨 Accept returned-payment notices
Section titled “📨 Accept returned-payment notices”A returned payment starts on the finance side, so finance has to tell Salesforce. Before writing Apex, apply this chapter’s own test: could finance use the standard REST API to update the claim’s Status__c and Reimbursement_Error__c directly? It could, but then finance would need to know Salesforce’s field names and status values. Salesforce would also be trusting finance’s code to confirm that the returned payment is the one recorded on the claim, instead of checking the payment reference itself before changing anything. A narrow Apex REST endpoint gives Salesforce one business operation to control: record a returned payment. Finance’s integration user still needs Read access to the claim, because the endpoint looks it up as that user. It needs no Edit access, because the endpoint makes the status change itself after its checks pass.
In Object Manager, add Reimbursement_Return_Reference__c, Text(255) to Expense_Claim__c before you create the endpoint class below, because the class won’t save until the field exists. It stores finance’s return ID without cutting it down to fit an error message. Leave it blank until a return arrives. In this exercise, Part 5’s payment rejection leaves a claim in Payment Review with no return reference.
The contract is fictional, like Part 5’s, so here it is before the code:
- Finance sends
POST /services/apexrest/v1/reimbursement-returns/with a JSON body holdingclientReference(the claim’s record ID, the same key Part 5 sent),paymentReference(the reference finance returned when it paid),returnReference(finance’s own ID for the return), and an optionalreason. - Salesforce answers
200with the outcomeRecordedwhen the claim moves toPayment Review, and200withAlready recordedwhen the samereturnReferencearrives again. 400means the request is malformed or the return reference is longer than the field can store.404means no accessible claim matches the claim ID and payment reference exactly, including case.409means the claim matched but is notPaid, or a different return reference was already recorded.
Two of those answers carry the design. Answering a repeat with 200 tells finance to stop retrying because that exact return is already recorded. A different return ID gets 409 for investigation rather than being mistaken for a duplicate. Matching the claim ID and payment reference means the request must identify the payment Part 5 actually confirmed.
Create a new Apex class named ReimbursementReturnApi with this code:
@RestResource(urlMapping='/v1/reimbursement-returns/*')global without sharing class ReimbursementReturnApi {
    // The request contract agreed with finance. Unknown fields are ignored.    global class ReturnNotice {        public String clientReference;        public String paymentReference;        public String returnReference;        public String reason;    }
    global class Result {        public String outcome;        public String message;    }
    @HttpPost    global static Result recordReturn() {        RestRequest req = RestContext.request;        RestResponse res = RestContext.response;
        ReturnNotice notice;        try {            notice = req.requestBody == null                ? null                : (ReturnNotice) JSON.deserialize(req.requestBody.toString(), ReturnNotice.class);        } catch (JSONException ex) {            notice = null;        }        if (notice == null                || String.isBlank(notice.clientReference)                || String.isBlank(notice.paymentReference)                || String.isBlank(notice.returnReference)) {            return reply(res, 400, 'Rejected',                'clientReference, paymentReference, and returnReference are required.');        }        if (notice.returnReference.length() > 255) {            return reply(res, 400, 'Rejected', 'returnReference must be 255 characters or fewer.');        }
        Id claimId;        try {            claimId = Id.valueOf(notice.clientReference);        } catch (StringException ex) {            return reply(res, 400, 'Rejected', 'clientReference is not a record ID.');        }
        String paymentReference = notice.paymentReference;        List<Expense_Claim__c> claims = [            SELECT Id, Status__c, Reimbursement_Reference__c, Reimbursement_Return_Reference__c            FROM Expense_Claim__c            WHERE Id = :claimId              AND Reimbursement_Reference__c = :paymentReference            WITH USER_MODE            FOR UPDATE        ];        // SOQL matches text without regard to case, so check the reference exactly.        if (claims.isEmpty() || !claims[0].Reimbursement_Reference__c.equals(paymentReference)) {            // The same answer for an inaccessible claim or wrong reference, so the            // endpoint cannot be used to confirm which claim IDs exist.            return reply(res, 404, 'Not found', 'No accessible claim matches these references.');        }
        Expense_Claim__c claim = claims[0];        if (claim.Status__c == 'Payment Review') {            if (notice.returnReference.equals(claim.Reimbursement_Return_Reference__c)) {                return reply(res, 200, 'Already recorded', 'This return was already recorded.');            }            return reply(res, 409, 'Conflict',                'The claim is already in Payment Review for a different reason or return.');        }        if (claim.Status__c != 'Paid') {            return reply(res, 409, 'Conflict', 'The claim cannot record a return in its current state.');        }
        String reason = String.isBlank(notice.reason) ? 'no reason given' : notice.reason;        claim.Status__c = 'Payment Review';        claim.Reimbursement_Return_Reference__c = notice.returnReference;        claim.Reimbursement_Error__c = ('Payment returned: ' + reason).left(255);        // The caller can read the claim, but only this validated operation can change it.        update as system claim;
        return reply(res, 200, 'Recorded', 'The claim is now in Payment Review.');    }
    private static Result reply(RestResponse res, Integer statusCode, String outcome, String message) {        res.statusCode = statusCode;        Result result = new Result();        result.outcome = outcome;        result.message = message;        return result;    }}
There are a few important details in this example:
- No method parameters. The support-request endpoint earlier binds the body to a parameter, which makes the caller wrap its JSON in
{"requestBody": ...}. With no parameters, Apex REST leaves the raw body inRestContext.request.requestBody, so finance sends a flat JSON object and this class decides what a malformed body means. - The return ID tells a retry from a new return. The status alone can’t: a claim already in
Payment Reviewlooks the same whether finance is resending a return it already reported or reporting a different one. Comparing the incomingreturnReferencewith the storedReimbursement_Return_Reference__cseparates the two. A match is a retry and gets200 Already recorded; a mismatch gets409so someone investigates. - References match exactly. SOQL compares text without regard to case unless the field is unique and case-sensitive, so the query would find
PAY-0001for a notice aboutpay-0001. Apex’s==does the same for strings. Finance issued these references, and one in a different case isn’t the one it issued. So the endpoint reads the stored reference back and compares it withequals, and compares return IDs the same way. A notice with the wrong case gets404or409and changes nothing. FOR UPDATEstops two notices racing. The query locks the claim until this request finishes. If two notices for the same claim arrive together, the second waits, then reads the claim as the first left it (Payment Review) rather than the earlierPaidstate. Without the lock, both could readPaidand both record a return. If the second request waits too long for the lock, it fails with an unexpected error, which finance can retry.- User-mode read, deliberate system-mode write. The
WITH USER_MODEquery enforces the integration user’s object, field, and record access even though the class declareswithout sharing. After matching the payment and checking the state and return ID,update as systemcan write the claim without giving the caller direct Edit or record-level write access. Both declarations are intentional: the update is the one operation this endpoint is trusted to perform. Part 5 also writes payment-owned fields in system mode. - Unexpected failures return
500. A missing permission or a validation rule surfaces as an unhandled exception, which Apex REST returns as HTTP500. Finance will usually retry a5xx, which suits a brief lock or outage, but a permission fault will not fix itself, so it belongs in your monitoring. - The return ID survives a long reason.
Reimbursement_Return_Reference__cstoresRTN-0042, whileReimbursement_Error__cshowsPayment returned: Account closed. Support can use the return field to speak to finance even if the reason is truncated. Part 5’sExpenseClaimTriggerdoes not react to this update, because the claim is not becomingApproved.
🛂 Let the finance system in
Section titled “🛂 Let the finance system in”Finance uses the same OAuth 2.0 client credentials flow that Salesforce uses for the Payment API, with the roles swapped. This time Salesforce issues the client ID and secret, finance exchanges them with Salesforce for an access token, and every request runs as the integration user you name. New connected apps are restricted as of Spring ’26, so the app finance connects through is an External Client App.
Give that app a dedicated integration user rather than a person’s account, and grant the access this operation needs:
- API Enabled, so the user can call Salesforce APIs.
- Apex Class Access to
ReimbursementReturnApi, without which the user cannot call the endpoint. - Read, without Edit, on Expense Claim, with field Read access to
Status__c,Reimbursement_Reference__c, andReimbursement_Return_Reference__c. The user-mode query needs those fields; the system-mode update does not require the caller to edit them directly. - Read access to paid claims. If the Expense Claim sharing model is Private, create a public group named Finance Integration (
Finance_Integration) containing the integration user. Then, in Sharing Settings, add a criteria-based sharing rule on Expense Claim named Paid Claims for Finance (Paid_Claims_for_Finance):StatusequalsPaid, Payment Review, shared with Finance Integration, Read Only. The user-mode query only finds claims the integration user can read. The deliberately elevated update handles the state change after validation.
With this access, the same OAuth token can read the shared claims through Salesforce’s standard API, but it cannot use that API to edit their status. If your org grants the user Edit through another profile or permission set, remove that access before treating the endpoint as the only return path.
Every notice is an inbound API request, so it counts toward the org’s rolling 24-hour API request allocation. Returns are rare enough that this won’t matter here, but it is why a high-volume sender batches its updates or uses Bulk API 2.0 rather than calling once per record.
Create the External Client App (optional)
Section titled “Create the External Client App (optional)”You don’t need the app to complete this build, because the tests below play finance’s part. They call the endpoint directly, though, so they can’t prove the OAuth setup or the integration user’s permissions. To check those in your practice org, set up the app and send one request yourself. Create the integration user and its access from the list above first, because the app needs a user to run as.
-
Create the app. In Setup, open External Client App Manager and click New External Client App. Fill in the basic information, with a name such as Finance Returns and your email as the contact.
-
Enable OAuth for the client credentials flow. Under API (Enable OAuth Settings), select Enable OAuth. Enter a callback URL. This flow never redirects a browser, so a placeholder such as
https://localhost/callbackis fine. Add the Manage user data via APIs (api) scope, which covers Apex REST. Under Flow Enablement, select Enable Client Credentials Flow. If Require Proof Key for Code Exchange (PKCE) extension for Supported Authorization Flows is selected, clear it. Then click Create. -
Name the Run As user. On the app’s Policies tab, click Edit. Under OAuth Flows and External Client App Enhancements, confirm that Enable Client Credentials Flow is selected, and enter the integration user in Run As. Every token the app issues runs as this user, so the user’s permissions are the limits of what finance can do.
-
Copy the consumer key and secret. On the Settings tab, expand OAuth Settings and click Consumer Key and Secret. Salesforce may ask you to verify your identity first. The key is the client ID and the secret is the client secret. In a real integration, send them to finance through a secure channel, never in email or a ticket.
To check the whole path, request a token from your org’s My Domain URL. The client credentials flow doesn’t accept login.salesforce.com or test.salesforce.com:
POST https://<your-my-domain>.my.salesforce.com/services/oauth2/tokenContent-Type: application/x-www-form-urlencoded
grant_type=client_credentials&client_id=<consumer key>&client_secret=<consumer secret>
Then send a notice that can’t match anything, using the access_token from the response. Use the ID of any Expense Claim in your org, with a payment reference no claim has:
POST https://<your-my-domain>.my.salesforce.com/services/apexrest/v1/reimbursement-returns/Authorization: Bearer <access token>Content-Type: application/json
{"clientReference": "<an Expense Claim ID>", "paymentReference": "CHECK-ONLY", "returnReference": "RTN-CHECK"}
A 404 with the outcome Not found is the result you want. It means Salesforce accepted the token, let the integration user call the class, and ran the query, without changing any data. A 401 points at the token request or the app’s settings. If the request fails before it reaches the endpoint, check the user’s API Enabled and Apex Class Access first. Postman is an easy way to send both requests, and the Postman quick start earlier in this chapter covers the basics.
🔬 Test the return path
Section titled “🔬 Test the return path”These are unit tests of the endpoint’s logic. Each one builds the request finance would send as a RestRequest, puts it in RestContext, and calls the method directly, the same technique as the Apex REST test earlier in this chapter. Because that skips the HTTP layer, the tests check responses and record changes but not authentication or permissions. The optional External Client App check covers those. Four helpers keep each test focused on one outcome:
paidClaim()inserts a claim that is alreadyPaidwith the referencePAY-0001. Inserting it in that state is fine, because Part 5’s trigger only runs on update.notice()builds the JSON body finance would send for a claim and a payment reference.send()turns that body into JSON and passes it tosendRaw().sendRaw()puts a body inRestContextexactly as given, or no body at all when passednull, and calls the endpoint. Most tests go throughsend(), but malformed requests need bodies thatsend()can’t produce.
Create a test class named ReimbursementReturnApiTest, then run it:
@IsTestprivate class ReimbursementReturnApiTest {
    private static Expense_Claim__c paidClaim() {        Expense_Claim__c claim = new Expense_Claim__c(            Amount__c = 250,            Status__c = 'Paid',            Reimbursement_Reference__c = 'PAY-0001'        );        insert claim;        return claim;    }
    private static Map<String, Object> notice(Id claimId, String paymentReference) {        return new Map<String, Object>{            'clientReference' => claimId,            'paymentReference' => paymentReference,            'returnReference' => 'RTN-0042',            'reason' => 'Account closed'        };    }
    private static ReimbursementReturnApi.Result send(Map<String, Object> body) {        return sendRaw(JSON.serialize(body));    }
    private static ReimbursementReturnApi.Result sendRaw(String body) {        RestRequest req = new RestRequest();        req.requestUri = '/services/apexrest/v1/reimbursement-returns/';        req.httpMethod = 'POST';        if (body != null) {            req.requestBody = Blob.valueOf(body);        }        RestContext.request = req;        RestContext.response = new RestResponse();        return ReimbursementReturnApi.recordReturn();    }
    @IsTest    static void returnMovesPaidClaimToReview() {        Expense_Claim__c claim = paidClaim();
        Test.startTest();        ReimbursementReturnApi.Result result = send(notice(claim.Id, 'PAY-0001'));        Test.stopTest();
        Assert.areEqual(200, RestContext.response.statusCode);        Assert.areEqual('Recorded', result.outcome);        claim = [            SELECT Status__c, Reimbursement_Reference__c,                   Reimbursement_Return_Reference__c, Reimbursement_Error__c            FROM Expense_Claim__c WHERE Id = :claim.Id        ];        Assert.areEqual('Payment Review', claim.Status__c);        Assert.areEqual('PAY-0001', claim.Reimbursement_Reference__c);        Assert.areEqual('RTN-0042', claim.Reimbursement_Return_Reference__c);        Assert.areEqual('Payment returned: Account closed', claim.Reimbursement_Error__c);    }
    @IsTest    static void repeatedNoticeIsAcknowledgedWithoutChange() {        Expense_Claim__c claim = paidClaim();        send(notice(claim.Id, 'PAY-0001'));
        Test.startTest();        ReimbursementReturnApi.Result result = send(notice(claim.Id, 'PAY-0001'));        Test.stopTest();
        Assert.areEqual(200, RestContext.response.statusCode);        Assert.areEqual('Already recorded', result.outcome);        claim = [            SELECT Status__c, Reimbursement_Return_Reference__c            FROM Expense_Claim__c WHERE Id = :claim.Id        ];        Assert.areEqual('Payment Review', claim.Status__c);        Assert.areEqual('RTN-0042', claim.Reimbursement_Return_Reference__c);    }
    @IsTest    static void differentReturnIsNotAcknowledgedAsTheSameOne() {        Expense_Claim__c claim = paidClaim();        send(notice(claim.Id, 'PAY-0001'));        Map<String, Object> anotherReturn = notice(claim.Id, 'PAY-0001');        anotherReturn.put('returnReference', 'RTN-0043');
        Test.startTest();        ReimbursementReturnApi.Result result = send(anotherReturn);        Test.stopTest();
        Assert.areEqual(409, RestContext.response.statusCode);        Assert.areEqual('Conflict', result.outcome);        claim = [            SELECT Reimbursement_Return_Reference__c            FROM Expense_Claim__c WHERE Id = :claim.Id        ];        Assert.areEqual('RTN-0042', claim.Reimbursement_Return_Reference__c);    }
    @IsTest    static void missingReturnReferenceIsRejected() {        Expense_Claim__c claim = paidClaim();        Map<String, Object> body = notice(claim.Id, 'PAY-0001');        body.remove('returnReference');
        Test.startTest();        ReimbursementReturnApi.Result result = send(body);        Test.stopTest();
        Assert.areEqual(400, RestContext.response.statusCode);        Assert.areEqual('Rejected', result.outcome);        claim = [SELECT Status__c FROM Expense_Claim__c WHERE Id = :claim.Id];        Assert.areEqual('Paid', claim.Status__c);    }
    @IsTest    static void malformedRequestsAreRejected() {        Expense_Claim__c claim = paidClaim();        Map<String, Object> notAnId = notice(claim.Id, 'PAY-0001');        notAnId.put('clientReference', 'CLM-0001');
        Test.startTest();        ReimbursementReturnApi.Result noBody = sendRaw(null);        Integer noBodyStatus = RestContext.response.statusCode;        ReimbursementReturnApi.Result invalidJson = sendRaw('not json');        Integer invalidJsonStatus = RestContext.response.statusCode;        ReimbursementReturnApi.Result invalidId = send(notAnId);        Integer invalidIdStatus = RestContext.response.statusCode;        Test.stopTest();
        Assert.areEqual(400, noBodyStatus);        Assert.areEqual('Rejected', noBody.outcome);        Assert.areEqual(400, invalidJsonStatus);        Assert.areEqual('Rejected', invalidJson.outcome);        Assert.areEqual(400, invalidIdStatus);        Assert.areEqual('clientReference is not a record ID.', invalidId.message);        claim = [SELECT Status__c FROM Expense_Claim__c WHERE Id = :claim.Id];        Assert.areEqual('Paid', claim.Status__c);    }
    @IsTest    static void longReturnReferenceIsRejectedWithoutTruncation() {        Expense_Claim__c claim = paidClaim();        String longReference = '';        for (Integer i = 0; i < 256; i++) {            longReference += 'R';        }        Map<String, Object> body = notice(claim.Id, 'PAY-0001');        body.put('returnReference', longReference);
        Test.startTest();        ReimbursementReturnApi.Result result = send(body);        Test.stopTest();
        Assert.areEqual(400, RestContext.response.statusCode);        Assert.areEqual('Rejected', result.outcome);        claim = [            SELECT Status__c, Reimbursement_Return_Reference__c            FROM Expense_Claim__c WHERE Id = :claim.Id        ];        Assert.areEqual('Paid', claim.Status__c);        Assert.areEqual(null, claim.Reimbursement_Return_Reference__c);    }
    @IsTest    static void claimOutsidePaidStateIsRejected() {        Expense_Claim__c claim = paidClaim();        claim.Status__c = 'Submitted';        update claim;
        Test.startTest();        ReimbursementReturnApi.Result result = send(notice(claim.Id, 'PAY-0001'));        Test.stopTest();
        Assert.areEqual(409, RestContext.response.statusCode);        Assert.areEqual('Conflict', result.outcome);        claim = [SELECT Status__c FROM Expense_Claim__c WHERE Id = :claim.Id];        Assert.areEqual('Submitted', claim.Status__c);    }
    @IsTest    static void wrongPaymentReferenceChangesNothing() {        Expense_Claim__c claim = paidClaim();
        Test.startTest();        ReimbursementReturnApi.Result result = send(notice(claim.Id, 'PAY-9999'));        Test.stopTest();
        Assert.areEqual(404, RestContext.response.statusCode);        Assert.areEqual('Not found', result.outcome);        claim = [SELECT Status__c FROM Expense_Claim__c WHERE Id = :claim.Id];        Assert.areEqual('Paid', claim.Status__c);    }
    @IsTest    static void referencesMustMatchExactly() {        Expense_Claim__c claim = paidClaim();        Map<String, Object> returnInLowerCase = notice(claim.Id, 'PAY-0001');        returnInLowerCase.put('returnReference', 'rtn-0042');
        Test.startTest();        send(notice(claim.Id, 'pay-0001'));        Integer wrongPaymentStatus = RestContext.response.statusCode;        send(notice(claim.Id, 'PAY-0001'));        ReimbursementReturnApi.Result wrongReturn = send(returnInLowerCase);        Integer wrongReturnStatus = RestContext.response.statusCode;        Test.stopTest();
        Assert.areEqual(404, wrongPaymentStatus);        Assert.areEqual(409, wrongReturnStatus);        Assert.areEqual('Conflict', wrongReturn.outcome);        claim = [SELECT Reimbursement_Return_Reference__c FROM Expense_Claim__c WHERE Id = :claim.Id];        Assert.areEqual('RTN-0042', claim.Reimbursement_Return_Reference__c);    }}
These tests cover every response in the return contract and the record changes behind it, including both kinds of 409. The malformed-request test sends a request with no body, a body that isn’t JSON, and a claim reference that isn’t a record ID. Testing only well-formed notices would leave the input handling at the top of the class unexercised, even with coverage comfortably above 75%. The last test sends both references in the wrong case. It’s the one that fails if the exact comparisons are removed, because the query alone would still find the claim. All nine tests should pass, with every line of ReimbursementReturnApi covered.
In a real project, add a System.runAs test with a read-only integration user to check the user-mode query and the deliberate system-mode update; Part 7, Testing & Deployment covers that technique. Then send an authenticated request from a sandbox, as in the External Client App check, before finance starts sending notices.
For the Developer Journey’s Stage 3 evidence, keep this build with Part 5’s: the credential setup for both directions, the two contracts, the passing tests with their coverage, and the 404 from the External Client App check, or mark that check Not run. The developer capstone later extends both directions to reissue returned payments, with a new key for each attempt.
🎯 Final Thoughts
Section titled “🎯 Final Thoughts”Integrations are where Salesforce stops being an isolated CRM and becomes part of a wider architecture. You now have the core patterns:
- Named Credentials keep endpoints and authentication out of Apex code.
- REST callouts let Salesforce ask external systems for data or send updates.
- Apex REST lets external systems call custom Salesforce business logic.
- Platform Events let systems react to business events without tight coupling.
- Change Data Capture streams record changes to external subscribers.
The most important design skill is knowing when not to write custom code. Use standard APIs when they fit. Use custom Apex when you need business logic. Use events when systems don’t need to wait for each other.
The reimbursement build put both directions on one Expense Claim: Salesforce calls finance to request payment, and finance calls Salesforce to report a returned payment. Both use the client credentials flow, with credentials issued by the system being called. Finance controls the payment API contract; Salesforce controls the return endpoint’s validation and claim update. Each direction has its own failure handling, so you can troubleshoot it independently.
The tests exercise each boundary without a live external system: callout mocks for outbound requests, a REST context for inbound requests, and event delivery for subscribers.
🚀 Next steps
Section titled “🚀 Next steps”Building features is only half the job — getting them safely into production is the other half. In Part 7 — Testing & Deployment, you’ll learn how Salesforce enforces code coverage, how to structure test suites as your codebase grows, and how to move validated code from sandbox to production using change sets, CLI deployments, and scratch orgs.