Salesforce Service Cloud Admin: Build a Support Process

A customer emails about a printer that keeps disconnecting. A case appears in Salesforce, but nobody picks it up. By the afternoon it’s still marked New, the customer has sent another email, and the team lead has no reliable view of what’s waiting. Creating the record was the easy part. What the support process has to do is make the next action somebody’s responsibility.
This chapter assumes you can already configure access, build a record page, and test a flow. You’ll use those skills to set up Cases, queues, assignment and escalation rules, and Email-to-Case, then prove that an agent can work a case and a team lead can see what is waiting. Salesforce now calls the product Agentforce Service in its documentation. This chapter sticks with Service Cloud, because that’s still the name most people use.
You’ll be building on work from earlier chapters: the Support Workspace app and Support Case Workspace page from Advanced UI Customisation, the Case follow-up flows from Automation, and the Resolution Notes field and validation rule you built in Testing Configuration Changes and released in Sandbox Strategy & Change Management. If you arrived here from a search, build those first. The Service Cloud overview describes the wider product; here we build one working support process.
🚧 Before you start
Section titled “🚧 Before you start”Build one part of the process at a time, then use its Check now instructions to catch problems before continuing. Each check names the person doing it and the result to look for. Return to the administrator account for the next Configure block. Once everything is configured, the final checkpoint takes fresh cases through the complete process, including the timed escalation, access checks, and report totals.
Keep the two sets of records separate. Start every setup case and test email subject with [SC-SETUP]. Reserve [SC-FINAL-01] for your first final walkthrough; use a fresh prefix such as [SC-FINAL-02] if you repeat it, and update the report filter to match. This keeps earlier checks out of the expected totals without deleting their evidence. Record the user, Case ID, expected result, and actual result as you go.
By the end you’ll have watched assignment and escalation move a case, run an email conversation from first message to threaded reply, checked that the agent can reach their own cases but not the escalated ones, and matched the backlog report against the cases you created. The final section shows where Omni-Channel, Knowledge, and Entitlements come in, but none of them is part of this build.
Work in the practice org or private sandbox that holds those earlier builds. It needs Case record types, queues, assignment and escalation rules, reports, and On-Demand Email-to-Case; check which editions include Email-to-Case before you start. Your test users need a licence that includes Cases, which a Salesforce Platform licence doesn’t. Reuse the Salesforce-licensed test users from the Users chapter, one as the agent and one as the team lead, and keep the administrator account for configuration and monitoring.
Before you change anything, write down what’s active now: the assignment and escalation rules, Support Settings, page assignments, and any flows that touch Cases. Several of these settings apply to every Case in the org, not just your new record type, so it’s worth knowing what you’re walking into. If the sandbox is shared, agree a test window with its owner and how you will keep your changes apart from theirs. The steps below assume you can activate the exercise rules without affecting anyone else.
Before the first agent check, give both test users access to Support Workspace, Create, Read, and Edit on Case, and access to the working fields, including Resolution Notes and Follow-Up Date. Use permission sets and the ordinary support profiles from the earlier builds, without View All or Modify All on Case. The workspace section adds the new record type and page assignment; the queues section adds record sharing. Email and report permissions come with those sections.
Choose your user-testing route now. With two available test licences, keep both users active. If you have only one spare licence, keep two separate user records and have one active at a time.
Deactivating a user returns its licence and freezing doesn’t, as Test Permissions and Reports covered. An inactive user keeps its permission sets, group and queue memberships, and owned cases. Keep the agent active throughout the setup checks and the agent portion of the final walkthrough, then switch to the team lead when instructed. This preserves the agent’s ownership for the lead’s access tests, although it does not demonstrate two people working at the same time. Record that limitation.
Don’t make either test user the Default Case Owner or Automated Case User in Support Settings, because that prevents deactivation.
You also need two mailboxes you control: a private test support mailbox that can forward mail, and a separate inbox to send from. Make up the case details, and don’t connect a real customer inbox or copy production mail into the exercise. If your org or mail provider can’t support the email test, do everything else and mark email intake as Not run in your results; the checkpoint stays incomplete until it runs.
🧭 Decide what each status means
Section titled “🧭 Decide what each status means”A Case is the record of one support request. Its Status says how far the work has got; its Owner is the user or queue responsible for it. A queue holds work that any of its members can claim, so a case sitting in a queue has an owner, but nobody has started on it yet.
For this exercise, agree the meanings below before you configure anything. The team lead owns the policy and reviews the exceptions; once an agent claims a case, the next action is theirs.
| Status | Meaning and next action |
|---|---|
| New | Received and waiting for triage. A queue member checks the priority and claims the case. |
| Working | An agent owns the case and is investigating or responding. |
| Waiting on Customer | The agent has asked the customer a specific question and is still responsible for chasing it. This is still open work. |
| Closed | The agent has recorded the resolution and checked that the follow-up automation ran. |
Priority is about urgency, not progress. The rule for this exercise is simple: a High-priority case still open 30 minutes after it was created moves to the Support Escalations queue, and Waiting on Customer does not pause that clock. Thirty minutes is short so you can watch it happen in one sitting; a real team would set its own response times, business hours, and cover before going live.

In Salesforce, a support process sets which Status values a case can have, and a record type ties that process to a page layout and its picklist values. Neither forces users through the statuses in order; if the business needs a transition enforced, that’s a job for a validation rule or a flow. Keep the exact Closed value your existing flows look for, or a tidy-up of the status list will quietly stop the follow-up automation.
🔧 Configure the process and its workspace
Section titled “🔧 Configure the process and its workspace”Give the exercise its own record type so rules and reports can pick out its cases. A record type earns its place when the process or the layout differs; don’t create one for every priority or queue.
Configure — administrator.
-
Check the status values. In Setup → Object Manager → Case → Fields & Relationships → Status, look at the existing values. Keep
New,Working, andClosed, and addWaiting on Customerif it is missing. Check thatClosedis the only one of the four marked as a closed status. Don’t rename values that other automation already uses. -
Create the support process. In Setup, find Support Processes and click New. Start from Master, name it
Workspace Support, give it a description and save. Select the four statuses above, withNewas the default, and save again. Trailhead’s support-process exercise walks through the same screens. -
Create the Case record type. Under Case → Record Types → New, start from Master, label it
Workspace Support, and pick your new support process. Make it active and available to the administrator profile and the test users’ support profiles, assign their existing Case page layout, and save. On the record type’s detail page, check the picklist values it offers: Priority needsHighandMedium, and Case Origin needsEmail, for this exercise. Trailhead’s record-type setup covers this screen. Creating the record type doesn’t give it a Lightning page; that’s the next step. -
Add a page assignment. Edit Support Case Workspace in Lightning App Builder, click Activation, and add an assignment for the Support Workspace app, Desktop, the new Workspace Support record type, and the test profiles. Leave the earlier assignments in place. Check that the page shows Owner, Status, Priority, Subject, Description, Resolution Notes, and Follow-Up Date, and that the Related tab has the activities related lists. The email tools come later, once Email-to-Case exists.
Check now — agent. In Support Workspace, create a Workspace Support case with the subject [SC-SETUP] Workspace check, Medium priority, and made-up details. Check that you get the Support Case Workspace page and the four agreed statuses, then save it. This checks the record type, page assignment, and basic permissions; routing is not configured yet.
Continue when the agent can save and reopen the case on the right page. Record its ID and the result, then return to the administrator account.
If the familiar page disappears after you add the record type, look at the page’s activation assignments first. If a status is missing, look at the support process. If a field or action is missing, check field permissions, the page layout, and any Dynamic Forms or Dynamic Actions visibility rules. Check the result as the user, following the testing method from Testing Configuration Changes, rather than trusting the App Builder canvas.
👥 Set up the queues and access
Section titled “👥 Set up the queues and access”Start from what each person needs to do. The agent needs to claim work from triage and edit their own cases. The team lead needs to pick up escalations and see the whole backlog. Then set up queue membership and sharing to match.
Configure — administrator.
In Setup → Queues → New, create Support Triage and Support Escalations, with Case as a supported object for each. Make the agent and the team lead members of Triage, and only the team lead a member of Escalations. If you give a queue an email address or notify its members, use addresses inside your test setup. Queue membership lets a user see and take ownership of the queue’s cases; it doesn’t give them object or field permissions.
For both queues, leave Grant Access Using Hierarchies unticked and save. This keeps queue membership from extending access to the members’ superiors for this exercise. Since Summer ’26, each queue has its own hierarchy access setting; check the saved value rather than relying on the default. It controls access through the queue, while the Case object’s hierarchy setting still governs access to cases owned by users.
Set the Case organisation-wide default to Private for this exercise. The object and field permissions you prepared earlier let the users work with Cases, but record access still decides which cases they can open. With a Private default, the team lead sees only the cases they own, the cases in their queues, and the cases owned by anyone below them in the role hierarchy, and they need to see every Workspace Support case, whoever owns it. Sharing rules do that. In Setup → Public Groups, create Support Reviewers with the team lead as its member. Then in Setup → Sharing Settings, add a Case sharing rule based on criteria, Case Record Type equals Workspace Support, that shares with the Support Reviewers group with Read/Write access. The criteria-based rule example in the Record Access chapter walks through the same screens and shows how to test the result.
Check your test users’ roles before you rely on that test. The role hierarchy gives a user access to records owned by anyone in a role below theirs, and for a standard object like Case the Grant Access Using Hierarchies setting that controls this is locked on. If your team lead sits above the agent, as the Ops Manager and Ops Team roles from Test Permissions and Reports do, the hierarchy already shows them the agent’s cases, and the sharing rule adds nothing you can see with two users. The rule earns its place with cases owned by people outside the team lead’s branch, such as another team’s agents, which is what “whoever owns it” means in a real org. To watch the rule itself do the work, clear the agent’s role, or move it to a branch that isn’t below the team lead’s, before you test.
| Persona | What they should be able to do | What the final checkpoint tests |
|---|---|---|
| Agent | Work Triage cases and their own claimed cases, including the working fields and Resolution Notes. | Cannot open a case owned by Support Escalations, even from a direct link. |
| Team lead | Work both queues and see every Workspace Support case, including the agent’s. | Can see the whole backlog without View All or Modify All on Case. |
If the agent can open an Escalations-owned case during the final test, some other route is letting them in, and with Cases there are three to check. Queue access is one: check for unintended membership, including through a group or role, and confirm Grant Access Using Hierarchies is unticked on Support Escalations. If that queue setting is ticked, users above its members can also gain access through the hierarchy. Implicit sharing is another: access to an Account can carry access to its cases, depending on the account owner’s role settings, so use a case with no Account or Contact. The third is anything else that grants Case access, such as another sharing rule or a permission set with View All on Case. Close these off before you test rather than after a failed run. A separate record type and a hidden list view change what the agent sees in a list, but a direct link still opens the case.
Check now — administrator. Review the saved queue memberships and hierarchy settings, Private sharing default, Support Reviewers membership, and sharing-rule criteria against the table above. Check the users’ effective permissions and roles for other routes to Case access.
Continue when the configuration matches the intended access. The next section checks that the agent can claim Triage work. The final checkpoint uses a case that has actually escalated to prove the allowed and denied access.
Claim before closing. The follow-up flow from Automation copies the Case owner onto the Task it creates. A queue can own only the objects it supports, and ours support Cases only, so if a queue still owns the case when it closes, the flow tries to give the Task an owner that cannot hold Tasks and fails. Have the agent take ownership before closing, and when you check the Task, check its owner as well as the fact that it exists. Letting queue-owned cases close cleanly would mean changing the flow or the queues and testing again, and that’s outside this chapter.
📥 Route new cases into triage with an assignment rule
Section titled “📥 Route new cases into triage with an assignment rule”An assignment rule picks an owner at the moment it runs. It doesn’t keep rebalancing work between agents afterwards. Cases created by hand and cases created from email trigger the rule in different ways: a manual save runs it only when the assignment checkbox is ticked, and Email-to-Case runs it automatically unless the routing address names an owner. That is why you test both.
Configure — administrator.
-
Create the rule and its entry. In Setup, find Case Assignment Rules and create
Workspace Support Assignment. Add a rule entry with sort order1and the criteria Case: Case Record Type equals Workspace Support, assigning matching cases to the Support Triage queue. Leave Do Not Reassign Owner unticked for this exercise; ticking it stops the rule changing the owner of a case that already has one, which is often what you want in production, but here you want to see what the rule does on its own first. Save the entry, then activate the rule in your practice org. Only one Case assignment rule can be active at a time, so in a real org you’d add this entry to the existing rule after reading its other entries, not replace it. Salesforce’s assignment-rule guidance explains how rules and entries fit together.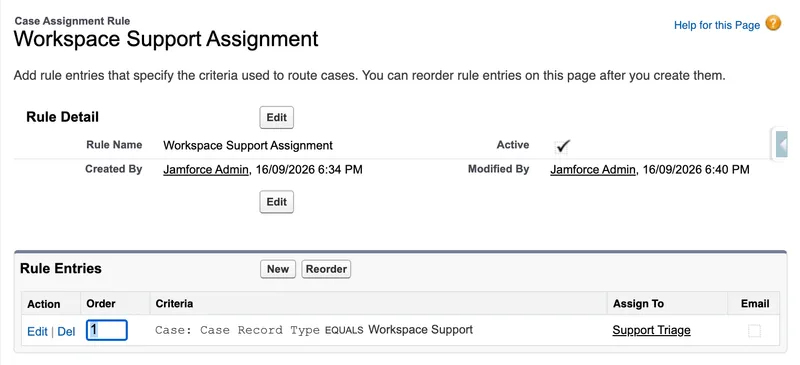
This is what the rule should look like when the step is done: active, with one entry and no email.
-
Decide the fallback owner. Open Setup → Support Settings and look at Default Case Owner: this is who gets a case when no rule entry matches. Decide who should investigate those cases. In a practice org you can point it at Support Triage, but write that down, because a fallback that lands in the same queue as the rule hides a rule that never matched. While you are there, set Record Type Setting to Keep the existing record type, so assignment does not swap a case to the new owner’s default record type; the other support settings also change what happens when assignment runs, so read them.
-
Show the assignment checkbox. Edit the Case page layout your record type uses. Under Layout Properties → Case Assignment Checkbox, tick Show on edit page and leave Default unticked for this exercise, then save. For the manual tests, use the standard Cases New action and tick Assign using active assignment rules yourself each time. Salesforce documents this under layout save options.
Check now — agent. Create two Medium-priority Workspace Support cases: [SC-SETUP] Assignment on with Assign using active assignment rules ticked, and [SC-SETUP] Assignment off with it unticked. The first should belong to Support Triage; the second should remain yours. Record each case’s ID, record type, checkbox choice, and actual owner. Salesforce describes the two behaviours under Assign Cases.
Then open Cases in Support Workspace, switch to the Support Triage list view, tick the first case, and click Accept. Open it and check that Owner is now the agent. Queue membership and Edit permission on Case are needed for Accept, as Salesforce’s case-list guidance explains.
Continue when both initial owners are correct and the agent can claim the Triage case. Return to the administrator account.
Leave the checkbox unticked when you edit or close a claimed case, or the save can send it back to triage. If a case ends up with the wrong owner, check whether the rule actually ran, the record type, the order of the entries, and any flow or trigger that also sets Owner. Don’t bolt on a second piece of ownership automation to cover for one you haven’t understood.
⏳ Escalate unresolved cases with an escalation rule
Section titled “⏳ Escalate unresolved cases with an escalation rule”An escalation rule hands a case on when it has been open for too long. Where that time is measured from matters: 30 minutes since the case was created is a different promise from 30 minutes since anyone last touched it. For this exercise, editing a case must not restart the clock.
Configure — administrator.
-
Create the escalation rule. In Setup → Escalation Rules, create
Workspace Support Escalation(leave Active unticked). -
Add the entry and set its clock. Add a rule entry with sort order
1and three criteria: Case: Case Record Type equals Workspace Support, Case: Priority equals High, and Case: Closed equals False. Choose Ignore business hours and, for the start time, When case is created, then save the entry. With these escalation settings, the clock counts plain elapsed time from creation, overnight included. Before you use escalation for real, agree the business-hours calendar, time zone, holidays, and who covers after hours, then set these options to match. -
Add the handoff. Under the entry’s Escalation Actions, click New. Set Age Over to
0hours and30minutes, and set the action to reassign the case to Support Escalations. If you add a notification, use a template you have tested and send it only to your test addresses. Save, then activate the rule. An escalation action can reassign and notify, but an email arriving doesn’t prove the owner changed; check the case.
Check now — agent, then administrator. As the agent, create [SC-SETUP] Escalation check, a High-priority Workspace Support case with the assignment checkbox ticked, and leave it open in Triage. As the administrator, open Setup → Case Escalations, click Search, and record its pending action and Escalate At time.
At least two minutes after creation, and before the 30-minute threshold, return as the agent, claim the case, and change Status to Waiting on Customer, leaving the assignment checkbox unticked. Record the edit time. As the administrator, search Case Escalations again: the pending action should still exist with the original Escalate At time. A missing action or a later time means the clock is not following the agreed policy; check that the rule entry uses When case is created rather than either of the modification-based options.
Continue when the action remains scheduled for the original time after the edit. You can configure email while it waits; there is no need to switch to the team lead now. Before starting the final checkpoint, confirm as the administrator that this case moved from the agent to Support Escalations while still Waiting on Customer, and record the actual owner and time observed. Keep that result with the before-and-after scheduled times. The final checkpoint uses a fresh case to test the complete handoff and both users’ access. The rule sets a threshold, not to-the-second timing.
The escalation queue in Setup tells you the difference between a rule that did not schedule anything and an action that is still waiting to run. Two things shouldn’t happen: a Medium-priority case shouldn’t appear there at all, and a High-priority case closed inside 30 minutes shouldn’t be handed off afterwards. The checkpoint tests both.
Under this policy, editing a case while it’s Waiting on Customer doesn’t buy it another 30 minutes. If that’s the wrong policy for your real support team, change the policy, reconfigure the clock, and test it again; don’t bury the decision in a formula.
📧 Connect a test mailbox with Email-to-Case
Section titled “📧 Connect a test mailbox with Email-to-Case”On-Demand Email-to-Case takes mail forwarded to it, creates a Case for each new enquiry, and attaches later messages in the same thread to that case. Two addresses are involved and they do different jobs: customers write to your support mailbox, and your mail provider forwards that mail to the Email Services Address Salesforce generates.
Configure — administrator.
-
Enable the service. In Setup, open Email-to-Case and click Edit. Tick Enable Email-to-Case and save, then tick Enable On-Demand Service and save again; Salesforce’s enablement steps cover both, and the settings reference explains the other options on the page. If your org uses Salesforce Go, check whether it has already switched these on. Once Email-to-Case is on, it stays on, so your rollback for this exercise is to stop the test forwarding and clean up the routing address, not to switch the feature off.
-
Add the routing address. Under Routing Addresses, make sure Email2Case is selected in the Source dropdown and click New. Enter
Workspace Support Labas the Routing Name and the address of your test support mailbox as the Email Address. Leave the email and task settings at their defaults. Under Case Settings, leave Case Owner blank so the assignment rule decides the owner, then set Case Priority to Medium, Case Origin to Email, and Case Record Type to Workspace Support. Salesforce’s routing-address settings describe each option.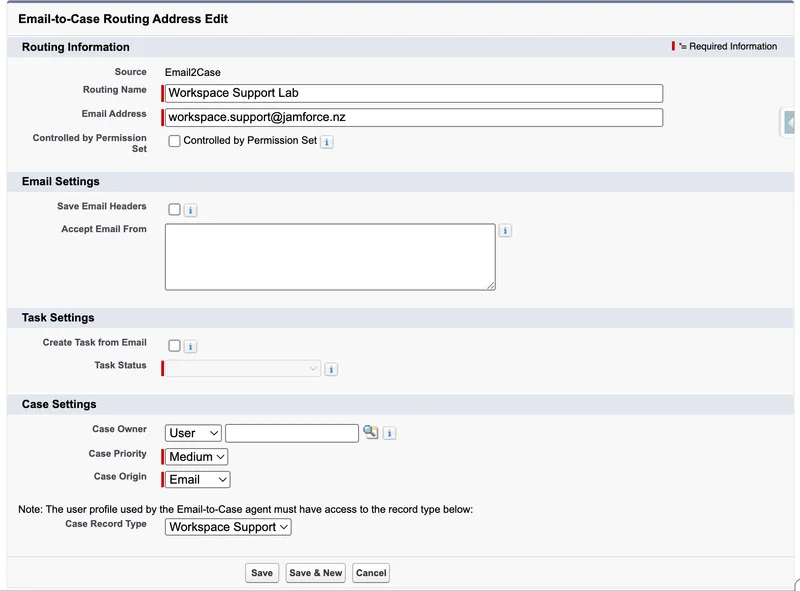
This is what the form should look like before you save: an empty Case Owner and the three case settings filled in.
-
Save and verify it. Click Save. Salesforce sends a verification email to the mailbox you entered; open it while signed in as the same user who saved the address, because only that user can complete the verification, and click the link. Until the address is verified, its case settings aren’t applied to incoming mail, so an unverified address is the first thing to check if a test case arrives with the wrong priority or record type. Check that the Automated Case User in Support Settings has access to the record type, because email cases are created under that user.
-
Set up forwarding. Copy the generated Email Services Address and, in your mail provider, forward the test support mailbox to it. Keep copies of the originals in the mailbox; you’ll want them if something goes wrong. If the provider asks you to confirm the forwarding address, do that before you test. Forward only this one mailbox, and make sure no rule sends mail back into it. If you can’t set up forwarding, send your test mail straight to the Email Services Address instead: Salesforce creates the case with the same routing-address settings, so the intake checks below still work. It proves nothing about forwarding, though, and the customer’s reply has no route back into Salesforce, so record the reply check as Not run.
-
Check the threading method. Back on the Email-to-Case settings page, the checkbox labels tell you which method the org uses. Labels that mention a threading token, with a Use email headers for threading option, mean Lightning threading: turn on headers and at least one token setting. Labels that say thread ID, under a banner recommending the Disable Ref ID release update, mean the older Ref ID threading: tick both thread ID settings, which is enough for this exercise; switching is covered after the checks below.
-
Enable the case feed. The email conversation needs Case Feed, which depends on Chatter. Chatter is off by default in new Summer ’26 orgs. In Setup, find Chatter Settings, click Edit, select Enable if it is unticked, and save. Then find Feed Tracking, select Case, tick Enable Feed Tracking, and save. Confirm both settings are enabled before adding the component.
-
Put the email tools on the page. Enabling Email-to-Case creates a Send Email quick action on Case, which appears as Email on the page; if your org predates Spring ’17 you create it yourself. Add it to the Salesforce Mobile and Lightning Experience Actions section of the support users’ Case page layout. Then edit the Support Case Workspace record page in Lightning App Builder, add a Chatter component in a new Feed tab, which is where the email conversation appears, and save. The agent checks the action in the exchange below.
-
Prepare outbound email. The agent needs the Send Email permission, access to the case, and the Email action on the page. Replies must go out from the test support address, so that the customer’s answer lands in the mailbox you are forwarding: once the routing address is verified, Lightning offers it in the From field, usually as the default, and Salesforce recommends setting it as the Email action’s predefined From value so nobody has to remember. Email Templates & Deliverability covers sender authentication, sandbox deliverability settings, and the email logs.
Check now — sender inbox and agent. Use the two mailboxes you prepared earlier:
-
Send a new enquiry. From your sender inbox, email the support mailbox with the subject
[SC-SETUP] Printer disconnects. As the agent, find the new Workspace Support case in Triage. Check Origin Email, Medium priority, the sender’s address, the subject, and the attached email. Record the Case ID. -
Reply from the case. Claim it as the agent, check that the Email action is in the actions bar, check that From shows the test support address rather than the agent’s own, and reply. Confirm the message reaches the sender inbox and that it came from the support address, because that is where the customer’s reply will go.
-
Reply as the customer. From the sender inbox, reply normally to the agent’s message so the threading information survives. Check that it appears on the same Case ID without creating a new case.
-
Send a separate enquiry. Compose a brand-new message with the subject
[SC-SETUP] Paper tray fault. Check that it creates a second case in Triage, with a different Case ID. Leave both cases open.
Continue when the first enquiry and reply share one case, the separate enquiry has its own case, and both inbound and outbound mail work. Record the results and return to the administrator account. These setup cases stay outside the final report filter. If email cannot run in your environment, record Not run and continue with the remaining configuration; the email checks remain outstanding.
A routing-address owner overrides assignment. If you fill in Case Owner on the routing address, email cases go to that owner and the assignment rule is skipped. When that happens, the routing address has taken precedence over the rule, and the queue itself is fine. A related trap: write assignment criteria against fields the Case has at the moment it is created, and do not assume the rule can read every field on the related EmailMessage.
Ref ID threading is maintenance-only. The Lightning settings, including Use email headers for threading, don’t appear until you enable the Disable Ref ID and Switch to Lightning Threading release update under Setup → Release Updates. The switch changes how existing templates and Apex thread, so make it in your own practice org or a sandbox by following the migration instructions, not in a shared sandbox mid-exercise.
There are two other emails you could send, and both are optional. An auto-response rule can tell the customer their message arrived, and an assignment notification can tell staff they now own something. Decide each on its own merits; this build uses the agent’s reply as the proof that the conversation works. If you do add an acknowledgement, test who receives it, which address it replies to, what it says, and whether it threads, rather than assuming it behaves like a reply an agent sent. Automated case emails have their own threading rules.
| Symptom | What to check, and what to do |
|---|---|
| No case arrives | Send one message straight to the Email Services Address: if that creates a case, Salesforce is working and the problem is your forwarding. Then check the address verification, your mail provider’s forwarding logs, the accepted senders, limits, and Salesforce’s inbound email errors. Keep the original email, and do not keep re-forwarding it until you know whether processing is just slow. |
| The case has the wrong owner or type | Check the routing address’s Case Owner and record type, the Automated Case User’s access, the assignment entry, and any other automation that sets Owner. Fix the setting, then send one new test message. |
| The customer’s reply never arrives | Check which address the agent’s email went out from. If it was the agent’s own address, the reply went to their mailbox and nothing forwarded it; resend from the support address. If it was the support address, check the forwarding as for a missing case. |
| A reply creates a second case | Compare the reply’s headers and token with the message the agent sent. Check whether a mail gateway rewrote them, and the threading settings, before you merge or delete anything. |
| The agent cannot reply | Check that Chatter and Case Feed Tracking are enabled, then check the Email action, the agent’s permissions, sender verification, and deliverability. A case arriving proves inbound mail works; it says nothing about outbound. |
When an email fails, keep it, with the case number, the time, and the error, and strip out anything sensitive. Before you use Email-to-Case for real, write down who is allowed to send in, the message and attachment limits, where files are stored and scanned, how long mail is kept, how you prevent forwarding loops, and who watches for failures. The Email-to-Case threading guide explains how Salesforce matches a reply to a case; it isn’t the subject line, so don’t test by copying one.
📊 Build a case backlog report for the team lead
Section titled “📊 Build a case backlog report for the team lead”The team lead’s daily question is: what is still open, who owns it, and what needs attention first? A report that only counts agent-owned cases hides the work still sitting in Support Triage, and that’s the work nobody has picked up yet. This report shows all cases grouped by owner, so the queue appears alongside the agents.
Configure — administrator.
In Reports → New Report, choose Cases and click Start Report. Set the Show Me filter to All Cases, the opened-date range to All Time, Closed to False, and Case Record Type to Workspace Support. Add Subject starts with [SC-FINAL-01], or your chosen run prefix, to keep the setup cases out of the totals.
Add the columns Case Number, Subject, Owner, Status, Priority, Opened Date, and Age. Group by Owner, then by Status, and sort by Age descending so the oldest work is at the top; if report grouping is new to you, Reports & Dashboards covers the basics. Check the case-report field reference to be sure you are using plain elapsed Age and not a business-hours version. An average age or a count on its own does not tell you whether a promised response time was met.
Save it as Workspace Support Backlog in a folder shared with the team lead. Give the lead Run Reports and, if the folder is public, View Reports in Public Folders; neither comes with the minimum profile, and Test Permissions and Reports covers both. All Cases doesn’t get around record access, and being able to open the folder doesn’t mean being able to see the cases in it.
Check now — administrator. Reopen the saved report and check its filters, columns, grouping, and folder sharing. A new, unused final-run prefix should return no rows at this point. If records appear, choose a fresh prefix before starting the walkthrough.
Continue when the report is saved with the correct filter and the lead’s folder access and permissions are configured. The final checkpoint creates the queue-owned and Waiting on Customer cases, then has the team lead verify the actual rows and totals. An admin preview here does not prove the lead’s access.
🧪 Checkpoint: prove the support process
Section titled “🧪 Checkpoint: prove the support process”The setup checks have tested individual pieces. Now follow fresh cases through the finished process. Keep your earlier evidence, but create new records for this run and record their IDs. The table describes the expected outcomes; the numbered steps below give the running order.
| Case | Expected outcome |
|---|---|
| A — normal work | Medium priority; routed to Triage, then claimed by the agent and set to Working. No escalation is scheduled. |
| B — overdue work | High priority; left New in Triage, then moved to Escalations. The agent cannot open it there; the team lead can. |
| C — resolved in time | High priority; claimed and closed by the agent within 30 minutes of its creation. Closing without Resolution Notes is refused. The successful close creates the expected follow-up and does not escalate later. |
| D — waiting work | Medium priority; claimed by the agent and set to Waiting on Customer. It remains in the open backlog without an escalation. |
| E — email conversation | A new email creates one Medium-priority case. The agent claims it and replies; the customer’s reply joins that same case. Leave it open. |
| F — separate email enquiry | A brand-new email creates a separate Medium-priority case. Leave it open in Triage. |
-
Prepare the run as the administrator. Confirm the rules are active and the report uses an unused prefix, such as
[SC-FINAL-01]. Use that prefix for all six subjects below. Confirm the agent is active and has no Resolution Notes bypass custom permission for the negative test. If your rule uses the escape-hatch pattern, record the user’s bypass assignment and resolve it before testing. Choose the route for two active users or one spare licence described at the start. With one spare licence, leave the agent active through step 6; the switch happens in step 7. -
Start B’s clock. As the agent, use the standard Cases New action to create
[SC-FINAL-01] B — overdue work, with record type Workspace Support, High priority, and the assignment checkbox ticked. Leave Account and Contact blank so the access test is not affected by their sharing. Record the ID and direct link, confirm Support Triage owns it, and leave it New. As the administrator, record its pending escalation and Escalate At time. Return to the agent without waiting for it to run. -
Create and resolve C promptly. Create
[SC-FINAL-01] C — resolved in timewith the same record type, High priority, and assignment checkbox ticked. Confirm it enters Triage, then claim it as the agent. With the assignment checkbox unticked on edits, try to close it without Resolution Notes and record the rejected save. Add meaningful notes and close it within 30 minutes of C’s own creation. Check the Follow-Up Date and the Task, including that the Task’s owner is the agent. If the rejection or follow-up fails, investigate before calling this case a pass; do not close A or D as a substitute test. -
Work A and D while B waits. As the agent, create
[SC-FINAL-01] A — normal workand[SC-FINAL-01] D — waiting work, both Medium-priority Workspace Support cases with the assignment checkbox ticked. Confirm each enters Triage, claim both, then set A to Working and D to Waiting on Customer. Leave them open. As the administrator, check that neither has a pending escalation and that C has no pending handoff after closing. -
Observe the escalation and test the agent’s access. Once B’s action has run, record its actual owner and the time observed as the administrator. It should belong to Support Escalations. Before anyone claims it, try B’s saved direct link as the agent and confirm access is denied. Also check after C’s threshold has passed that C stayed closed and owned by the agent.
With two active test users, sign in as the lead, confirm B opens, and run the backlog report: it should contain exactly A, B, and D — three open cases. Leave B in the queue. With one spare licence, keep the agent active and leave the lead’s checks until step 7.
-
Run E’s conversation, then send F. Follow the email exchange from the mailbox section using fresh subjects:
[SC-FINAL-01] E — printer disconnectsand[SC-FINAL-01] F — paper tray fault. For E, check the inbound fields and Triage owner, claim it as the agent, reply from the case, and reply normally from the sender inbox. Confirm the customer reply attaches to E’s Case ID. Send F as a brand-new enquiry and confirm it has a different ID. Keep both open and leave F in Triage.With two active users, have the lead refresh the report after E arrives (four), after the threaded reply (still four), and after F arrives (five). With one spare licence, record the two IDs and the threading result now; check the total after switching users. If email cannot run, mark E and F Not run and expect only A, B, and D in the report. If you’re sending straight to the Email Services Address, E and F still count; only the threaded reply is Not run.
-
Finish as the team lead. With one spare licence, use the administrator to deactivate the agent and activate the lead now. Before claiming B, confirm the lead can open it from the same direct link the agent was denied.
Whether you’re running two active users or one spare licence, run the report as the lead and match every row to your recorded IDs. If E and F ran, expect five open cases: A, B, D, E, and F. C is closed, so it’s excluded. If email was Not run, expect three, A, B, and D, and keep the checkpoint incomplete. Check that D is Waiting on Customer and that B, and F if it exists, are still queue-owned.
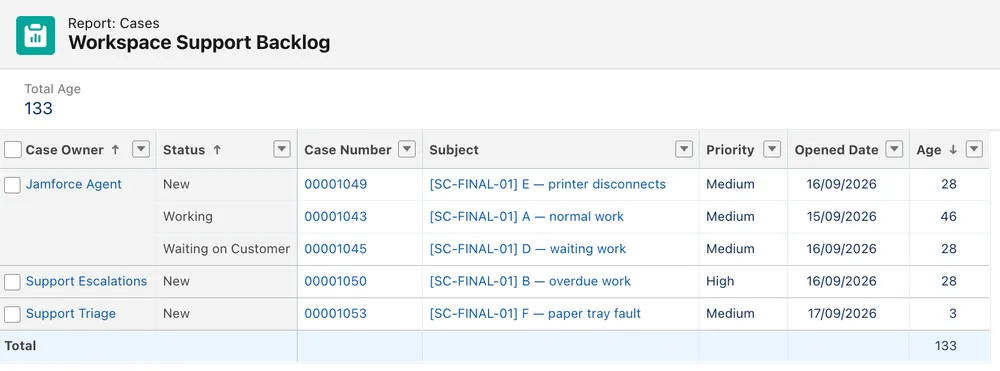
This is what a matching report looks like: five rows, the agent’s three cases split across New, Working, and Waiting on Customer, B under Support Escalations, F under Support Triage. Your case numbers and ages will differ; the owners, statuses, and letters shouldn’t.
The report should let the team lead decide what to do next: claim waiting queue work, chase a waiting customer, or investigate an escalation. A matching total alone is not enough; the right cases, owners, and statuses must be visible. Keep the fault-path evidence from your earlier flow testing and re-check anything this chapter changed, especially who owns the case when it closes.
Keep everything in one evidence pack: the status agreement, the rule entries and which rules are active, the queue memberships and the access table, the page assignment, the results of the manual routing tests, the escalation’s scheduled time and what happened, the email exchange, the backlog report checked against your case IDs, and for every check what you expected and what you got. Add the settings you recorded before you started, anything you had to undo, any failures still open, and what the business owner decided. Mark any check you could not run as Not run. You’re done when the checks pass and someone else could follow a case from arrival to resolution or escalation using nothing but that pack.
If a test fails, stop the damage first. Turn off the test forwarding if it is creating duplicates, put the previous rule back if that is the right call, and look at, or cancel, any pending escalation actions it affected. Use your recorded IDs to find and reassign any misrouted test cases. Putting a rule back doesn’t fix the owners it already set, recall email it sent, or delete Tasks it created; sort those out before you rerun the failed check, the same way your release runbook handles a rollback.
🚀 What to add later
Section titled “🚀 What to add later”Queues and manual claiming are a sensible first design. Add more when a real problem calls for it, and check each addition’s licences, permissions, and failure behaviour in the org where it will run.
| If you need to… | Look at |
|---|---|
| Share work out by availability, capacity, or skills | Omni-Channel. Decide whether it or the assignment rules owns routing before you run both. |
| Track promised response and resolution times | Entitlements and milestones, with agreed business hours and rules for pausing the clock. |
| Reuse approved answers | Knowledge, with owners, publishing permissions, and review dates. |
| Handle messaging, voice, self-service, or AI-assisted work | The channel or feature for that job, each with its own access, handoff, retention, and cost questions. |
All of these extend a process that already works. None of them will fix a case with no clear owner, or a status that everyone reads differently.
🎯 Final Thoughts
Section titled “🎯 Final Thoughts”This chapter opened with a case that nobody picked up. The fix wasn’t a feature; it was making ownership explicit at every point where a case can stall. A status now has a meaning the team agreed to, a queue means work that’s waiting rather than work that’s handled, the assignment rule names an owner the moment a case exists, escalation moves it when that owner doesn’t, and the backlog report shows the team lead who has what. Each piece is small, and the process works because they agree with each other about who owns what.
That agreement is also where the process breaks, usually by one setting quietly overruling another: a routing address with an owner filled in, a default case owner that hides a rule that never matched, a report that leaves out the queue. You caught those by checking as the agent and the team lead rather than as yourself, and by writing down what you expected before you looked. Keep doing that for every change to this process, and keep the Not run marks honest; they tell the next person exactly what still needs proving.
Queues and manual claiming will carry a small team a long way. Add Omni-Channel, entitlements, or Knowledge when a real problem asks for them, and put each one through the same configure, check, and continue routine before anyone relies on it.
Continue to Salesforce Admin Capstone Project: Change a Live Approval to bring your app, access, data, testing, and release work together for review. Keep this support-process evidence pack alongside it: the capstone’s product-administration check uses the results you recorded here. Before then, ask another admin to use the pack to trace a case through the process; their questions will show you what still needs explaining or proving.