Salesforce Flow Approval Process: Build It End to End

At the end of the previous chapter you created a request and it sat there. It has a status of Awaiting Approval because that is the default you gave the picklist, and nothing in the org has any opinion about it. No manager has been asked anything. The requester will not be told anything. The status will stay where it is until somebody changes it by hand, which is not an approval. It is a picklist.
This chapter builds the part that makes the difference. By the end, creating a request will assign a work item to the requester’s manager, the manager will decide on a screen that will not let them reject without a reason, the decision will write itself back to the record and notify the requester, and closing the request will stamp its fulfilment date without anyone typing a date.
Where you are: the object, its fields and validation rules, the four persona permission sets, the sharing model, and the Lightning app and record page are all built. The record page already carries the Orchestration Work Guide component, waiting for something to put work in it. The Manager and IT permission sets already have Run Flows. If any of that is missing, finish the previous chapter first. Every step here assumes it.
Budget a sitting for this chapter. It is the longest of the three, and most of the time goes on Flow Builder rather than on decisions.
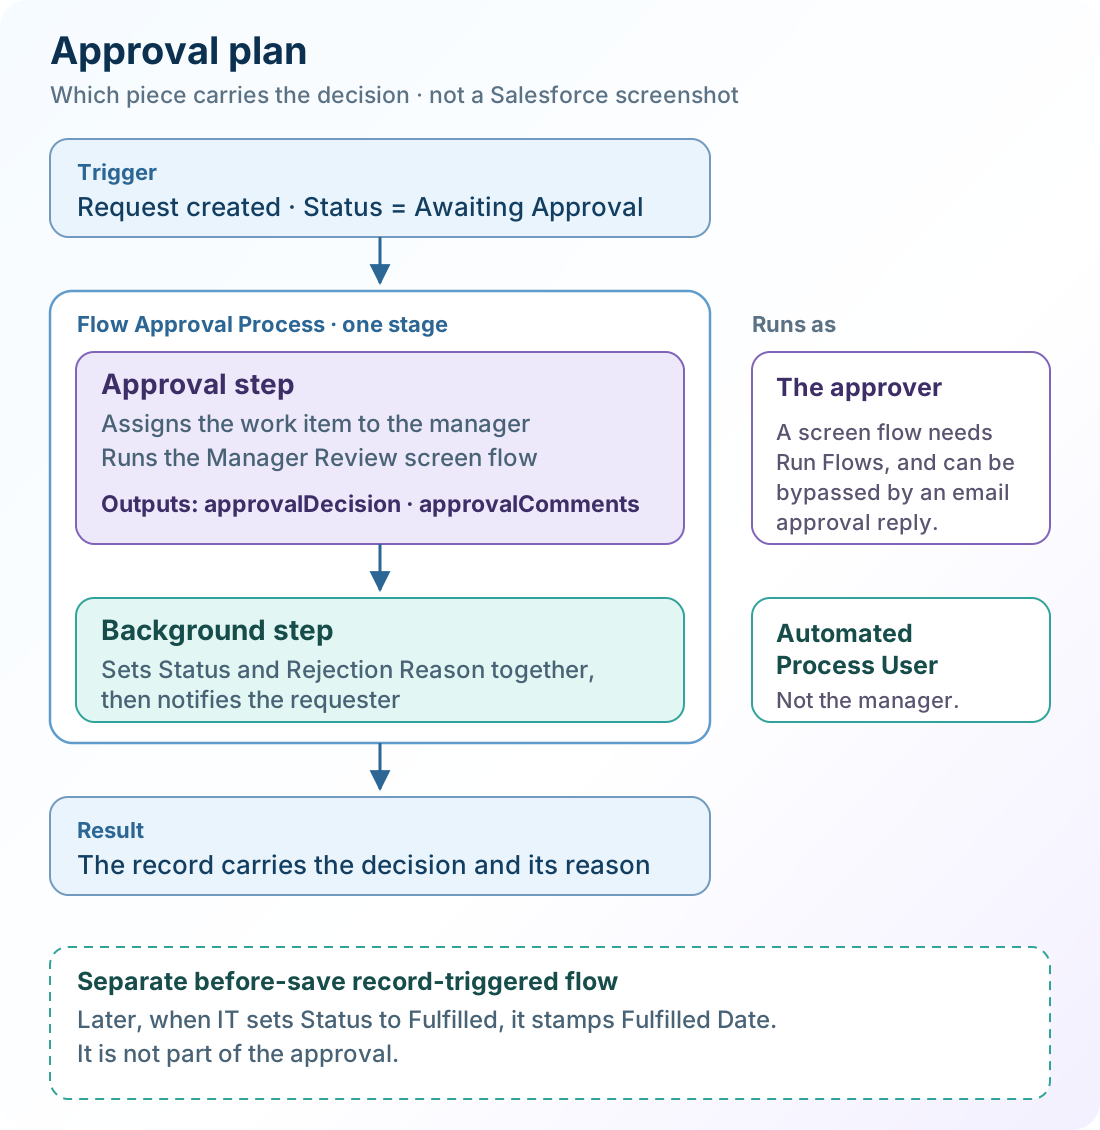
🧩 The four pieces of a Flow Approval Process, and which one to open when something breaks
Section titled “🧩 The four pieces of a Flow Approval Process, and which one to open when something breaks”The staff member needs to learn the outcome without asking anyone. The manager needs to decide where the request already is, and to give a reason when the answer is no. IT needs a request that is unambiguously cleared before anyone spends money. An approval that only moves a picklist leaves all three of those jobs undone.
Salesforce spreads that work across four pieces, and they are easy to confuse with one another:
| Piece | What it owns |
|---|---|
| Flow Approval Process | The trigger, the approver, the work item, and the order of the steps |
| Manager review screen flow | What the approver sees, and the decision they hand back |
| Result flow | Every record change and notification that the decision causes |
| Before-save record-triggered flow | Stamping Fulfilled Date later, when IT closes the request |
That table is also a fault-finding guide. If a decision gets recorded but nothing changes on the request, the result flow is the piece to open. If nobody is ever asked to decide, the trigger or the approver is wrong.
I built this exact bug into the first draft of this chapter. Testing the approval, the manager completed the screen cleanly, and the request stayed at Awaiting Approval with no notifications and no error email. I spent ten minutes on the approval process canvas, convinced the background step had not fired or that its mappings had been lost. When I finally opened the result flow, it had run without a fault, straight down the Default Outcome. The cause was a single tense in its decision element, and it has its own warning further down, where you build that flow. The table above would have sent me to the right piece in seconds, which is the only reason it is here.
The first three pieces are the approval. The fourth is a separate automation that runs much later in a request’s life; it appears in this section because it is the last Flow work in the build, not because the approval calls it. It has to be its own flow, because one flow cannot run both before and after the save.
Flow Approval Processes are available in Enterprise, Performance, Unlimited, Einstein 1, and Developer Editions, in Lightning Experience only, and they consume no automation credits or orchestration runs. Confirm the target org’s edition before building; do not design an approval experience a production licence cannot run.
Two habits are worth carrying through all four builds. Fill in the Description on every element, resource, and variable as you go, for the same reason you did it on the fields: the label says what a thing is called, and only the description says why it is there. Flow Builder asks for all three on every element, so the prompt is already in front of you.
And save each flow as early as it will let you. A screen flow or an autolaunched flow saves before you add anything; a record-triggered flow and a flow approval process both want their Start element configured first. The first save is where the flow’s own label, API name, and description get set. The API name fills itself in from the label, and the description is what appears beside the flow in the Setup Flows list, which is the only place most people will ever read it. Doing that save at the earliest opportunity settles all three and makes every save after it a single click.
Save again whenever something starts working. Nothing here rewards you for saving late, and a closed tab costs you whatever is still only on the canvas.
The two disposable requests you created at the end of the previous chapter are the fixtures for everything below. Have both record IDs to hand: the screen and result flows are debugged against them one at a time. Before each full approval-process debug, reset the corresponding request to Awaiting Approval and clear Rejection Reason; choose Created as the simulated trigger where that option is shown.
👤 Build the manager review screen
Section titled “👤 Build the manager review screen”The manager is deciding, not browsing. This screen’s only job is to put the request in front of them and hand back a decision the process can act on. Everything that changes as a result belongs in the result flow, because an approver can complete a work item without ever running this screen. Anything you make the screen responsible for is something that can be skipped.
🔤 The two output variables an approval step reads
Section titled “🔤 The two output variables an approval step reads”Before building anything, know the contract. An approval step reads two output variables back out of the screen flow, and their names are fixed by the platform rather than chosen by you:
| Variable | Required | Type | What it carries |
|---|---|---|---|
approvalDecision |
Yes | Text | The result. Approve and Reject are the only valid values. |
approvalComments |
No | Text | The approver’s comments. Salesforce copies this into the work item’s Comments field. |
A missing approvalDecision, or one holding any other value, fails the whole approval submission rather than just the step.
🧱 Build the screen the approver actually sees
Section titled “🧱 Build the screen the approver actually sees”-
Open Setup → Flows → New Flow, and choose Screen Flow. Save it straight away as
Equipment Request Manager Review, before adding a single element. -
Create the input variable. In the Toolbox, choose New Resource → Variable, name it
recordIdwith a Data Type of Text, and tick Available for input. Fill in its Description as well (“The ID of the Equipment Request the approval step is asking about”), because the name alone says nothing about which record arrives here or who sends it. The approval step supplies the value at run time; nothing on the screen fills it in. -
Get the request. Add a Get Records element on Equipment Request, label it
Get the Equipment Request record, set the API Name toGet_Request, and filter where Id equals{!recordId}. Store only the first record, choose Choose fields and let Salesforce do the rest, and select Equipment Request Number, Equipment Type, Business Justification, Needed By, Estimated Cost, and Owner ID. Everything the screen shows is a merge field on this element from here on, in the form{!Get_Request.Equipment_Type__c}. The canvas card displays the label, so keep the API name short: merge fields use that, and it is the half you type dozens of times. -
Get the requester’s name. Add a second Get Records element on User, label it
Get Requesterwith the API NameGet_Requester, and filter where Id equals{!Get_Request.OwnerId}, storing Name. The request carries the owner’s ID, and an ID tells the approver nothing. -
Add the Screen element. Label it
Review Equipment Request. Under Configure Footer → Navigation, set Hide Pause: a paused screen leaves the work item looking assigned while the interview sits paused until someone finds and resumes it, and nobody will be looking for it. Pause only appears there if Let users pause flows is enabled in Process Automation Settings. A single-screen flow has no Previous or Next, so the footer shows Finish alone. -
Show the request as read-only Display Text. Add a Display Text component named
Request_Summaryand build the summary from merge fields:Request: {!Get_Request.Name}Requester: {!Get_Requester.Name}Equipment: {!Get_Request.Equipment_Type__c}Needed by: {!Get_Request.Needed_By__c}Estimated cost: {!Get_Request.Estimated_Cost__c}Justification:{!Get_Request.Business_Justification__c}Display Text cannot be edited by the person running the flow, which is exactly right here. The manager is judging this request, not correcting it.
-
Create the two choices. In the Toolbox, choose New Resource → Choice twice, naming them
Choice_ApproveandChoice_Rejectwith a Data Type of Text. The Choice Label is what the manager reads; the Choice Value is what the flow stores, and those two values must be exactlyApproveandReject. A label of “Approve this request” is fine. A value ofApprovedfails the whole approval submission. -
Add the decision component. Drag a Radio Buttons component onto the screen, label it
Decision, set the API Name toDecisionand the Data Type to Text, and tick Require. Add both choices under Choice, Approve first, and leave Default Value empty so nobody approves a request by not reading it. -
Add the rejection reason. Drag a Text component below the radio buttons, label it
Rejection Reason, set the API Name toRejection_Reason, and tick Require. Then expand Set Component Visibility and add a single condition:{!Decision}equals theChoice_Rejectresource. Use the Text component rather than Long Text Area here, becauseRejection_Reason__cis Text(255): the Text component enforces that same 255-character limit and the Long Text Area component enforces none, so a 400-character rejection would sail through the screen and fail in the result flow’s update. -
Create the two output variables. In the Toolbox, choose New Resource → Variable twice:
approvalDecision, Data Type Text, Available for output ticked.approvalComments, Data Type Text, Available for output ticked.
Type both names exactly as the table above spells them. The approval step reads its result from those names, so a near miss such as
approvalDecisionscosts you a failed submission at run time rather than an error in Flow Builder. Leave Available for input clear on both.recordIdis the only value anything sends into this flow. -
Copy the screen’s answers into them. Add an Assignment element on the canvas between the screen and the End marker, name it
Set_Approval_Outputs, and add two rows:{!approvalDecision}Equals{!Decision}{!approvalComments}Equals{!Rejection_Reason}
This looks like copying a value onto itself, and it is not.
{!Decision}is the radio button component’s own value, which exists only inside the flow, and a screen component cannot be marked Available for output. Only a variable can. Skip the Assignment and everything still looks right in Flow Builder. The manager picks Approve, the screen finishes, and the submission then fails on a missingapprovalDecision. -
Save again, debug both branches with a real request ID, then activate. An approval step can only call an active screen flow.
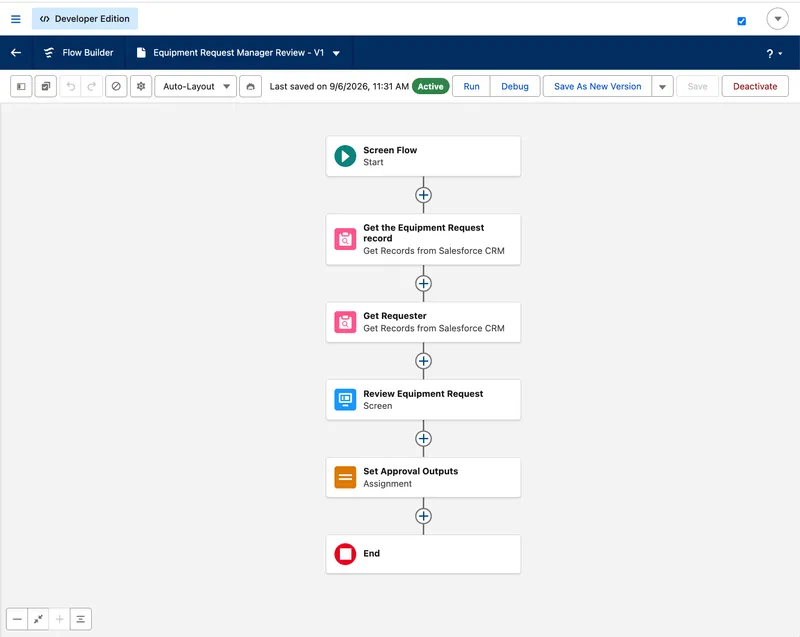
Five elements, and the last one is the whole trick. The Assignment sitting between the screen and End is what turns the manager’s answer into the approvalDecision the approval step goes looking for. Without that last Assignment, the screen can still look complete to the approver while returning none of the outputs the process needs.
The name recordId is a convention worth keeping, but each launch method supplies it differently. The approval step below explicitly maps the request’s ID into this input. A flow quick action automatically passes the record ID into a Text variable named recordId that is available for input.
If you later embed the flow using a Flow component on a Lightning record page, select the flow in Lightning App Builder and tick Pass record ID into this variable for recordId in the component’s properties. Naming the variable alone does not configure that component. Test each launch method you expose: a missing input leaves Get Records without the ID it needs.
The screen runs in the context of whoever is completing it, which is why the manager and IT permission sets were given Run Flows in the previous chapter. Label the comments field Rejection Reason so it reads naturally to the approver, but keep the distinction clear in your own notes: this screen collects text into approvalComments, and the result flow is what writes it into the Rejection_Reason__c field. They are two different things that share a name.
🔔 Prepare the notification before a flow needs it
Section titled “🔔 Prepare the notification before a flow needs it”The result flow cannot send a notification type that does not exist yet, and the Send Custom Notification action will not offer you one to pick. This is the same dependency that put page layouts before the record page: build the thing that gets referenced first.
In Setup → Notification Builder → Custom Notifications, click New under Custom Notification Types, and name it Equipment Request Updates. The API name fills itself in as Equipment_Request_Updates. Under Supported Channels, select the desktop and mobile channels your users actually have; if you select Mobile, enable the supported apps after saving. Creating a notification type needs Customize Application; sending one from a flow needs Send Custom Notifications.
The action wants the notification type’s ID, not its name, so the result flow will look it up with a Get Records element filtered on the API name. Recipients arrive as a collection of IDs rather than a single value, which is why the next flow builds one with an Assignment element.
🧰 Build the result flow
Section titled “🧰 Build the result flow”This is where a decision becomes something the requester can see. It runs after the approval step with nobody present, so it is an autolaunched flow rather than a screen flow.
-
Open Setup → Flows → New Flow, and choose Autolaunched Flow (No Trigger). Save it as
Equipment Request Decisionbefore you build. -
Create three Text input variables (
recordId,approvalDecision, andapprovalComments), each with Available for input ticked. These are the values the background step will pass in. -
Get the two records the flow needs. Add a Get Records on Custom Notification Type, labelled
Get Custom Notification Typewith the API NameGet_Notification_Type. Add a second on Equipment Request, labelledGet Equipment Requestwith the API NameGet_Request, filtered where Id equals{!recordId}and storing Owner ID. The notification lookup has a trap in it: the object offers two fields labelled Name, and the one you want is the one whose API name isDeveloperName. Hover the field and check its information icon before you filter on it, then match it toEquipment_Request_Updates. -
Build the recipient collection. Create a Text collection variable named
recipientIds, then add an Assignment element labelledAdd the requester to the recipientswith the API NameSet_Recipients, holding one row:{!recipientIds}Add{!Get_Request.OwnerId}. The Send Custom Notification action takes a collection, so a single ID on its own will not do, and Add rather than Equals is the operator that puts a value into one. -
Add a Decision element labelled
Approved or Rejectedwith the API NameApproved_or_Rejected. Give it two named outcomes:Approvedwhere{!approvalDecision}equalsApprove, andRejectedwhere it equalsReject. Flow Builder always adds a third, the Default Outcome, and you cannot delete it. Leave it connected straight to End so it does nothing. The tempting shortcut is oneApprovedoutcome with everything else falling through the default to the rejection path, and that quietly rejects any value you did not expect rather than stopping.Watch the vocabulary in this element. Two sets of words sit one step apart and differ only by a tense. The screen hands back
ApproveorReject, fixed by the platform, while the Status picklist you built holdsApprovedorRejected. This Decision tests the first pair. The Update Records elements below it write the second. Naming the outcomes after the statuses reads well on the canvas, and it is also the easiest place in the build to typeRejectedinto a condition that can never be true. If a decision completes and the request stays atAwaiting Approval, this comparison is the first thing to open: the run took the Default Outcome to End and changed nothing. -
On the Approve path, add an Update Records element labelled
Set Status to Approvedwith the API NameSet_Status_Approved, setting Status toApprovedon the record identified by{!recordId}. Follow it with the Send Custom Notification action, labelledNotify Requester of Approvalwith the API NameNotify_Approved. It takes{!Get_Notification_Type.Id}as the notification type,{!recipientIds}as the recipients, and{!recordId}as the target. Write a title and body that make sense to someone reading them away from the record. -
On the Reject path, add a single Update Records element labelled
Set Status and Rejection Reasonwith the API NameSet_Status_Rejected, setting Status toRejectedand Rejection Reason to{!approvalComments}in that one element. Follow it with a second Send Custom Notification, labelledNotify Requester of Rejectionwith the API NameNotify_Rejected, configured the same way but carrying the reason in the body. -
Save again, debug both paths, and activate it.
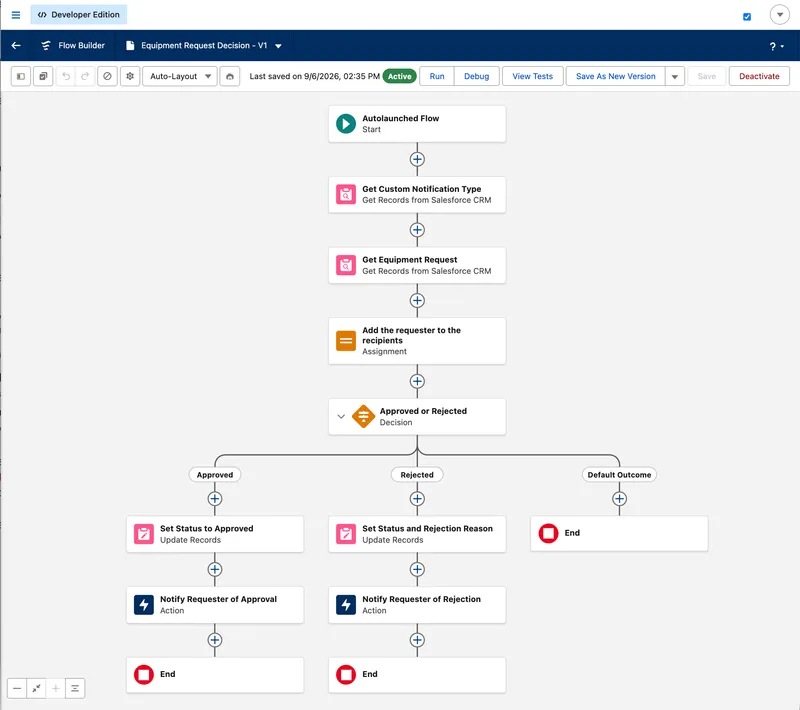
The three branches are worth looking at together. Both working paths update the record before they notify anyone, so nothing tells a requester about a decision the record does not yet carry. The Reject branch does it in a single Update Records element. The Default Outcome ends the flow without touching anything, which is what you want an unexpected value to do.
Updating both rejection fields in one element is the point of the whole design. An update that set Status first would meet the validation rule requiring Rejection Reason, fail, and leave the approval stuck. Nor can you grant your way out of it: the background step runs as the Automated Process User by default, and that user holds none of the permission sets you built, so the bypass custom permission is not available to it. Satisfying the rule is the only route through.
Once this flow works in debug, go back to Object Manager → Equipment Request → Validation Rules and activate the rejection-reason rule you deliberately left inactive earlier, then run the rejection again. The screen prevents a missing reason for anyone who uses it; the validation rule protects every other edit path that can set Status to Rejected.
🔗 Assemble the Flow Approval Process
Section titled “🔗 Assemble the Flow Approval Process”Both flows are active, and neither will ever run on its own. Nothing yet knows that a request has been submitted, nothing knows who should look at it, and nothing can wait. That last one is the real gap: a flow runs to its end in seconds, while an approval spends most of its life doing nothing at all, sitting in someone’s queue until they get to it. The Flow Approval Process holds that time open, decides whose queue it belongs in, and runs your two flows in order.
There is no Flow Approval Processes node in Setup. Open Setup → Flows → New Flow, then find and select Record-Triggered Flow Approval Process in the New Automation window.
-
Configure the Start element. Select Equipment Request as the object, set Configure Trigger to A record is created, and add the entry condition Status equals
Awaiting Approval. Nothing sets that value at submission time. It is the default you gave the Status picklist when you built the field, and the Staff permission set grants Read on Status rather than Edit, so a staff member cannot create a request with any other status. Those two decisions, made two sections apart, are what guarantee every new request enters this process. Save it asEquipment Request Approval; a record-triggered process needs its object chosen before the first save will take. -
Resolve the approver into a single Formula resource. This canvas is not a flow canvas. It offers Decision and Stage elements and nothing else, so there is no Get Records element here to look a manager up with. What it does have is formula resources, and one is enough. Choose New Resource → Formula, name it
approverName, set the Data Type to Text, and enter:BLANKVALUE({!$Record.Owner:User.Manager.Username},"Equipment_Request_IT")An approver of type Resource resolves either a username or the API name of a public group at run time. The intended results are the requester’s manager’s Username when Manager is populated, and
Equipment_Request_ITwhen it is blank. A user ID is not the documented input for that assignment type.Those two lines also settle an exception from the very first chapter, which is worth noticing because it never becomes a piece of configuration of its own. The brief said a manager’s own request goes to their manager, and that falls out of the formula for free: the lookup starts from whoever owns the record rather than from a named approver, so a manager submitting a request is routed to the person above them. The
BLANKVALUEbranch then covers the case the brief didn’t ask about, which is the person at the top of the tree with no manager to route to.Check the owner-to-manager reference against the fields available in your formula resource picker and run Check Syntax before saving. During the persona tests, record the actual assignee for both Manager populated and Manager blank. The administrator debug run assigns its work item to the debugging user, so completing that run alone does not prove either routing result.
-
Add a Stage, labelled
Manager Decisionwith the API NameManager_Decision. Every flow approval process needs at least one, and stages run in sequence. This build needs only the one. -
Add the approval step. In the stage, click + Add Step → Approval Step and label it
Manager Reviewwith the API NameManager_Review. Under Select an Action to Run, choose theEquipment Request Manager Reviewscreen flow and pass{!$Record.Id}into itsrecordIdinput. Set Approver Type to Resource and select the resource from step 2. Under Select the Record to Approve, set Record ID to{!$Record.Id}. That is what makes the work item appear in the Work Guide on the right record. The same panel carries Lock the record, ticked by default. It stops anyone changing the request while the approval is in progress, apart from an administrator and, when Allow approver to edit the locked record is also ticked, the assigned approver. That is a control worth having, so keep it. Note only that your background step is neither of those things, so if it ever fails to write Status, this is the first setting to rule out. Leave the completion condition at When the assigned user has completed the action. -
Add the background step that applies the decision. Click + Add Step → Background Step, label it
Apply the Decisionwith the API NameApply_the_Decision, and set its start condition to When another step is marked Completed, the step starts, namingManager_Reviewas the step that has to finish first. ChooseEquipment Request Decisionas its action, and pass{!$Record.Id}plus theManager_Reviewstep’sapprovalDecisionandapprovalCommentsoutputs into that flow’s three inputs. Leave Select Who to Run the Action As at Automated Process User. -
Turn on the assignment emails. Approvers are told about a work item only when Send Approval Work Item Assignment Emails to Approvers is selected in the approval email settings. Nothing in the process warns you when it is off. The work item appears in the Work Guide exactly as designed, and nobody knows to go and look at it.
-
Give the Automated Process User an address to send from. Flow approval processes send from the Automated Process User Email Address in Setup → Process Automation Settings. Leave it blank and Salesforce works down a fallback chain: an org-wide address whose purpose is Default No-Reply, then any verified org-wide address, then the running user. An orchestration runs in system context and has no running user, so a practice org with none of these configured reaches the end of that chain and sends nothing. Create an org-wide address from Setup → Organization-Wide Address with the Purpose User Selection and Default No-Reply Address, verify it from that inbox, then select it in Process Automation Settings. Both the address and the sending domain have to be verified before anything leaves.
-
Save again, then debug one approval and one rejection using disposable test requests. You need the screen and the background flow to run, so clear Run automation in rollback mode and leave mock outputs off. This default debug mode keeps its data changes. The run assigns the work item to you as the debugging user, then stops at the approval step and waits. Open the request and complete the screen in the Work Guide yourself before the background step can run. Confirm the record changes you expect, then activate the process.
Rollback mode answers a different question. It requires mock outputs for asynchronous steps, including every approval step and this notification-sending background step. Those steps do not run their referenced flows, so that mode cannot prove the screen validation or the resulting record updates.
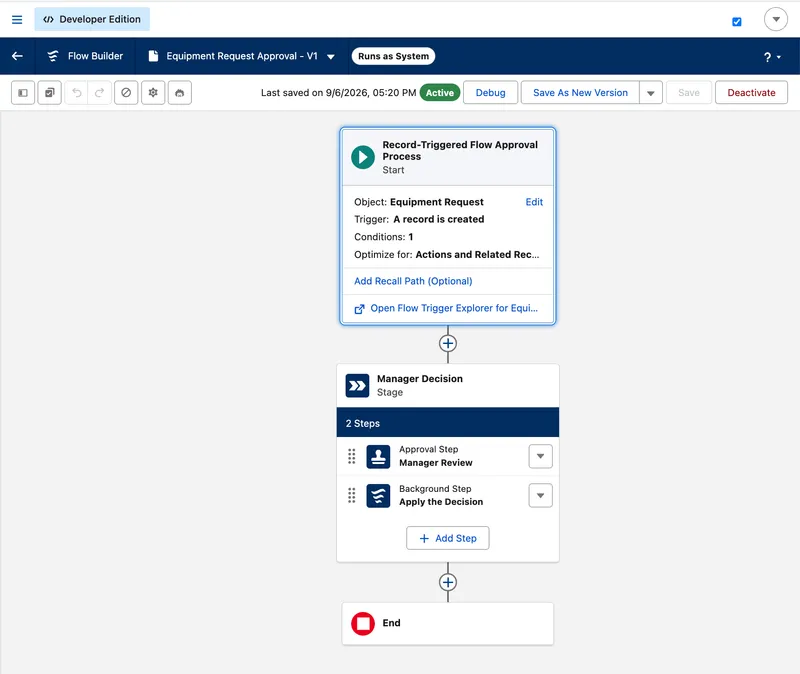
It is worth noticing how little there is here. The two flows carry all the detail, and the process is one stage holding two steps in order. Both steps live in that same stage rather than getting one each, which is what the background step’s start condition arranges: the background step waits for the approval step to be marked Completed, however many days that takes.
🚦 Telling a waiting approval from a failed one
Section titled “🚦 Telling a waiting approval from a failed one”Two states look identical from the outside and are not. An approval step sitting at In Progress with its exit condition evaluating to false is not broken. It is doing the only thing an approval exists to do, which is wait for a person, and it shows no outputs until somebody completes the work item. A run that has actually failed shows a status of Error, and Salesforce emails the admin who last edited the process naming the step that failed. Tell those two apart before changing anything, because a failed orchestration run cannot be resumed and means starting again with a new request, while a waiting one just needs someone to open the Work Guide.
Activation checks some of this for you, but only warns. If it reports that the Automated Process User has no valid email address, the org-wide address step above is what it is asking for, and activating past the warning gives you an approval that routes correctly and notifies nobody.
📅 Stamp the fulfilment date before the save
Section titled “📅 Stamp the fulfilment date before the save”When Status is Fulfilled, Days Open and Weekdays Open both use Fulfilled Date instead of today’s date. They therefore need that date populated as part of the status change to calculate the final age correctly. Leaving it to be typed by hand makes the result depend on whether IT remembers it. A flow can stamp the date before that save completes.
-
Open Setup → Flows → New Flow and choose Record-Triggered Flow. Select Equipment Request as the object, and set the trigger to A record is created or updated.
-
Add the entry conditions. Set Condition Requirements to All Conditions Are Met (AND), then add Status Equals
Fulfilledand Fulfilled Date Is NullTrue. That second condition is the one doing the careful work: without it, every later edit to a fulfilled request would restamp the date to the day of the edit, and the age formulas would quietly report the wrong answer forever. -
Set Optimize the Flow for to Fast Field Updates, which is what makes it run before the save. Then save it as
Stamp Fulfilled Date. A record-triggered flow will not save until its Start element is configured, which is why the naming waits until here rather than coming first. -
Add the Assignment element. Label it
Set the fulfilled datewith the API NameSet_Fulfilled_Date, and give it one row:{!$Record.Fulfilled_Date__c}Equals{!$Flow.CurrentDate}. That is the whole flow. Nothing follows it, and in particular no Update Records element: assigning to{!$Record}in a before-save flow is the write, because Salesforce applies those values as part of the save that triggered the flow. -
Save the flow again, debug against a request you move to
Fulfilled, then activate it. Confirm Fulfilled Date receives today’s date. If the flow is inactive when IT fulfils a request, that date stays empty: the formulas take the fulfilled branch but have no end date from which to calculate the final age. They do not fall back to counting through today.
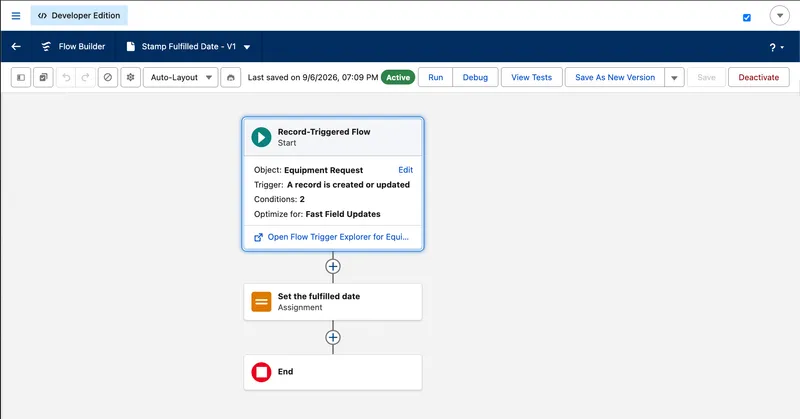
The expanded Start card is steps 1 to 3 in one place: the object, the trigger, Conditions: 2, and Optimize for: Fast Field Updates. That last line is the one to check if the flow runs but the date never appears, because it is what makes this a before-save flow rather than an ordinary one. Below it there is an assignment and an End, and nothing else. If you were expecting an Update Records element in that gap, its absence is the point: the record is already on its way to being saved.
Writing through $Record instead of issuing a second save is also why a before-save flow can do so little. It skips the extra save procedure entirely, which is what makes it fast, and its work stays within that before-save boundary. Assignment, Decision, Get Records, and Loop are available, as is Custom Error, which Declarative Business Rules uses to reject an invalid save. Notifications and related-record updates need an after-save flow.
Before the evidence run, return to the object’s Edit page and change Deployment Status from In Development to Deployed. That is a deliberate release step: make the object visible only after the permission sets, sharing, interface, automation, and reports are ready to be tested together.
You will exercise all of this in the evidence run, once the reports exist and the persona permissions are assigned. Test the routes people will really use: Staff submits a fresh request and receives the notification; Manager finds the work item in the Work Guide on the record itself, not in Setup, and completes the screen. Run a rejection as well as an approval, and check that the requester can read the reason on the record afterwards. Test the fallback approver by clearing a test user’s Manager field, since that path is invisible until it is the only one left.
✅ Checkpoint
Section titled “✅ Checkpoint”Produce a request that can move from submission to fulfilment without anyone editing a picklist by hand.
Build it, then write down:
- Two active flows: the manager review screen and the result flow, each debugged on both branches.
- One custom notification type, and the two Send Custom Notification actions that use it.
- One active Flow Approval Process: one stage, an approval step, and a background step that waits for it.
- One active before-save flow that stamps Fulfilled Date, with the null check that stops it restamping.
- The rejection-reason validation rule activated, once the result flow could satisfy it.
- The object moved to Deployed, changed once the automation was ready rather than as soon as it was built.
You’re finished when you can answer this without opening Flow Builder: a manager completes the screen and the request does not change. Which of the four pieces do I open first, and what am I looking for? The four-piece table near the top of this chapter is the answer, and knowing it cold is worth more than remembering any individual element’s settings.
If you want to see the older way of doing this, the Trailhead module below builds a Classic approval process. It is worth an hour: many orgs still run Classic approvals, and the Approval Process chapter later in the path assumes you can read one. The superbadge asks you to build and change approvals against a brief with hidden checks, which is the closest thing to a reviewer you can get without a colleague.
🎯 Final Thoughts
Section titled “🎯 Final Thoughts”The approval is the first thing in this build that has to survive a gap in time. Everything before it happened in one sitting, in one session, under your own permissions. An approval spends most of its life doing nothing at all, waiting for a person who is in a meeting, and the design has to hold across that wait.
That is why the work is split across four pieces rather than gathered into one flow. The screen collects a decision. The result flow applies it. The approval process holds the time open and decides whose queue the work belongs in. The before-save flow does a job that happens days later and has nothing to do with the approval at all. Each of them can be opened and understood on its own, which is the whole benefit when something goes wrong at four in the afternoon.
The detail I would not compromise on is the one in the result flow: Status and Rejection Reason are written in a single update. It looks like a tidying preference and it is not. Split them, and the first update meets a validation rule the second update was going to satisfy, the approval fails, and the request is stranded between a decision that was made and a record that does not carry it. The Automated Process User cannot be granted around that, because it holds none of the permission sets you built.
You now have automation that works when you run it. Whether it works for the people it was built for is a different question, and the answer is not in Flow Builder.
🚀 Next steps
Section titled “🚀 Next steps”Test Permissions and Reports is next, and it is where the build stops being yours. It adds the two reports the brief asked for, then works through the acceptance criteria as four different people, from four different seats, with fixtures whose answers you already know.
For more depth on approval design beyond a first build, Approval Processes covers delegation, recall, and multi-step routing. Flow Automation in Depth goes further into the flow types this chapter used and the patterns that keep them maintainable.